


1. Spring Boot 介绍
Spring Boot帮助你创建可以运行的独立的、基于Spring的生产级应用程序。 我们对Spring平台和第三方库采取了有主见的观点,这样你就能以最少的麻烦开始工作。 大多数Spring Boot应用程序只需要很少的Spring配置。
你可以使用Spring Boot来创建Java应用程序,可以通过使用 java -jar 或更传统的war部署来启动。
我们的主要目标是。
为所有的Spring开发提供一个根本性的更快、更广泛的入门体验。
开箱即用,但随着需求开始偏离默认值,请迅速摆脱困境。
提供一系列大类项目常见的非功能特性(如嵌入式服务器、安全、度量、健康检查和外部化配置)。
绝对没有代码生成(当不以原生镜像为目标时),也不要求XML配置。
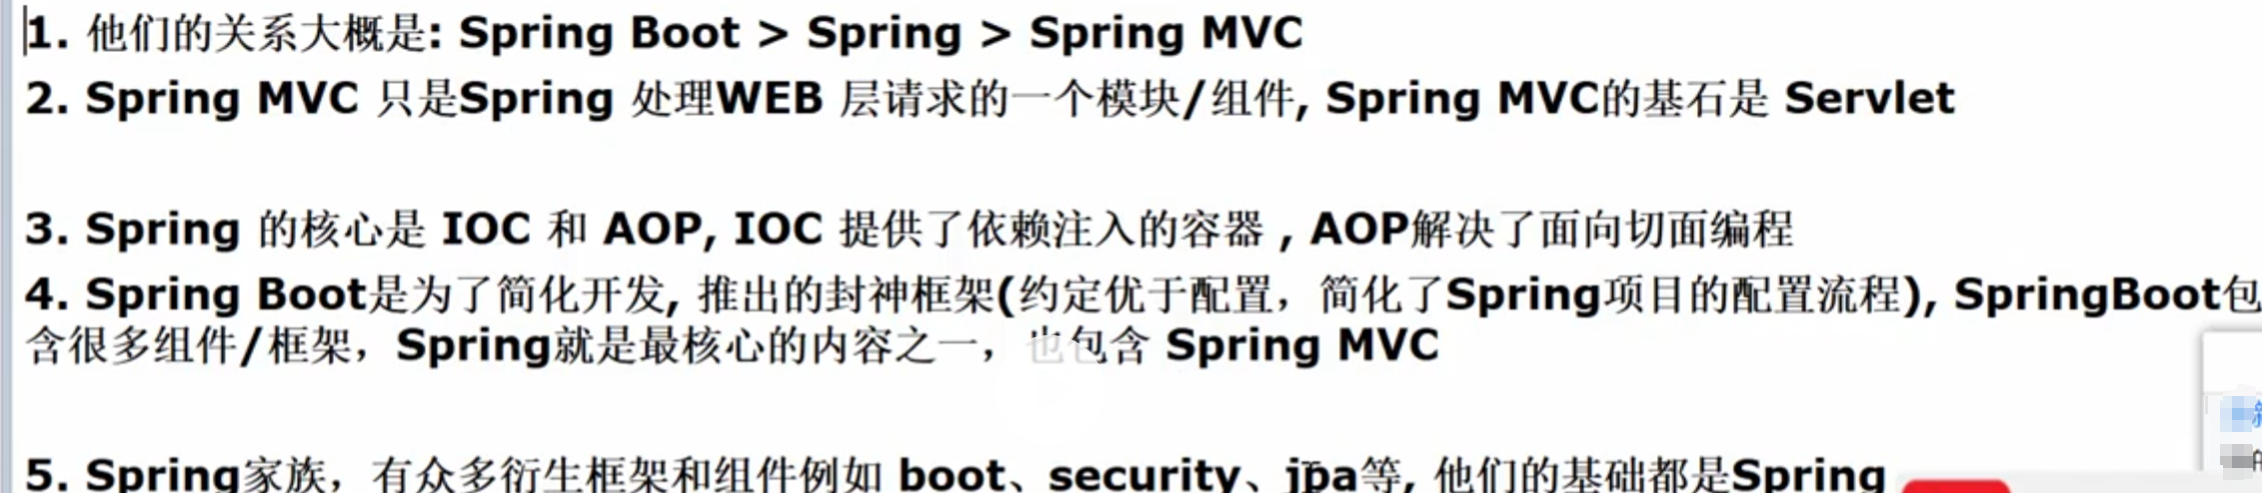
2. Spring Boot SpringMVC 和Spring 的关系
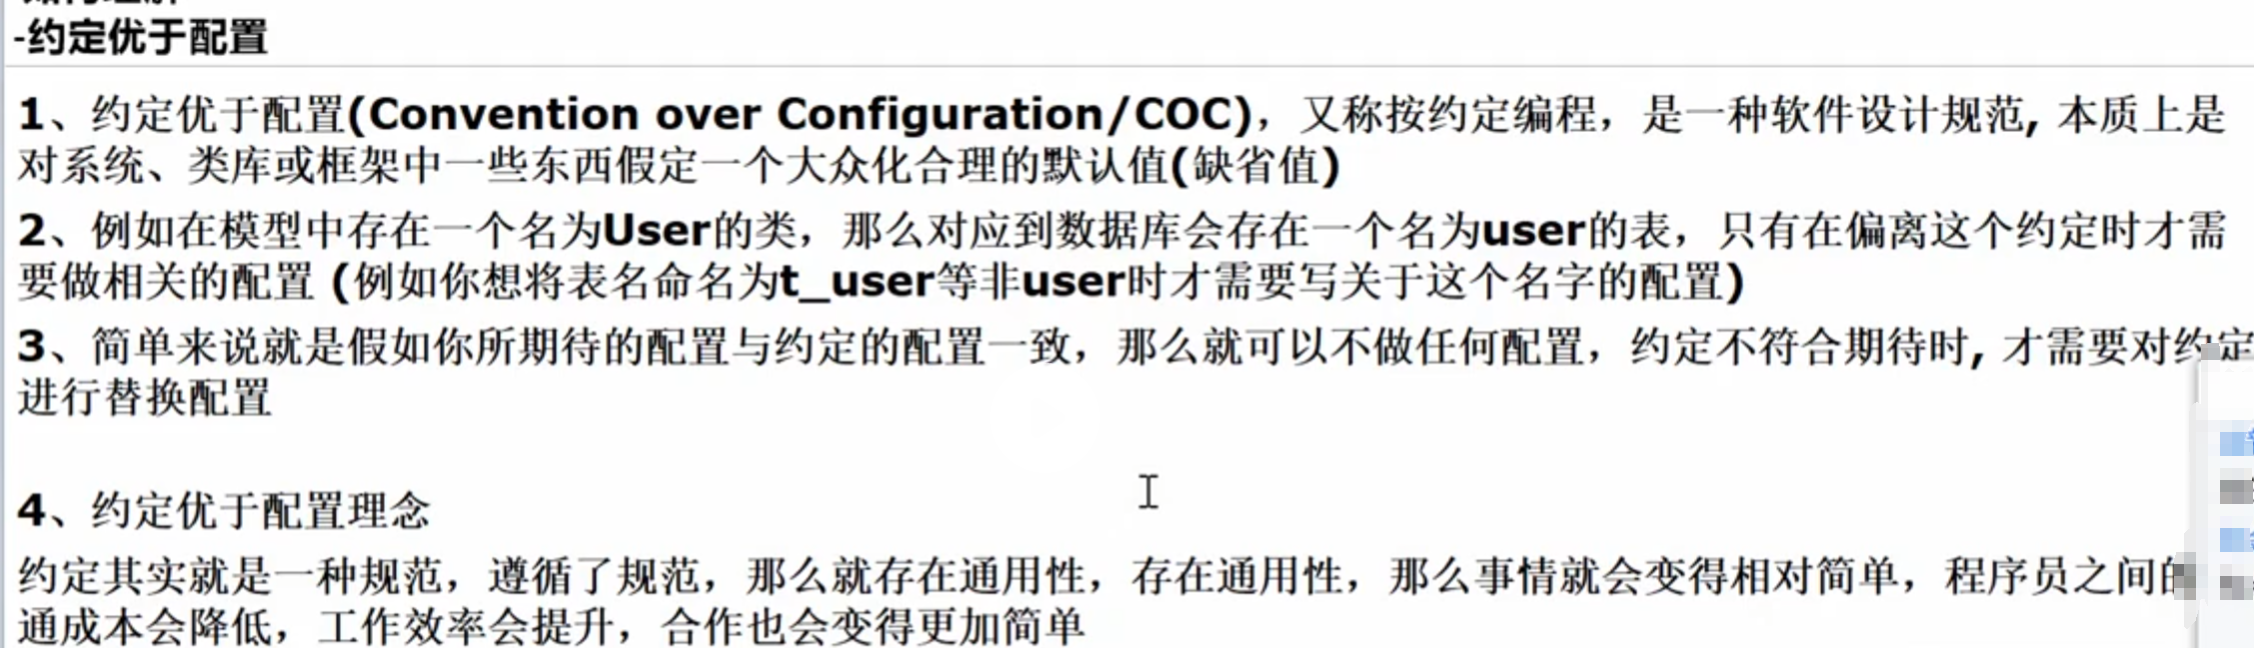
3.约定优于配置
3.场景启动器
    <parent>
        <groupId>org.springframework.boot</groupId>
        <artifactId>spring-boot-starter-parent</artifactId>
    </parent>
4.Application 配置大全
#SPRING CONFIG(ConfigFileApplicationListener)
spring.config.name =#配置文件名(默认 为  'application' )
spring.config.location =#配置文件的位置

# 多环境配置文件激活属性
spring.profiles.active=dev					#加载application-dev.properties配置文件内容
application-dev.properties:					#开发环境
application-test.properties:					#测试环境
application-prod.properties:					#生产环境


#activemq
spring.activemq.broker-url						#指定ActiveMQ broker的URL,默认自动生成.
spring.activemq.in-memory						#是否是内存模式,默认为true.
spring.activemq.password						#指定broker的密码.
spring.activemq.pooled							#是否创建PooledConnectionFactory,而非ConnectionFactory,默认false
spring.activemq.user							#指定broker的用户.


#aop
spring.aop.auto									#是否支持@EnableAspectJAutoProxy,默认为: true
spring.aop.proxy-target-class					#true为使用CGLIB代理,false为JDK代理,默认为false


#application
spring.application.admin.enabled				#是否启用admin特性,默认为: false
spring.application.admin.jmx-name				#指定admin MBean的名称,默认为: org.springframework.boot:type=Admin,name=SpringApplication


#artemis(HornetQ捐献给apache后的版本)
spring.artemis.embedded.cluster-password		#指定集群的密码,默认是启动时随机生成.
spring.artemis.embedded.data-directory			#指定Journal文件的目录.如果不开始持久化则不必要指定.
spring.artemis.embedded.enabled					#是否开启内嵌模式,默认true
spring.artemis.embedded.persistent				#是否开启persistent store,默认false.
spring.artemis.embedded.queues					#指定启动时创建的队列,多个用逗号分隔,默认: []
spring.artemis.embedded.server-id				#指定Server ID. 默认是一个自增的数字,从0开始.
spring.artemis.embedded.topics					#指定启动时创建的topic,多个的话逗号分隔,默认: []
spring.artemis.host								#指定Artemis broker 的host. 默认: localhost
spring.artemis.mode								#指定Artemis 的部署模式, 默认为auto-detected(也可以为native or embedded).
spring.artemis.port								#指定Artemis broker 的端口,默认为: 61616


#autoconfig
spring.autoconfigure.exclude					#配置要排除的Auto-configuration classes.


#batch
spring.batch.initializer.enabled				#是否在必要时创建batch表,默认为true
spring.batch.job.enabled						#是否在启动时开启batch job,默认为true
spring.batch.job.names							#指定启动时要执行的job的名称,逗号分隔,默认所有job都会被执行
spring.batch.schema								#指定要初始化的sql语句路径,默认:classpath:org/springframework/batch/core/schema-@@platform@@.sql)
spring.batch.table-prefix						#指定批量处理的表的前缀.


#cookie、session配置
server.session.cookie.comment					#指定session cookie的comment
server.session.cookie.domain					#指定session cookie的domain
server.session.cookie.http-only					#是否开启HttpOnly.
server.session.cookie.max-age					#设定session cookie的最大age.
server.session.cookie.name						#设定Session cookie 的名称.
server.session.cookie.path						#设定session cookie的路径.
server.session.cookie.secure					#设定session cookie的“Secure” flag.
server.session.persistent						#重启时是否持久化session,默认false
server.session.timeout							#session的超时时间
server.session.tracking-modes					#设定Session的追踪模式(cookie, url, ssl).


#datasource
spring.dao.exceptiontranslation.enabled			#是否开启PersistenceExceptionTranslationPostProcessor,默认为true
spring.datasource.abandon-when-percentage-full	#设定超时被废弃的连接占到多少比例时要被关闭或上报
spring.datasource.allow-pool-suspension			#使用Hikari pool时,是否允许连接池暂停,默认为: false
spring.datasource.alternate-username-allowed	#是否允许替代的用户名.
spring.datasource.auto-commit					#指定updates是否自动提交.
spring.datasource.catalog						#指定默认的catalog.
spring.datasource.commit-on-return				#设置当连接被归还时,是否要提交所有还未完成的事务
spring.datasource.connection-init-sql			#指定连接被创建,再被添加到连接池之前执行的sql.
spring.datasource.connection-init-sqls			#使用DBCP connection pool时,指定初始化时要执行的sql
spring.datasource.connection-properties.[key]	#在使用DBCP connection pool时指定要配置的属性
spring.datasource.connection-test-query			#指定校验连接合法性执行的sql语句
spring.datasource.connection-timeout			#指定连接的超时时间,毫秒单位.
spring.datasource.continue-on-error				#在初始化数据库时,遇到错误是否继续,默认false
spring.datasource.data							#指定Data (DML)脚本
spring.datasource.data-source-class-name		#指定数据源的全限定名.
spring.datasource.data-source-jndi				#指定jndi的地址
spring.datasource.data-source-properties.[key]	#使用Hikari connection pool时,指定要设置的属性
spring.datasource.db-properties					#使用Tomcat connection pool,指定要设置的属性
spring.datasource.default-auto-commit			#是否自动提交.
spring.datasource.default-catalog				#指定连接默认的catalog.
spring.datasource.default-read-only				#是否设置默认连接只读.
spring.datasource.default-transaction-isolation	#指定连接的事务的默认隔离级别.
spring.datasource.driver-class-name				#指定driver的类名,默认从jdbc url中自动探测.
spring.datasource.fair-queue					#是否采用FIFO返回连接.
spring.datasource.health-check-properties.[key]	#使用Hikari connection pool时,在心跳检查时传递的属性
spring.datasource.idle-timeout					#指定连接多久没被使用时,被设置为空闲,默认为10ms
spring.datasource.ignore-exception-on-pre-load	#当初始化连接池时,是否忽略异常.
spring.datasource.init-sql						#当连接创建时,执行的sql
spring.datasource.initial-size					#指定启动连接池时,初始建立的连接数量
spring.datasource.initialization-fail-fast		#当创建连接池时,没法创建指定最小连接数量是否抛异常
spring.datasource.initialize					#指定初始化数据源,是否用data.sql来初始化,默认: true
spring.datasource.isolate-internal-queries		#指定内部查询是否要被隔离,默认为false
spring.datasource.jdbc-interceptors				#使用Tomcat connection pool时,指定jdbc拦截器,分号分隔
spring.datasource.jdbc-url						#指定JDBC URL.
spring.datasource.jmx-enabled					#是否开启JMX,默认为: false
spring.datasource.jndi-name						#指定jndi的名称.
spring.datasource.leak-detection-threshold		#使用Hikari connection pool时,多少毫秒检测一次连接泄露.
spring.datasource.log-abandoned					#使用DBCP connection pool,是否追踪废弃statement或连接,默认为: false
spring.datasource.log-validation-errors			#当使用Tomcat connection pool是否打印校验错误.
spring.datasource.login-timeout					#指定连接数据库的超时时间.
spring.datasource.max-active					#指定连接池中最大的活跃连接数.
spring.datasource.max-age						#指定连接池中连接的最大年龄
spring.datasource.max-idle						#指定连接池最大的空闲连接数量.
spring.datasource.max-lifetime					#指定连接池中连接的最大生存时间,毫秒单位.
spring.datasource.max-open-prepared-statements	#指定最大的打开的prepared statements数量.
spring.datasource.max-wait						#指定连接池等待连接返回的最大等待时间,毫秒单位.
spring.datasource.maximum-pool-size				#指定连接池最大的连接数,包括使用中的和空闲的连接.
spring.datasource.min-evictable-idle-time-millis		#指定一个空闲连接最少空闲多久后可被清除.
spring.datasource.min-idle						#指定必须保持连接的最小值(For DBCP and Tomcat connection pools)
spring.datasource.minimum-idle					#指定连接维护的最小空闲连接数,当使用HikariCP时指定.
spring.datasource.name							#指定数据源名.
spring.datasource.num-tests-per-eviction-run	#指定运行每个idle object evictor线程时的对象数量
spring.datasource.password						#指定数据库密码.
spring.datasource.platform						#指定schema要使用的Platform(schema-${platform}.sql),默认为: all
spring.datasource.pool-name						#指定连接池名字.
spring.datasource.pool-prepared-statements		#指定是否池化statements.
spring.datasource.propagate-interrupt-state		#在等待连接时,如果线程被中断,是否传播中断状态.
spring.datasource.read-only						#当使用Hikari connection pool时,是否标记数据源只读
spring.datasource.register-mbeans				#指定Hikari connection pool是否注册JMX MBeans.
spring.datasource.remove-abandoned				#指定当连接超过废弃超时时间时,是否立刻删除该连接.
spring.datasource.remove-abandoned-timeout		#指定连接应该被废弃的时间.
spring.datasource.rollback-on-return			#在归还连接时,是否回滚等待中的事务.
spring.datasource.schema						#指定Schema (DDL)脚本.
spring.datasource.separator						#指定初始化脚本的语句分隔符,默认: ;
spring.datasource.sql-script-encoding			#指定SQL scripts编码.
spring.datasource.suspect-timeout				#指定打印废弃连接前的超时时间.
spring.datasource.test-on-borrow				#当从连接池借用连接时,是否测试该连接.
spring.datasource.test-on-connect				#创建时,是否测试连接
spring.datasource.test-on-return				#在连接归还到连接池时是否测试该连接.
spring.datasource.test-while-idle				#当连接空闲时,是否执行连接测试.
spring.datasource.time-between-eviction-runs-millis    #指定空闲连接检查、废弃连接清理、空闲连接池大小调整之间的操作时间间隔
spring.datasource.transaction-isolation			#指定事务隔离级别,使用Hikari connection pool时指定
spring.datasource.url							#指定JDBC URL.
spring.datasource.use-disposable-connection-facade		#是否对连接进行包装,防止连接关闭之后被使用.
spring.datasource.use-equals					#比较方法名时是否使用String.equals()替换==.
spring.datasource.use-lock						#是否对连接操作加锁
spring.datasource.username						#指定数据库名.
spring.datasource.validation-interval			#指定多少ms执行一次连接校验.
spring.datasource.validation-query				#指定获取连接时连接校验的sql查询语句.
spring.datasource.validation-query-timeout		#指定连接校验查询的超时时间.
spring.datasource.validation-timeout			#设定连接校验的超时时间,当使用Hikari connection pool时指定
spring.datasource.validator-class-name			#用来测试查询的validator全限定名.
spring.datasource.xa.data-source-class-name		#指定数据源的全限定名.
spring.datasource.xa.properties					#指定传递给XA data source的属性
#data  springdata
spring.data.elasticsearch.cluster-name			#指定es集群名称,默认: elasticsearch
spring.data.elasticsearch.cluster-nodes			#指定es的集群,逗号分隔,不指定的话,则启动client node.
spring.data.elasticsearch.properties			#指定要配置的es属性.
spring.data.elasticsearch.repositories.enabled	#是否开启es存储,默认为: true
spring.data.jpa.repositories.enabled			#是否开启JPA支持,默认为: true
spring.data.mongodb.authentication-database		#指定鉴权的数据库名
spring.data.mongodb.database					#指定mongodb数据库名
spring.data.mongodb.field-naming-strategy		#指定要使用的FieldNamingStrategy.
spring.data.mongodb.grid-fs-database			#指定GridFS database的名称.
spring.data.mongodb.host						#指定Mongo server host.
spring.data.mongodb.password					#指定Mongo server的密码.
spring.data.mongodb.port						#指定Mongo server port.
spring.data.mongodb.repositories.enabled		#是否开启mongodb存储,默认为true
spring.data.mongodb.uri							#指定Mongo database URI.默认:mongodb://localhost/test
spring.data.mongodb.username					#指定登陆mongodb的用户名.
spring.data.rest.base-path						#指定暴露资源的基准路径.
spring.data.rest.default-page-size				#指定每页的大小,默认为: 20
spring.data.rest.limit-param-name				#指定limit的参数名,默认为: size
spring.data.rest.max-page-size					#指定最大的页数,默认为1000
spring.data.rest.page-param-name				#指定分页的参数名,默认为: page
spring.data.rest.return-body-on-create			#当创建完实体之后,是否返回body,默认为false
spring.data.rest.return-body-on-update			#在更新完实体后,是否返回body,默认为false
spring.data.rest.sort-param-name				#指定排序使用的key,默认为: sort
spring.data.solr.host							#指定Solr host,如果有指定了zk的host的话,则忽略。默认为: http://127.0.0.1:8983/solr
spring.data.solr.repositories.enabled			#是否开启Solr repositories,默认为: true
spring.data.solr.zk-host						#指定zk的地址,格式为HOST:PORT.
#----------------------------------------
#DEVTOOLS属性
#----------------------------------------

#DEVTOOLS(DevToolsProperties)
spring.devtools.livereload.enabled = true		#启用livereload.com兼容的server。
spring.devtools.livereload.port = 35729			#服务器端口。
spring.devtools.restart.additional-exclude =		#应该从触发完全重新启动时排除的其他模式。
spring.devtools.restart.additional-paths =		#额外的路径来观察变化。
spring.devtools.restart.enabled = true			#启用自动重启。
spring.devtools.restart.exclude = META-INF /行家/ **,META-INF /资源/ **,资源/ **,静态/ **,公共/ **,模板/ **,** / * Test.class,** / * Tests.class,git.properties#应该排除触发完全重启的模式。
spring.devtools.restart.poll-interval = 1000	#polling 路径更改之间等待的时间(以毫秒为单位)。
spring.devtools.restart.quiet-period = 400		#触发重新启动之前,没有任何类路径变化所需的静默时间(以毫秒为单位)。
spring.devtools.restart.trigger-file =			#特定文件的名称,在更改时会触发重新启动检查。如果未指定任何类路径文件更改将触发重新启动。


#DEVTOOLS   REMOTE DEVTOOLS(RemoteDevToolsProperties)
spring.devtools.remote.context-path =  			#用于处理远程连接的上下文路径。
spring.devtools.remote.debug.enabled = true		#启用远程调试支持。
spring.devtools.remote.debug.local-port = 8000	#本地远程调试服务器端口。
spring.devtools.remote.proxy.host =				#用于连接远程应用程序的代理主机。
spring.devtools.remote.proxy.port =				#用于连接远程应用程序的代理端口。
spring.devtools.remote.restart.enabled = true	#启用远程重启。
spring.devtools.remote.secret =					#建立连接所需的共享密钥(需要启用远程支持)。
spring.devtools.remote.secret-header-name = X-AUTH-TOKEN  		#用于传输共享密钥的HTTP头。


#----------------------------------------
#执行器属性
#----------------------------------------

#ENDPOINTS(AbstractEndpoint子类)
endpoints.enabled = true						#启用端点。
endpoints.sensitive =							#默认的端点敏感设置。
endpoints.actuator.enabled = true				#启用端点。
endpoints.actuator.path =						#端点URL路径。
endpoints.actuator.sensitive = false			#在端点上启用安全性。
endpoints.autoconfig.enabled =					#启用端点。
endpoints.autoconfig.id =						#端点标识符。
endpoints.autoconfig.sensitive =				#标记端点是否暴露敏感信息。
endpoints.beans.enabled =						#启用端点。
endpoints.beans.id =							#端点标识符。
endpoints.beans.sensitive =						#标记端点是否暴露敏感信息。
endpoints.configprops.enabled =					#启用端点。
endpoints.configprops.id =						#端点标识符。
endpoints.configprops.keys-to-sanitize			#应该清理的密钥。键可以是属性以或正则表达式结束的简单字符串。
endpoints.configprops.sensitive =				#标记端点是否公开敏感信息。
endpoints.docs.curies.enabled = false			#启用居里代。
endpoints.docs.enabled = true					#启用执行器文档终结点。
endpoints.docs.path = / docs					#
endpoints.docs.sensitive = false				#


#终端CORS配置(EndpointCorsProperties)
endpoints.cors.allow-credentials =				#设置是否支持凭据。未设置时,不支持凭证。
endpoints.cors.allowed-headers =				#在请求中允许使用逗号分隔的标题列表。'*'允许所有标题。
endpoints.cors.allowed-methods = GET			#逗号分隔的允许的方法列表。'*'允许所有的方法。
endpoints.cors.allowed-origins =				#逗号分隔的起源列表允许。'*'允许所有的来源。未设置时,CORS支持被禁用。
endpoints.cors.exposed-headers =				#包含在响应中的逗号分隔的标题列表。
endpoints.cors.max-age = 1800					#以秒为单位,客户端可以缓存飞行前请求的响应。

#JMX ENDPOINT(EndpointMBeanExportProperties)
endpoints.jmx.domain =							#JMX域名。如果设置,则用“spring.jmx.default-domain”的值初始化。
endpoints.jmx.enabled = true					#启用所有端点的JMX导出。
endpoints.jmx.static-names =					#附加到所有表示端点的MBean的ObjectName的静态属性。
endpoints.jmx.unique-names = false				#确保ObjectNames在发生冲突时被修改。


#flyway
flyway.baseline-description 					#对执行迁移时基准版本的描述.
flyway.baseline-on-migrate						#当迁移时发现目标schema非空,而且带有没有元数据的表时,是否自动执行基准迁移,默认false.
flyway.baseline-version							#开始执行基准迁移时对现有的schema的版本打标签,默认值为1.
flyway.check-location							#检查迁移脚本的位置是否存在,默认false.
flyway.clean-on-validation-error				#当发现校验错误时是否自动调用clean,默认false.
flyway.enabled									#是否开启flywary,默认true.
flyway.encoding									#设置迁移时的编码,默认UTF-8.
flyway.ignore-failed-future-migration			#当读取元数据表时是否忽略错误的迁移,默认false.
flyway.init-sqls								#当初始化好连接时要执行的SQL.
flyway.locations								#迁移脚本的位置,默认db/migration.
flyway.out-of-order								#是否允许无序的迁移,默认false.
flyway.password									#目标数据库的密码.
flyway.placeholder-prefix						#设置每个placeholder的前缀,默认${.
flyway.placeholder-replacement					#placeholders是否要被替换,默认true.
flyway.placeholder-suffix						#设置每个placeholder的后缀,默认}.
flyway.placeholders.[placeholder name]			#设置placeholder的value
flyway.schemas									#设定需要flywary迁移的schema,大小写敏感,默认为连接默认的schema.
flyway.sql-migration-prefix						#迁移文件的前缀,默认为V.
flyway.sql-migration-separator					#迁移脚本的文件名分隔符,默认__
flyway.sql-migration-suffix						#迁移脚本的后缀,默认为.sql
flyway.table									#flyway使用的元数据表名,默认为schema_version
flyway.target									#迁移时使用的目标版本,默认为latest version
flyway.url										#迁移时使用的JDBC URL,如果没有指定的话,将使用配置的主数据源
flyway.user										#迁移数据库的用户名
flyway.validate-on-migrate						#迁移时是否校验,默认为true.

#FREEMARKER(FreeMarkerAutoConfiguration)
spring.freemarker.allowRequestOverride = false   			#设置HttpServletRequest属性是否允许覆盖(隐藏)控制器生成的相同名称的模型属性。
spring.freemarker.allowSessionOverride = false   			#设置HttpSession属性是否允许覆盖(隐藏)控制器生成的相同名称的模型属性。
spring.freemarker.cache = true  				 			#使用模板缓存。
spring.freemarker.charset=UTF-8 				 			# Template encoding.
spring.freemarker.checkTemplateLocation = true   			#检查模板位置是否存在spring.freemarker.check-template-location=true
spring.freemarker.contentType = text / html  	 			#Content-Type
spring.freemarker.exposeRequestAttributes = false  			#在与模板合并之前,设置是否应该将所有请求属性添加到模型中。spring.freemarker.expose-request-attributes=false
spring.freemarker.exposeSessionAttributes = false  			#在与模板合并之前,设置是否应该将所有HttpSession属性添加到模型中。spring.freemarker.expose-session-attributes=false
spring.freemarker.exposeSpringMacroHelpers = false  		#设定是否以springMacroRequestContext的形式暴露RequestContext给Spring’s macro library使用      spring.freemarker.expose-spring-macro-helpers=true
spring.freemarker.prefer-file-system-access=true 			#是否优先从文件系统加载template,以支持热加载,默认为true
spring.freemarker.prefix =  								#在构建URL时,前缀被预先指定以查看名称。
spring.freemarker.requestContextAttribute =  				#所有视图的RequestContext属性的名称.   freemarker.request-context-attribute=
spring.freemarker.settings.* =  							#Well-known FreeMarker keys which will be passed to FreeMarker's Configuration
spring.freemarker.suffix = .ftl  							#在构建URL时附加到视图名称后面的后缀
spring.freemarker.templateEncoding = UTF- 8
spring.freemarker.templateLoaderPath =classpath:/templates  #设定ftl文件路径 类路径:/模板/
spring.freemarker.viewNames =								#可以解析的视图名称的白名单
spring.mvc.static-path-pattern=/static/**  					#设定静态文件路径,js,css等
#GIT信息
spring.git.properties =							#生成的git信息属性文件的资源引用。
#GROOVY模板(GroovyTemplateAutoConfiguration)
spring.groovy.template.allow-request-override 				#指定HttpServletRequest的属性是否可以覆盖controller的model的同名项
spring.groovy.template.allow-session-override 				#指定HttpSession的属性是否可以覆盖controller的model的同名项
spring.groovy.template.cache  								#是否开启模板缓存
.spring.groovy.template.charset 							#指定Template编码
.spring.groovy.template.check-template-location 			#是否检查模板的路径是否存在.
spring.groovy.template.configuration.auto-escape 			#是否在渲染模板时自动排查model的变量,默认为: false
spring.groovy.template.configuration.auto-indent 			#是否在渲染模板时自动缩进,默认为false
spring.groovy.template.configuration.auto-indent-string 	#如果自动缩进启用的话,是使用SPACES还是TAB,默认为: SPACES
spring.groovy.template.configuration.auto-new-line 			#渲染模板时是否要输出换行,默认为false
spring.groovy.template.configuration.base-template-class 	#指定template base class.
spring.groovy.template.configuration.cache-templates 		#是否要缓存模板,默认为true
spring.groovy.template.configuration.declaration-encoding 	#在写入declaration header时使用的编码
spring.groovy.template.configuration.expand-empty-elements 	#是使用<br/>这种形式,还是<br></br>这种展开模式,默认为: false)
spring.groovy.template.configuration.locale 				#指定template locale.
spring.groovy.template.configuration.new-line-string 		#当启用自动换行时,换行的输出,默认为系统的line.separator属性的值
spring.groovy.template.configuration.resource-loader-path 	#指定groovy的模板路径,默认为classpath:/templates/
spring.groovy.template.configuration.use-double-quotes 		#指定属性要使用双引号还是单引号,默认为false
spring.groovy.template.content-type 						#指定Content-Type.
spring.groovy.template.enabled 								#是否开启groovy模板的支持.
spring.groovy.template.expose-request-attributes 			#设定所有request的属性在merge到模板的时候,是否要都添加到model中.
spring.groovy.template.expose-session-attributes 			#设定所有request的属性在merge到模板的时候,是否要都添加到model中.
spring.groovy.template.expose-spring-macro-helpers 			#设定是否以springMacroRequestContext的形式暴露RequestContext给Spring’s macro library使用
spring.groovy.template.prefix 								#指定模板的前缀.
spring.groovy.template.request-context-attribute 			#指定RequestContext属性的名.
spring.groovy.template.resource-loader-path				 	#指定模板的路径,默认为: classpath:/templates/
spring.groovy.template.suffix								#指定模板的后缀
spring.groovy.template.view-names 							#指定要使用模板的视图名称.
#h2
spring.h2.console.enabled						#是否开启控制台,默认为false
spring.h2.console.path							#指定控制台路径,默认为: /h2-console
#hornetq	(HornetQProperties)
spring.hornetq.embedded.cluster-password		#指定集群的密码,默认启动时随机生成.
spring.hornetq.embedded.data-directory			#指定Journal file 的目录. 如果不开启持久化则不必指定.
spring.hornetq.embedded.enabled					#是否开启内嵌模式,默认:true
spring.hornetq.embedded.persistent				#是否开启persistent store,默认: false
spring.hornetq.embedded.queues					#指定启动是创建的queue,多个以逗号分隔,默认: []
spring.hornetq.embedded.server-id				#指定Server ID. 默认使用自增数字,从0开始.
spring.hornetq.embedded.topics					#指定启动时创建的topic,多个以逗号分隔,默认: []
spring.hornetq.host								#指定HornetQ broker 的host,默认: localhost
spring.hornetq.mode								#指定HornetQ 的部署模式,默认是auto-detected,也可以指定native 或者 embedded.
spring.hornetq.port								#指定HornetQ broker 端口,默认: 5445
#http
spring.hateoas.apply-to-primary-object-mapper   #设定是否对object mapper也支持HATEOAS,默认为: true
spring.http.converters.preferred-json-mapper   	#是否优先使用JSON mapper来转换.
spring.http.encoding.charset 					#指定http请求和相应的Charset,默认: UTF-8
spring.http.encoding.enabled					#是否开启http的编码支持,默认为true
spring.http.encoding.force						#是否强制对http请求和响应进行编码,默认为true
#jersey
spring.jersey.filter.order 						#指定Jersey filter的order,默认为: 0
spring.jersey.init								#指定传递给Jersey的初始化参数.
spring.jersey.type								#指定Jersey的集成类型,可以是servlet或者filter.
#jms
spring.jms.jndi-name							#指定Connection factory JNDI 名称.
spring.jms.listener.acknowledge-mode			#指定ack模式,默认自动ack.
spring.jms.listener.auto-startup				#是否启动时自动启动jms,默认为: true
spring.jms.listener.concurrency					#指定最小的并发消费者数量.
spring.jms.listener.max-concurrency				#指定最大的并发消费者数量.
spring.jms.pub-sub-domain						#是否使用默认的destination type来支持 publish/subscribe,默认: false
jmx
spring.jmx.default-domain						#指定JMX domain name.
spring.jmx.enabled								#是否暴露jmx,默认为true
spring.jmx.server								#指定MBeanServer bean name. 默认为: mbeanServer)
#jooq
spring.jooq.sql-dialect							#指定JOOQ使用的SQLDialect,比如POSTGRES.
#Messages
spring.messages.basename		 							#指定message的basename,多个以逗号分隔,如果不加包名的话,默认从classpath路径开始,默认: messages
spring.messages.cache-seconds	 							#设定加载的资源文件缓存失效时间,-1的话为永不过期,默认为-1
spring.messages.encoding    			 					#设定Message bundles的编码,默认: UTF-8
#JPA
spring.jpa.database								#指定目标数据库.
spring.jpa.database-platform					#指定目标数据库的类型.
spring.jpa.generate-ddl							#是否在启动时初始化schema,默认为false
spring.jpa.hibernate.ddl-auto					#指定DDL mode (none, validate, update, create, create-drop). 当使用内嵌数据库时,默认是create-drop,否则为none.
spring.jpa.hibernate.naming-strategy			#指定命名策略.
spring.jpa.open-in-view							#是否注册OpenEntityManagerInViewInterceptor,绑定JPA EntityManager到请求线程中,默认为: true
spring.jpa.properties							#添加额外的属性到JPA provider.
spring.jpa.show-sql								#是否开启sql的log,默认为: false
#json
spring.jackson.date-format						#指定日期格式,比如yyyy-MM-dd HH:mm:ss,或者具体的格式化类的全限定名
spring.jackson.deserialization					#是否开启Jackson的反序列化
spring.jackson.generator						#是否开启json的generators.
spring.jackson.joda-date-time-format			#指定Joda date/time的格式,比如yyyy-MM-dd HH:mm:ss). 如果没有配置的话,dateformat会作为backup
spring.jackson.locale							#指定json使用的Locale.
spring.jackson.mapper							#是否开启Jackson通用的特性.
spring.jackson.parser							#是否开启jackson的parser特性.
spring.jackson.property-naming-strategy			#指定PropertyNamingStrategy (CAMEL_CASE_TO_LOWER_CASE_WITH_UNDERSCORES)或者指定PropertyNamingStrategy子类的全限定类名.
spring.jackson.serialization					#是否开启jackson的序列化.
spring.jackson.serialization-inclusion			#指定序列化时属性的inclusion方式,具体查看JsonInclude.Include枚举.
spring.jackson.time-zone						#指定日期格式化时区,比如America/Los_Angeles或者GMT+10.
#JTA
spring.jta.allow-multiple-lrc					#是否允许 multiple LRC,默认为: false
spring.jta.asynchronous2-pc						#指定两阶段提交是否可以异步,默认为: false
spring.jta.background-recovery-interval			#指定多少分钟跑一次recovery process,默认为: 1
spring.jta.background-recovery-interval-seconds	#指定多久跑一次recovery process,默认: 60
spring.jta.current-node-only-recovery			#是否过滤掉其他非本JVM的recovery,默认为: true
spring.jta.debug-zero-resource-transaction		#是否追踪没有使用指定资源的事务,默认为: false
spring.jta.default-transaction-timeout			#设定默认的事务超时时间,默认为60
spring.jta.disable-jmx							#是否禁用jmx,默认为false
spring.jta.enabled								#是否开启JTA support,默认为: true
spring.jta.exception-analyzer					#设置指定的异常分析类
spring.jta.filter-log-status					#使用Bitronix Transaction Manager时,是否写mandatory logs,开启的话,可以节省磁盘空间,但是调试会复杂写,默认为false
spring.jta.force-batching-enabled				#使用Bitronix Transaction Manager时,是否批量写磁盘,默认为true.
spring.jta.forced-write-enabled					#使用Bitronix Transaction Manager时,是否强制写日志到磁盘,默认为true
spring.jta.graceful-shutdown-interval			#当使用Bitronix Transaction Manager,指定shutdown时等待事务结束的时间,超过则中断,默认为60
spring.jta.jndi-transaction-synchronization-registry-name		#当使用Bitronix Transaction Manager时,在JNDI下得事务同步registry,默认为: java:comp/TransactionSynchronizationRegistry
spring.jta.jndi-user-transaction-name			#指定在JNDI使用Bitronix Transaction Manager的名称,默认:java:comp/UserTransaction
spring.jta.journal								#当使用Bitronix Transaction Manager,指定The journal是否disk还是null还是一个类的全限定名,默认disk
spring.jta.log-dir								#Transaction logs directory.
spring.jta.log-part1-filename					#指定The journal fragment文件1的名字,默认: btm1.tlog
spring.jta.log-part2-filename					#指定The journal fragment文件2的名字,默认: btm2.tlog
spring.jta.max-log-size-in-mb					#指定journal fragments大小的最大值. 默认: 2M
spring.jta.resource-configuration-filename		#指定Bitronix Transaction Manager配置文件名.
spring.jta.server-id							#指定Bitronix Transaction Manager实例的id.
spring.jta.skip-corrupted-logs					#是否忽略corrupted log files文件,默认为false.
spring.jta.transaction-manager-id				#指定Transaction manager的唯一标识.
spring.jta.warn-about-zero-resource-transaction	#当使用Bitronix Transaction Manager时,是否对没有使用指定资源的事务进行警告,默认为: true
#mail
spring.mail.default-encoding					#指定默认MimeMessage的编码,默认为: UTF-8
spring.mail.host								#指定SMTP server host.
spring.mail.jndi-name							#指定mail的jndi名称
spring.mail.password							#指定SMTP server登陆密码.
spring.mail.port								#指定SMTP server port.
spring.mail.properties							#指定JavaMail session属性.
spring.mail.protocol							#指定SMTP server使用的协议,默认为: smtp
spring.mail.test-connection						#指定是否在启动时测试邮件服务器连接,默认为false
spring.mail.username							#指定SMTP server的用户名.
#mobile
spring.mobile.devicedelegatingviewresolver.enable-fallback	#是否支持fallback的解决方案,默认false
spring.mobile.devicedelegatingviewresolver.enabled			#是否开始device view resolver,默认为: false
spring.mobile.devicedelegatingviewresolver.mobile-prefix	#设定mobile端视图的前缀,默认为:mobile/
spring.mobile.devicedelegatingviewresolver.mobile-suffix	#设定mobile视图的后缀
spring.mobile.devicedelegatingviewresolver.normal-prefix	#设定普通设备的视图前缀
spring.mobile.devicedelegatingviewresolver.normal-suffix	#设定普通设备视图的后缀
spring.mobile.devicedelegatingviewresolver.tablet-prefix	#设定平板设备视图前缀,默认:tablet/
spring.mobile.devicedelegatingviewresolver.tablet-suffix	#设定平板设备视图后缀.
spring.mobile.sitepreference.enabled						#是否启用SitePreferenceHandler,默认为: true
#MONGODB(Mongo性能)
spring.data.mongodb.host =						#分贝主机
spring.data.mongodb.port = 27017  				#连接端口(默认为  27107 )
spring.data.mongodb.uri = 						#连接URL
spring.mongodb.embedded.features				#指定要开启的特性,逗号分隔.
spring.mongodb.embedded.version					#指定要使用的版本,默认: 2.6.10
#MANAGEMENT HTTP SERVER(ManagementServerProperties)
management.add-application-context-header = true#在每个响应中添加“X-Application-Context”HTTP标头。
management.address =							#管理端点应该绑定的网络地址。
management.context-path =						#管理端点上下文路径。例如`/执行器`
management.port =								#管理端点HTTP端口。默认使用与应用程序相同的端口。
management.security.enabled = true				#启用
management.security.role = ADMIN				#访问管理端点所需的角色。
management.security.sessions 					#会话创建策略使用(always, never, if_required, stateless)。

#HEALTH INDICATORS健康指标(以前的健康状况*)
management.health.db.enabled = true				#启用数据库运行状况检查。
management.health.defaults.enabled = true		#启用默认健康指标。
management.health.diskspace.enabled = true		#启用磁盘空间运行状况检查。
management.health.diskspace.path =				#用于计算可用磁盘空间的路径。
management.health.diskspace.threshold = 0		#应该可用的最小磁盘空间(以字节为单位)。
management.health.elasticsearch.enabled = true	#启用elasticsearch运行状况检查。
management.health.elasticsearch.indices =		#逗号分隔的索引名称。
management.health.elasticsearch.response-timeout = 100		#等待群集响应的时间(以毫秒为单位)。
management.health.jms.enabled = true			#启用JMS运行状况检查。
management.health.mail.enabled = true			#启用邮件运行状况检查。
management.health.mongo.enabled = true			#启用MongoDB运行状况检查。
management.health.rabbit.enabled = true			#启用RabbitMQ健康检查。
management.health.redis.enabled = true			#启用Redis运行状况检查。
management.health.solr.enabled = true			#启用Solr运行状况检查。
management.health.status.order 					#以逗号分隔的健康状态列表。
management.trace.include 						#要包含在跟踪中的项目。
#METRICS EXPORT(MetricExportProperties)
spring.metrics.export.aggregate.key-pattern =	#告诉聚合器如何处理源存储库中的密钥的模式。
spring.metrics.export.aggregate.prefix =		#全局存储库的前缀(如果处于活动状态)。
spring.metrics.export.delay-millis = 5000		#输出滴答之间的延迟(以毫秒为单位)。度量标准按照计划导出到外部源。
spring.metrics.export.enabled = true			#启用metric 标准导出的标志(假设MetricWriter可用)。
spring.metrics.export.excludes =				#要排除的metric 标准名称的模式列表。包括后应用。
spring.metrics.export.includes =				#要包含的metric 标准名称的模式列表。
spring.metrics.export.redis.key 				#Redis存储库导出密钥(如果有效)。
spring.metrics.export.redis.prefix				#如果处于活动状态,redis存储库的前缀。
spring.metrics.export.send-latest 				#根据不导出不变的metric 值的标志关闭所有可用的优化。
spring.metrics.export.statsd.host =				#接收导出metric 的statsd server的主机。
spring.metrics.export.statsd.port = 8125		#接收导出metric的statsd server的端口。
spring.metrics.export.statsd.prefix =			#统计导出metric的前缀。
spring.metrics.export.triggers。* =				#每个MetricWriter bean名称的特定触发器属性。
#multipart
multipart.enabled								#是否开启文件上传支持,默认为true
multipart.file-size-threshold					#设定文件写入磁盘的阈值,单位为MB或KB,默认为0
multipart.location								#指定文件上传路径.
multipart.max-file-size							#指定文件大小最大值,默认1MB
multipart.max-request-size						#指定每次请求的最大值,默认为10MB
#mustcache
spring.mustache.cache							#是否Enable template caching.
spring.mustache.charset							#指定Template的编码.
spring.mustache.check-template-location			#是否检查默认的路径是否存在.
spring.mustache.content-type					#指定Content-Type.
spring.mustache.enabled							#是否开启mustcache的模板支持.
spring.mustache.prefix							#指定模板的前缀,默认: classpath:/templates/
spring.mustache.suffix							#指定模板的后缀,默认: .html
spring.mustache.view-names						#指定要使用模板的视图名.
#MVC(SPRING MVC相关的一些配置)
http.mappers.json-pretty-print = false  					#打印JSON
http.mappers.json-sort-keys = false  						#排序键
spring.mvc.locale =											#设置固定语言环境,例如en_UK
spring.mvc.date-format =									#设置固定的日期格式,例如dd / MM / yyyy
spring.mvc.async.request-timeout	 						#设定async请求的超时时间,以毫秒为单位,如果没有设置的话,以具体实现的超时时间为准,比如tomcat的servlet3的话是10秒.
spring.mvc.favicon.enabled 									#是否支持favicon.ico,默认为: true
spring.mvc.ignore-default-model-on-redirect  				#在重定向时是否忽略默认model的内容,默认为true
spring.mvc.locale#指定使用的Locale.
spring.mvc.message-codes-resolver-format 					#指定message codes的格式化策略(PREFIX_ERROR_CODE,POSTFIX_ERROR_CODE).
spring.view.prefix =   										#MVC视图前缀
spring.view.suffix =   										#...和后缀
spring.resources.cache-period =             				#发送到浏览器的标题缓存超时
spring.resources.add-mappings = true         				#如果 应该添加默认映射
#liquibase
liquibase.change-log							#Change log 配置文件的路径,默认值为classpath:/db/changelog/db.changelog-master.yaml
liquibase.check-change-log-location				#是否坚持change log的位置是否存在,默认为true.
liquibase.contexts								#逗号分隔的运行时context列表.
liquibase.default-schema						#默认的schema.
liquibase.drop-first							#是否首先drop schema,默认为false
liquibase.enabled								#是否开启liquibase,默认为true.
liquibase.password								#目标数据库密码
liquibase.url									#要迁移的JDBC URL,如果没有指定的话,将使用配置的主数据源.
liquibase.user									#目标数据用户名
#logging日志
logging.path =  							#文件路径
logging.file = myapp.log   					#文件名称
logging.config =							#如果你即想完全掌控日志配置,但又不想用logback.xml作为Logback配置的名字,可以通过logging.config属性指定自定义的名字
logging.level.root=INFO  					#日志级别  从控制台打印出来的日志级别只有ERROR, WARN 还有INFO,如果你想要打印debug级别的日志,可以配置debug=true
logging.level.org.springframework.web=DEBUG
logging.level.org.hibernate=ERROR
#rabbitmq
spring.rabbitmq.addresses						#指定client连接到的server的地址,多个以逗号分隔.
spring.rabbitmq.dynamic							#是否创建AmqpAdmin bean. 默认为: true)
spring.rabbitmq.host							#指定RabbitMQ host.默认为: localhost)
spring.rabbitmq.listener.acknowledge-mode		#指定Acknowledge的模式.
spring.rabbitmq.listener.auto-startup			#是否在启动时就启动mq,默认: true)
spring.rabbitmq.listener.concurrency			#指定最小的消费者数量.
spring.rabbitmq.listener.max-concurrency		#指定最大的消费者数量.
spring.rabbitmq.listener.prefetch				#指定一个请求能处理多少个消息,如果有事务的话,必须大于等于transaction数量.
spring.rabbitmq.listener.transaction-size		#指定一个事务处理的消息数量,最好是小于等于prefetch的数量.
spring.rabbitmq.password						#指定broker的密码.
spring.rabbitmq.port							#指定RabbitMQ 的端口,默认: 5672)
spring.rabbitmq.requested-heartbeat				#指定心跳超时,0为不指定.
spring.rabbitmq.ssl.enabled						#是否开始SSL,默认: false)
spring.rabbitmq.ssl.key-store					#指定持有SSL certificate的key store的路径
spring.rabbitmq.ssl.key-store-password			#指定访问key store的密码.
spring.rabbitmq.ssl.trust-store					#指定持有SSL certificates的Trust store.
spring.rabbitmq.ssl.trust-store-password		#指定访问trust store的密码.
spring.rabbitmq.username						#指定登陆broker的用户名.
spring.rabbitmq.virtual-host					#指定连接到broker的Virtual host.
#redis
spring.redis.database							#指定连接工厂使用的Database index,默认为: 0
spring.redis.host								#指定Redis server host,默认为: localhost
spring.redis.password							#指定Redis server的密码
spring.redis.pool.max-active					#指定连接池最大的活跃连接数,-1表示无限,默认为8
spring.redis.pool.max-idle						#指定连接池最大的空闲连接数,-1表示无限,默认为8
spring.redis.pool.max-wait						#指定当连接池耗尽时,新获取连接需要等待的最大时间,以毫秒单位,-1表示无限等待
spring.redis.pool.min-idle						#指定连接池中空闲连接的最小数量,默认为0
spring.redis.port								#指定redis服务端端口,默认: 6379
spring.redis.sentinel.master					#指定redis server的名称
spring.redis.sentinel.nodes						#指定sentinel节点,逗号分隔,格式为host:port.
spring.redis.timeout							#指定连接超时时间,毫秒单位,默认为0
#resource
spring.resources.add-mappings					#是否开启默认的资源处理,默认为true
spring.resources.cache-period					#设定资源的缓存时效,以秒为单位.
spring.resources.chain.cache					#是否开启缓存,默认为: true
spring.resources.chain.enabled					#是否开启资源 handling chain,默认为false
spring.resources.chain.html-application-cache	#是否开启h5应用的cache manifest重写,默认为: false
spring.resources.chain.strategy.content.enabled	#是否开启内容版本策略,默认为false
spring.resources.chain.strategy.content.paths	#指定要应用的版本的路径,多个以逗号分隔,默认为:[/**]
spring.resources.chain.strategy.fixed.enabled	#是否开启固定的版本策略,默认为false
spring.resources.chain.strategy.fixed.paths		#指定要应用版本策略的路径,多个以逗号分隔
spring.resources.chain.strategy.fixed.version	#指定版本策略使用的版本号
spring.resources.static-locations				#指定静态资源路径,默认为classpath:[/META-INF/resources/,/resources/, /static/, /public/]以及context:/
#security     spring security是springboot支持的权限控制系统。
security.basic.authorize-mode					#要使用权限控制模式.
security.basic.enabled							#是否开启基本的鉴权,默认为true
security.basic.path								#需要鉴权的path,多个的话以逗号分隔,默认为[/**]
security.basic.realm							#HTTP basic realm 的名字,默认为Spring
security.enable-csrf							#是否开启cross-site request forgery校验,默认为false.
security.filter-order							#Security filter chain的order,默认为0
security.headers.cache							#是否开启http头部的cache控制,默认为false.
security.headers.content-type					#是否开启X-Content-Type-Options头部,默认为false.
security.headers.frame							#是否开启X-Frame-Options头部,默认为false.
security.headers.hsts							#指定HTTP Strict Transport Security (HSTS)模式(none, domain, all).
security.headers.xss							#是否开启cross-site scripting (XSS) 保护,默认为false.
security.ignored								#指定不鉴权的路径,多个的话以逗号分隔.
security.oauth2.client.access-token-uri			#指定获取access token的URI.
security.oauth2.client.access-token-validity-seconds		#指定access token失效时长.
security.oauth2.client.additional-information.[key]			#设定要添加的额外信息.
security.oauth2.client.authentication-scheme				#指定传输不记名令牌(bearer token)的方式(form, header, none,query),默认为header
security.oauth2.client.authorities				#指定授予客户端的权限.
security.oauth2.client.authorized-grant-types	#指定客户端允许的grant types.
security.oauth2.client.auto-approve-scopes		#对客户端自动授权的scope.
security.oauth2.client.client-authentication-scheme			#传输authentication credentials的方式(form, header, none, query),默认为header方式
security.oauth2.client.client-id				#指定OAuth2 client ID.
security.oauth2.client.client-secret			#指定OAuth2 client secret. 默认是一个随机的secret.
security.oauth2.client.grant-type				#指定获取资源的access token的授权类型.
security.oauth2.client.id						#指定应用的client ID.
security.oauth2.client.pre-established-redirect-uri			#服务端pre-established的跳转URI.
security.oauth2.client.refresh-token-validity-seconds		#指定refresh token的有效期.
security.oauth2.client.registered-redirect-uri				#指定客户端跳转URI,多个以逗号分隔.
security.oauth2.client.resource-ids				#指定客户端相关的资源id,多个以逗号分隔.
security.oauth2.client.scope					#client的scope
security.oauth2.client.token-name				#指定token的名称
security.oauth2.client.use-current-uri			#是否优先使用请求中URI,再使用pre-established的跳转URI. 默认为true
security.oauth2.client.user-authorization-uri	#用户跳转去获取access token的URI.
security.oauth2.resource.id						#指定resource的唯一标识.
security.oauth2.resource.jwt.key-uri			#JWT token的URI. 当key为公钥时,或者value不指定时指定.
security.oauth2.resource.jwt.key-value			#JWT token验证的value. 可以是对称加密或者PEMencoded RSA公钥. 可以使用URI作为value.
security.oauth2.resource.prefer-token-info		#是否使用token info,默认为true
security.oauth2.resource.service-id				#指定service ID,默认为resource.
security.oauth2.resource.token-info-uri			#token解码的URI.
security.oauth2.resource.token-type				#指定当使用userInfoUri时,发送的token类型.
security.oauth2.resource.user-info-uri			#指定user info的URI
security.oauth2.sso.filter-order				#如果没有显示提供WebSecurityConfigurerAdapter时指定的Filter order.
security.oauth2.sso.login-path					#跳转到SSO的登录路径默认为/login.
security.require-ssl							#是否对所有请求开启SSL,默认为false.
security.sessions								#指定Session的创建策略(always, never, if_required, stateless).
security.user.name								#指定默认的用户名,默认为user.
security.user.password							#默认的用户密码.
security.user.role								#默认用户的授权角色.
#sendgrid
spring.sendgrid.password						#指定SendGrid password.
spring.sendgrid.proxy.host						#指定SendGrid proxy host.
spring.sendgrid.proxy.port						#指定SendGrid proxy port.
spring.sendgrid.username						#指定SendGrid username.
#server配置
server.address								#指定server绑定的地址
server.compression.enabled					#是否开启压缩,默认为false.
server.compression.excluded-user-agents		#指定不压缩的user-agent,多个以逗号分隔,默认值为:text/html,text/xml,text/plain,text/css
server.compression.mime-types				#指定要压缩的MIME type,多个以逗号分隔.
server.compression.min-response-size		#执行压缩的阈值,默认为2048
server.context-parameters.[param name]		#设置servlet context 参数
server.context-path							#设定应用的context-path.
server.display-name							#设定应用的展示名称,默认: application
server.jsp-servlet.class-name				#设定编译JSP用的servlet,默认: org.apache.jasper.servlet.JspServlet)
server.jsp-servlet.init-parameters.[param name]				#设置JSP servlet 初始化参数.
server.jsp-servlet.registered				#设定JSP servlet是否注册到内嵌的servlet容器,默认true
server.port									#设定http监听端口
server.servlet-path							#设定dispatcher servlet的监听路径,默认为: /
#SHELL      REMOTE SHELL
shell.auth = simple								#认证类型。根据环境自动检测。
shell.auth.jaas.domain =my-domain				#JAAS域。
shell.auth.key.path =							#认证密钥的路径。这应该指向一个有效的“.pem”文件。
shell.auth.simple.user.name = user				#登录用户。
shell.auth.simple.user.password =				#登录密码。
shell.auth.spring.roles = ADMIN					#用于登录到CRaSH控制台的所需角色的逗号分隔列表。
shell.command-path-patterns = classpath *:/ commands / **,classpath *:/ crash / commands / **#用于查找命令的模式。
shell.command-refresh-interval = -1				#扫描更改并在必要时更新命令(以秒为单位)。
shell.config-path-patterns = 					#用于查找配置的模式。
shell.disabled-commands 						#禁用命令的逗号分隔列表。
shell.disabled-plugins =						#禁用逗号分隔的插件列表。根据环境,某些插件默认是禁用的。
shell.ssh.auth-timeout =						#用户提示重新登录后的毫秒数。
shell.ssh.enabled = true						#启用CRaSH SSH支持。
shell.ssh.idle-timeout =						#关闭未使用的连接之后的毫秒数。
shell.ssh.key-path =							#SSH服务器密钥的路径。
shell.ssh.port = 2000							#SSH端口。
shell.telnet.enabled = false					#启用CRaSH telnet支持。如果TelnetPlugin可用,则默认启用。
shell.telnet.port = 5000						#Telnet端口。
#social
spring.social.auto-connection-views				#是否开启连接状态的视图,默认为false
spring.social.facebook.app-id					#指定应用id
spring.social.facebook.app-secret				#指定应用密码
spring.social.linkedin.app-id					#指定应用id
spring.social.linkedin.app-secret				#指定应用密码
spring.social.twitter.app-id					#指定应用ID.
spring.social.twitter.app-secret				#指定应用密码
#ssl配置
server.ssl.ciphers								#是否支持SSL ciphers.
server.ssl.client-auth							#设定client authentication是wanted 还是 needed.
server.ssl.enabled								#是否开启ssl,默认: true
server.ssl.key-alias							#设定key store中key的别名.
server.ssl.key-password							#访问key store中key的密码.
server.ssl.key-store							#设定持有SSL certificate的key store的路径,通常是一个.jks文件.
server.ssl.key-store-password					#设定访问key store的密码.
server.ssl.key-store-provider					#设定key store的提供者.
server.ssl.key-store-type						#设定key store的类型.
server.ssl.protocol								#使用的SSL协议,默认: TLS
server.ssl.trust-store							#持有SSL certificates的Trust store.
server.ssl.trust-store-password					#访问trust store的密码.
server.ssl.trust-store-provider					#设定trust store的提供者.
server.ssl.trust-store-type						#指定trust store的类型.
#tomcat服务器配置(ServerProperties)
server.port = 8080   										#端口
server.address =  											#该服务绑定IP地址,启动服务器时如本机不是该IP地址则抛出异常启动失败,只有特殊需求的情况下才配置
server.session-timeout =									#会话超时秒数  默认30
server.context-path =   									#上下文路径,默认为  '/'
server.servlet-path =										#servlet路径,默认为  '/'
server.tomcat.access-log-pattern =							#访问日志的日志模式
server.tomcat.access-log-enabled = false  					#启用访问日志记录
server.tomcat.protocol-header = x -forwarded-proto 			#ssl转发标头
server.tomcat.accesslog.pattern								#设定access logs的格式,默认: common
server.tomcat.accesslog.prefix								#设定Log 文件的前缀,默认: access_log
server.tomcat.accesslog.suffix								#设定Log 文件的后缀,默认: .log
server.tomcat.background-processor-delay = 30 ; 			# 后台线程方法的Delay大小: 30
server.tomcat.basedir										#设定Tomcat的base 目录,如果没有指定则使用临时目录.
server.tomcat.internal-proxies								#设定信任的正则表达式,默认:“10\.\d{1,3}\.\d{1,3}\.\d{1,3}| 192\.168\.\d{1,3}\.\d{1,3}|
															#169\.254\.\d{1,3}\.\d{1,3}| 127\.\d{1,3}\.\d{1,3}\.\d{1,3}| 172\.1[6-9]{1}\.\d{1,3}\
															#.\d{1,3}| 172\.2[0-9]{1}\.\d{1,3}\.\d{1,3}|172\.3[0-1]{1}\.\d{1,3}\.\d{1,3}”
server.tomcat.max-http-header-size							#设定http header的最小值,默认: 0
server.tomcat.max-threads									#设定tomcat的最大工作线程数,默认为: 0
server.tomcat.port-header									#设定http header使用的,用来覆盖原来port的value.
server.tomcat.protocol-header								#设定Header包含的协议,通常是 X-Forwarded-Proto,如果remoteIpHeader有值,则将设置为RemoteIpValve.
server.tomcat.protocol-header-https-value					#设定使用SSL的header的值,默认https.
server.tomcat.remote-ip-header								#设定remote IP的header,如果remoteIpHeader有值,则设置为RemoteIpValve
server.tomcat.uri-encoding									#设定URI的解码字符集.
#THYMELEAF(Thymeleaf 模板)
spring.thymeleaf.prefix =    								#类路径:/模板/  检查模板位置
spring.thymeleaf.suffix =
spring.thymeleaf.mode = HTML5  								#模板的模式
spring.thymeleaf.encoding = UTF- 8
spring.thymeleaf.content-type = text / html#; charset = <编码>
spring.thymeleaf.cache = true  								#这个开发配置为false,避免改了模板还要重启服务器
#undertow
server.undertow.access-log-dir					#设定Undertow access log 的目录,默认: logs
server.undertow.access-log-enabled				#是否开启access log,默认: false
server.undertow.access-log-pattern				#设定access logs的格式,默认: common
server.undertow.accesslog.dir					#设定access log 的目录.
server.undertow.buffer-size						#设定buffer的大小.
server.undertow.buffers-per-region				#设定每个region的buffer数
server.undertow.direct-buffers					#设定堆外内存
server.undertow.io-threads						#设定I/O线程数.
server.undertow.worker-threads					#设定工作线程数
#velocity
spring.velocity.allow-request-override			#指定HttpServletRequest的属性是否可以覆盖controller的model的同名项
spring.velocity.allow-session-override			#指定HttpSession的属性是否可以覆盖controller的model的同名项
spring.velocity.cache							#是否开启模板缓存
spring.velocity.charset							#设定模板编码
spring.velocity.check-template-location			#是否检查模板路径是否存在.
spring.velocity.content-type					#设定ContentType的值
spring.velocity.date-tool-attribute				#设定暴露给velocity上下文使用的DateTool的名
spring.velocity.enabled							#设定是否允许mvc使用velocity
spring.velocity.expose-request-attributes		#是否在merge模板的时候,将request属性都添加到model中
spring.velocity.expose-session-attributes		#是否在merge模板的时候,将HttpSession属性都添加到model中
spring.velocity.expose-spring-macro-helpers		#设定是否以springMacroRequestContext的名来暴露RequestContext给Spring’s macro类库使用
spring.velocity.number-tool-attribute			#设定暴露给velocity上下文的NumberTool的名
spring.velocity.prefer-file-system-access		#是否优先从文件系统加载模板以支持热加载,默认为true
spring.velocity.prefix							#设定velocity模板的前缀.
spring.velocity.properties						#设置velocity的额外属性.
spring.velocity.request-context-attribute		#设定RequestContext attribute的名.
spring.velocity.resource-loader-path			#设定模板路径,默认为: classpath:/templates/
spring.velocity.suffix							#设定velocity模板的后缀.
spring.velocity.toolbox-config-location			#设定Velocity Toolbox配置文件的路径,比如 /WEB-INF/toolbox.xml.
spring.velocity.view-names						#设定需要解析的视图名称.
5.@Configuration 注入组件
@Configuration注解常常一起搭配使用的注解有@Bean、@Scope、@Lazy三个比较常见:
@Bean:等价于Spring中的bean标签用于注册bean对象的,内部有一些初始化、销毁的属性…
@Scope:用于声明该bean的作用域,作用域有singleton、prototype、request、session。
@Lazy:标记该bean是否开启懒加载
@Configuration

public class MyConfig {

    @Bean("user")

    public User getUser(){

    	System.out.println("User对象进行创建!");

        return new User("用户", 22, getDog());

    }

    @Bean("dog")

    public Dog getDog(){

    	System.out.println("Dog对象进行创建!");

        return new Dog("金毛", 3);

    }

}
这样就声明配置了两个bean,在Spring中相当于注册到xml配置文件中
默认情况下是以饿汉单例的形式进行创建,即IOC容器创建时立即创建这两个bean。
@SpringBootApplication
public class MainApplication {

    public static void main(String[] args) {
        // 获取IOC容器
        ConfigurableApplicationContext run = SpringApplication.run(MainApplication.class, args);
        System.out.println("====================================================");
        User user = run.getBean("user", User.class);
        System.out.println(user.toString());
        Dog dog = run.getBean("dog", Dog.class);
        System.out.println(dog.toString());
        System.out.println("====================================================");
    }

}
1.proxyBeanMethods:f型bean的方法
(1) Full(proxyBeanMethods =true)、【保证每个@Bean方法被调用多少次返回的组件都是单实例的,是代理方式
(2)Lite(proxyBeanMethods =false)【每个@Bean方法被调用多少次返回的组件都是新创建的,是非代理方式】
(3)特别说明:proxvBeanMethods 是在调用@Bean方法才生效,因此,需要先获取Beanconfig 组件,再调用方法而不是直接通过 SpringBoot 主程序得到的容器来获取bean,注意观察直按通过ioc.getBean()获取Bean,proxyBeanMethods 值并没有生效
(4)如何选择:组件依赖必须使用Fu模式默认。如果不需要组件依赖使用Lite模
(5)Lite模 也称为轻量级模式,因为不检测依赖关系,运行速度快
6.@import
@Target(ElementType.TYPE)
@Retention(RetentionPolicy.RUNTIME)
@Documented
public @interface Import {

   /**
    * {@link Configuration @Configuration}, {@link ImportSelector},
    * {@link ImportBeanDefinitionRegistrar}, or regular component classes to import.
    */
   Class<?>[] value();

}
从注释来看,@Import注解只可以标注在类上,可以结合 @Configuration注解、ImportSelector、ImportBeanDefinitionRegistrar一起使用,也可以导入普通的类。
因此,@Import的使用方式有4种:直接导入类,导入配置类来导入Bean,导入 ImportSelector 的实现类,导入 ImportBeanDefinitionRegister 的实现类。需要注意的是:ImportSelector、ImportBeanDefinitionRegistrar 这两个接口都必须依赖于 @Import 一起使用,而 @Import 可以单独使用。
@Import的实现原理
@Import注解的实现原理涉及到Spring框架的组件扫描、Bean注册和依赖注入等机制
组件扫描:Spring框架会通过组件扫描机制,自动扫描并加载带有@Configuration注解或其他指定注解的配置类,将它们识别为配置类。
注册配置类:当一个配置类被识别后,Spring会将其实例化为一个Bean,并将其注册到容器中。这样,配置类内部定义的所有Bean都可以由Spring容器进行管理。
处理@Import注解:当在配置类上使用@Import注解时,Spring会解析注解的参数,根据参数的不同类型进行相应的处理。
导入其他配置类:如果@Import的参数是其他配置类(例如@Configuration注解的类),Spring会将导入的配置类也加入到容器中,使得被导入的配置类内部定义的Bean也可以被管理。
导入普通类:如果@Import的参数是普通类,则Spring会将该类实例化为一个Bean,并注册到容器中。
导入实现了ImportSelector的类:如果@Import的参数是实现了ImportSelector接口的类,Spring会调用ImportSelector接口的selectImports()方法,根据返回的类名数组将相应的类注册为Bean。这样,可以根据特定的逻辑动态选择需要导入的类。
导入实现了ImportBeanDefinitionRegistrar的类:如果@Import的参数是实现了ImportBeanDefinitionRegistrar接口的类,Spring会调用ImportBeanDefinitionRegistrar接口的registerBeanDefinitions()方法,通过编程方式注册Bean定义到容器中。这样,可以通过自定义的逻辑来注册额外的Bean。
通过以上步骤,@Import注解使得我们能够方便地导入其他配置类、普通类或实现了ImportSelector、ImportBeanDefinitionRegistrar接口的类,并将它们注册到Spring容器中,从而实现Bean的管理和依赖注入
7.@Conditional
@Target({ElementType.TYPE,ElementType.METHOD})
@Retention(RetentionPolicy.RUNTIME)
@Document
public @interface Confitional{
	Class<? extend Condition> [] value();
}
该注解是Spring4.0之后才有的,该注解可以放在任意类型或者方法上。通过@Conditional可以配置一些条件判断,当所有条件都满足时,被该@Conditional注解标注的目标才会被Spring处理。
value:Condition类型的数组,Condition是一个接口,表示一个条件判断,内部有个方法返回true或false,当所有Condition都成立的时候,@Conditional的结果才成立
@Configuration
public class TestConfig3 {

    @Bean
    @Conditional({TestCondition3.class})
    public TestBean2 testBean3(){
        TestBean2 testBean2 = new TestBean2();
        testBean2.setAddress("上海");
        return  testBean2;
    }
}
8.@importResource
作用:原生配置文件引入,也就是可以直接导入Spring 传统的beans.xml,可以认为是SpringBoot对Spring 容器文件的兼容
package com.it.springboot.config;

import com.it.springboot.entity.Student;
import org.springframework.context.annotation.Bean;
import org.springframework.context.annotation.Configuration;
import org.springframework.context.annotation.ImportResource;

/**
 * Configuration:表示当前类作为配置文件使用的,就是配置容器的。
 * 位置:在类的上面
 * SpringConfig这个类就相当于beans.xml
 */
@Configuration
@ImportResource(value = "classpath:applicationContext.xml")
public class SpringConfig {
    /**
     * 创建方法,方法的返回值是对象。在方法的上面加入@bean
     * 方法的返回值对象就注入到容器中。
     *
     * @Bean:把对象注入到spring容器中,作用相当于<bean></bean>
     * 位置:方法的上面
     *
     * 说明:@Bean,不指定对象的名称,默认是方法名的id
     */
    @Bean
    public Student createStudent(){
        Student s1=new Student();
        s1.setName("李四");
        s1.setAge(19);
        s1.setSex("女");
        return s1;
    }

    /**
     * 指定对象在容器中的名字
     * @return
     */
    @Bean(name = "lisiStudent")
    public Student makeStudent(){
        Student s2=new Student();
        s2.setName("小红");
        s2.setAge(22);
        s2.setSex("女");
        return s2;
    }

}
9.@EnableConfigurationProperties
在@ConfigurationProperties的使用,把配置类的属性与yml配置文件绑定起来的时候,还需要加上@Component注解才能绑定并注入IOC容器中,若不加上@Component,则会无效。
@EnableConfigurationProperties的作用:则是将让使用了 @ConfigurationProperties 注解的配置类生效,将该类注入到 IOC 容器中,交由 IOC 容器进行管理,此时则不用再配置类上加上@Component
LomBok
1.简化JavaBean开发,可以使用Lombok的注解让代码更加简洁
2.Java项目中,很多没有技术含量又必须存在的代码:POJO的getter/setter/tostring;异常处理;I/O流的关闭操作等等,这些代码既没有技术含量,又影响着代码的美观,Lombok应运而生
@Getter和@Setter: 分别用于生成访问器(getters)和修改器(setters)方法,简化POJO(Plain Old Java Object)的字段操作。@ToString: 自动创建一个包含所有属性值的字符串表示,便于调试和日志输出。@NoArgsConstructor: 创建无参构造函数,如果不需要显式指定参数,则可以省去。@AllArgsConstructor: 生成包含所有参数的构造函数。@Data: 组合了上述大部分注解,常用于简化简单的POJO。@NoArgsConstructor,@AllArgsConstructor, 或@NoArgsConstructor,@AllArgsConstructor,@ToString: 这些单独的注解分别用于只生成特定类型的构造器。@Slf4j或@AutoLog: 使用SLF4J自动注入日志记录,方便日志管理。@NonNull和@Nullable: 标记变量是否允许为null,提高代码清晰度。@Value: 类似于@Data,但不包含默认构造函数和equals()和hashCode()方法。
Spring Initailizr

yml

静态资源的访问

Rest风格请求
接收参数注解
1.SpringBoot 接收客户端提交数据/参数会使用到相关注解
2.详解 @PathVariable、@RequestHeader、@ModelAttribute、@RequestParam.@CookieValue、@RequestBody
转换器
在Java中,转换器(Converter)通常是指用于数据类型转换的工具或机制。它们用于在不同类型的数据之间进行转换,尤其是在编程过程中,需要将某种类型的数据转换为另一种类型时,转换器显得尤为重要。
在Java中,常见的转换器包括:
1.自动类型转换(隐式转换)
Java 提供了一些自动类型转换的功能,在特定条件下,Java 编译器会自动将一种类型的数据转换为另一种类型。这种转换通常发生在数值类型之间的转换。
例如,int 到 double 的自动转换:
   int a = 10;

   double b = a;  // 自动将 int 转换为 double
这通常发生在数值较小的类型(如 int)到数值较大的类型(如 long、float 或 double)时。
2.强制类型转换(显式转换)
在某些情况下,类型转换不能自动完成,需要显式地进行转换。例如,将较大的类型强制转换为较小的类型时,可能会丢失数据,需要显式转换:
   double x = 10.5;

   int y = (int) x;  // 强制将 double 转换为 int,丢失小数部分
3.包装类与原始数据类型之间的转换
Java 中的包装类(如 Integer, Double, Boolean 等)与其对应的原始数据类型(如 int, double, boolean)之间的转换,通常通过自动装箱(Autoboxing)和拆箱(Unboxing)来完成。
自动装箱:

   Integer integerObj = 10;  // 自动将 int 转换为 Integer

拆箱:

   int number = integerObj;  // 自动将 Integer 转换为 int
4.类型转换器接口(Converter Interface)
在一些框架和库中,可能需要定义和使用类型转换器接口,例如 Spring 框架中有 Converter<S, T> 接口,用于定义源类型 S 到目标类型 T 的转换。
在 Spring 中,一个简单的类型转换器的实现如下:
   import org.springframework.core.convert.converter.Converter;

   public class StringToIntegerConverter implements Converter<String, Integer> {

       @Override

       public Integer convert(String source) {

           return Integer.valueOf(source);

       }

   }
这个转换器将一个 String 转换为 Integer。当 Spring 执行数据绑定或类型转换时,会使用这些转换器。
5.Object 到自定义类型的转换
在一些情境中,Java 会需要通过 Object 类来进行类型转换。比如将 Object 转换为具体的类型,可以通过强制转换来实现:
   Object obj = "Hello";

   String str = (String) obj;  // 强制将 Object 转换为 String
6.流式转换(Stream转换)
Java 8 引入的 Stream API 提供了对数据的流式操作,通常会用到 map、flatMap 等方法来转换流中的元素。例如,将一个包含字符串的列表转换为整数列表:
   List<String> strList = Arrays.asList("1", "2", "3");

   List<Integer> intList = strList.stream()

                                  .map(Integer::parseInt)

                                  .collect(Collectors.toList());
7.自定义类型转换器
在复杂的应用程序中,可能需要编写自定义类型转换器。例如,你可能需要将一个特定的类转换为另一个类。这通常通过实现自定义的转换方法来完成。
假设你有以下两个类,Person 和 Employee,并希望将 Person 转换为 Employee:
   class Person {

       String name;

       int age;

       // Constructor and Getters/Setters

   }

   class Employee {

       String employeeName;

       int employeeAge;

       // Constructor and Getters/Setters

   }

   class PersonToEmployeeConverter implements Converter<Person, Employee> {

       @Override

       public Employee convert(Person person) {

           Employee employee = new Employee();

           employee.setEmployeeName(person.getName());

           employee.setEmployeeAge(person.getAge());

           return employee;

       }

   }
8.使用第三方库进行类型转换
一些第三方库提供了更为简便和强大的类型转换机制。例如,Apache Commons Lang 提供了 ConvertUtils 类,允许你进行类型转换:
   import org.apache.commons.beanutils.ConvertUtils;

   String str = "100";

   Integer num = (Integer) ConvertUtils.convert(str, Integer.class);
总结
Java 中的类型转换器有许多形式,从简单的基本数据类型转换到复杂的对象转换。不同的转换方式适应不同的场景,开发人员可以根据需要选择使用内置机制(如自动装箱/拆箱、强制类型转换等),或者编写自定义的转换逻辑。常见的转换场景包括基础数据类型之间的转换、对象到对象的转换、以及使用第三方库来简化转换操作。
自定义转换器
import java.text.ParseException;
import java.text.SimpleDateFormat;
import java.util.Date;

interface Converter<S, T> {
    T convert(S source);
}

class StringToDateConverter implements Converter<String, Date> {

    private final String pattern;

    // 构造函数接受日期格式
    public StringToDateConverter(String pattern) {
        this.pattern = pattern;
    }

    @Override
    public Date convert(String source) {
        if (source == null || source.isEmpty()) {
            return null;
        }

        SimpleDateFormat dateFormat = new SimpleDateFormat(pattern);
        try {
            return dateFormat.parse(source);  // 将字符串解析为日期
        } catch (ParseException e) {
            throw new RuntimeException("Invalid date format: " + source, e);
        }
    }
}
内容协商
内容协商(Content Negotiation)是指在客户端和服务器之间基于请求头信息进行的一个过程,它允许客户端根据不同的需求和首选项来获取不同类型的内容或资源。当用户向服务器发送请求时,服务器会根据客户端的请求头(如 Accept、Accept-Language、Accept-Encoding 等)来决定响应的内容形式、语言、编码方式等。这样,服务器可以根据不同的客户端要求返回合适的响应内容。
1. 内容协商的工作原理
内容协商的基本思想是:客户端和服务器之间通过交换HTTP头来达成一种协议,决定客户端所希望获得的内容类型。在HTTP请求和响应中,常见的协商依据包括:
1.Accept: 告诉服务器客户端希望接受的媒体类型(如 text/html、application/json 等)。
2.Accept-Language: 客户端偏好的语言(如 en-US、zh-CN 等)。
3.Accept-Encoding: 客户端支持的内容编码格式(如 gzip、deflate)。
4.Accept-Charset: 客户端支持的字符集编码(如 UTF-8)。
5.User-Agent: 客户端的类型信息(如浏览器的类型和版本)。
当服务器收到请求时,它会根据这些请求头信息,选择一个最适合客户端的资源来返回。如果客户端没有指定首选项,服务器通常会返回默认的资源。
2. 内容协商的类型
内容协商可以分为几种常见的类型:
(1) 基于媒体类型的内容协商
服务器根据请求头中的 Accept 字段来决定返回的内容类型。例如:
6.请求头:Accept: text/html,客户端希望得到HTML格式的响应。
7.请求头:Accept: application/json,客户端希望得到JSON格式的响应。
如果客户端的请求包含多个可接受的内容类型,服务器会根据优先级来选择。例如,Accept: text/html, application/xhtml+xml, application/xml 表示客户端希望优先获得HTML格式的内容,如果没有HTML格式,则可以接受XHTML或XML格式。
(2) 基于语言的内容协商
通过 Accept-Language 请求头,客户端可以告诉服务器它的语言偏好。例如,Accept-Language: en-US 表示客户端希望获得英文内容;Accept-Language: zh-CN 表示中文内容。服务器可以返回相应语言的资源,如果没有合适的语言版本,通常会返回默认的语言版本(例如英文)。
(3) 基于编码格式的内容协商
Accept-Encoding 请求头告知服务器客户端可以接受哪些内容编码方式,以便进行压缩或加密处理。例如,Accept-Encoding: gzip, deflate 表示客户端能够接受gzip或deflate格式的压缩响应。服务器可以根据客户端的支持来选择是否压缩响应内容。
(4) 基于字符集的内容协商
Accept-Charset 请求头告诉服务器客户端支持的字符编码格式。例如,Accept-Charset: UTF-8 表示客户端希望接受UTF-8编码的响应。服务器可以根据此信息返回符合要求的编码格式。
3. 服务器端的响应
服务器根据请求头中的信息,决定返回最合适的内容形式。如果客户端要求的内容类型无法提供,服务器可能会返回一个 406 Not Acceptable 错误,表示无法满足客户端的需求。
例如,假设客户端请求:
8.请求头:Accept: application/json, text/html
9.如果服务器支持返回JSON数据,则返回JSON响应。
10.如果JSON不可用,且HTML可用,则返回HTML内容。
11.如果服务器不能满足任何格式要求,则可能返回 406。
4. 内容协商的应用场景
内容协商在许多实际应用中都有重要作用,尤其是在以下几个场景:
12.多语言支持:当一个网站支持多种语言时,内容协商可以根据 Accept-Language 请求头自动返回客户端所偏好的语言版本的页面。
13.多格式支持:例如,某些API可能会支持不同的数据格式(如 JSON、XML)。通过内容协商,客户端可以指定它希望的格式,服务器根据客户端的需求返回相应格式的响应。
14.内容压缩:为了减少网络传输的负担,内容压缩是一个常见的做法。通过 Accept-Encoding,客户端可以告知服务器它能够接受的压缩格式,服务器可以返回经过压缩的内容,节省带宽。
15.设备适配:移动设备和桌面设备可能需要不同的响应格式或内容样式,服务器可以根据 User-Agent 进行适配,返回不同格式的内容。
5. 优缺点
优点:
16.灵活性:通过内容协商,服务器可以根据客户端的需求灵活地返回不同格式的内容。
17.减少网络负担:通过支持压缩和编码方式,减少带宽消耗,提高性能。
18.多样性支持:可以为不同的用户和设备提供个性化的内容格式,如针对移动设备返回简洁版本的页面,或为不同地区的用户提供不同语言的内容。
缺点:
19.复杂性增加:服务器需要处理多种不同的请求和响应格式,这增加了实现的复杂性。
20.兼容性问题:不同的浏览器或客户端对内容协商的支持可能不同,这可能导致内容交付的不一致性。
21.性能开销:内容协商需要额外的计算和资源来判断最合适的响应格式,在高并发的场景中可能成为性能瓶颈。
总结
内容协商是HTTP协议中非常有用的一部分,能够帮助服务器根据客户端的需求返回适当的内容格式、语言、编码等。它使得应用能够灵活适配不同设备、不同语言环境和不同客户端的需求,从而提升用户体验。在实现时,开发者需要权衡灵活性、复杂性和性能之间的平衡。
Thymeleaf
Thymeleaf 是一个现代化的服务器端 Java 模板引擎,广泛用于 Web 应用开发中,尤其是在与 Spring Framework 结合使用时。它的主要目的是通过生成动态 HTML 内容来简化 Web 应用中的视图层开发。
1. 基本概念
Thymeleaf 作为一个模板引擎,它允许开发者通过模板文件和后端数据来生成最终的 HTML 页面。模板文件通常包含静态内容(如 HTML)和动态内容(如来自服务器的数据)。
Thymeleaf 支持多种不同类型的模板,最常见的就是 HTML 模板,但它也支持其他格式,如 XML 和文本文件。
2. 主要特点
自然模板(Natural Templates)
Thymeleaf 的一大特点是,它生成的模板是自然的 HTML 文件。也就是说,开发者可以直接在浏览器中查看这些模板文件,它们在浏览器中不会报错,可以当作普通的 HTML 文件打开和查看。这使得模板文件的开发和调试更加方便。丰富的表达式语言
Thymeleaf 提供了一套表达式语言(Thymeleaf Expression Language,简称 TEL)用于在模板中嵌入动态内容。常用的表达式包括:${}:用来从上下文中获取变量并输出其值。*{}:用于选择对象的属性并对其进行操作。#{}:用来获取国际化消息资源。@{}:用于生成 URL 或路径。~{}:用于引入外部文件资源,如 CSS 或 JavaScript 文件。
丰富的标签库
Thymeleaf 提供了许多内建标签来处理不同的 HTML 元素。例如:<th:block>:一个空的 HTML 标签,用于包裹多个元素。<th:each>:用于迭代集合。<th:if>:用于条件渲染。<th:switch>:用于进行条件判断。
这些标签支持类似于传统模板引擎中的“循环”、“条件判断”等常见功能。
灵活性和扩展性
Thymeleaf 具有很高的灵活性和扩展性。它不仅支持标准 HTML,也可以生成 XML 或其他文本格式。此外,Thymeleaf 也支持扩展和自定义标签和方言,使其能够适应各种应用场景。
3. 使用场景
Web 应用开发
Thymeleaf 最常用的场景是在 Web 应用开发中,尤其是与 Spring Boot 或 Spring MVC 等框架结合使用。它常常作为视图模板引擎,动态生成页面内容。邮件模板
Thymeleaf 也被用来生成动态电子邮件模板。它支持生成 HTML 格式的电子邮件,并通过数据绑定实现动态内容填充。
4. 与 Spring 的结合
Thymeleaf 和 Spring Framework 是一种非常常见的组合。Spring 提供了对 Thymeleaf 的集成支持,使得开发者能够更容易地在 Spring MVC 中使用它作为视图解析器。Spring Boot 项目也可以非常容易地配置 Thymeleaf,只需在 application.properties 或 application.yml 文件中进行简单的配置。
spring.thymeleaf.prefix=classpath:/templates/
spring.thymeleaf.suffix=.html
spring.thymeleaf.mode=HTML
5. Thymeleaf 的优点
易于调试
由于 Thymeleaf 支持自然模板,开发者可以直接查看生成的 HTML 页面,调试起来相对简单。清晰的模板语法
Thymeleaf 提供了丰富的语法,能够让开发者在模板中以声明式的方式处理复杂的逻辑和数据绑定,同时保持模板的可读性和简洁性。支持国际化
Thymeleaf 很好地支持国际化,通过#{}语法,可以非常方便地引入不同语言的消息。良好的扩展性
除了内建的功能,Thymeleaf 还允许开发者通过自定义方言(Dialect)来扩展其功能,满足不同的应用需求。
6. 缺点与限制
性能问题
虽然 Thymeleaf 相较于其他模板引擎(如 JSP 或 FreeMarker)具有很多优势,但在处理非常复杂的模板时,性能上可能会有所下降,尤其是在大型应用中,需要谨慎使用。学习曲线
对于初学者来说,Thymeleaf 的模板语法可能稍显复杂,尤其是在需要进行较多条件判断和循环的情况下。
7. 示例代码
HTML 模板:
<!DOCTYPE html>
<html xmlns:th="http://www.thymeleaf.org">
<head>
    <title>Welcome Page</title>
</head>
<body>
    <h1 th:text="'Hello, ' + ${user.name} + '!'"></h1>

    <ul>
        <li th:each="item : ${items}" th:text="${item}"></li>
    </ul>

    <p th:if="${user.isAdmin}">You are an administrator!</p>
</body>
</html>
Controller 示例:
@Controller
public class MyController {

    @GetMapping("/welcome")
    public String welcomePage(Model model) {
        model.addAttribute("user", new User("Alice", true));
        model.addAttribute("items", List.of("Item 1", "Item 2", "Item 3"));
        return "welcome";
    }
}
在上述代码中,th:text 用于绑定动态数据,th:each 用于循环遍历一个集合,th:if 用于条件渲染。
拦截器
1.在Spring Boot项目中, 拦截器是开发中常用手段,要来做登陆验证、性能检查、日志记录等。
2.基本步骤:
编写一个拦截器实现HandlerInterceptor接口拦截器注册到配置类中(实现WebMvcConfigurer的addInterceptors)
指定拦截规则
在 Spring Boot 中,实现一个拦截器并将其注册到配置类中,通常的步骤如下:
1.创建拦截器:实现 HandlerInterceptor 接口,重写 preHandle、postHandle 和 afterCompletion 方法。
2.创建配置类:通过实现 WebMvcConfigurer 接口,在配置类中使用 addInterceptors 方法注册拦截器,并指定拦截规则。
下面是一个完整的示例,展示如何实现一个拦截器并将其注册到 Spring Boot 配置类中。
1. 创建拦截器实现类
package com.example.demo.interceptor;

import org.springframework.web.servlet.HandlerInterceptor;

import javax.servlet.http.HttpServletRequest;

import javax.servlet.http.HttpServletResponse;

public class MyInterceptor implements HandlerInterceptor {

    // 在请求处理之前调用(返回true表示继续执行,false表示请求终止)

    @Override

    public boolean preHandle(HttpServletRequest request, HttpServletResponse response, Object handler) throws Exception {

        System.out.println("Request intercepted at preHandle: " + request.getRequestURI());

        // 可以根据需要判断是否放行

        return true;

    }

    // 在请求处理之后调用,但在视图渲染之前调用(可以用来修改模型数据)

    @Override

    public void postHandle(HttpServletRequest request, HttpServletResponse response, Object handler,

                           org.springframework.web.servlet.ModelAndView modelAndView) throws Exception {

        System.out.println("Request intercepted at postHandle: " + request.getRequestURI());

    }

    // 在整个请求处理完毕之后调用,通常用来做资源清理工作

    @Override

    public void afterCompletion(HttpServletRequest request, HttpServletResponse response, Object handler, Exception ex)

            throws Exception {

        System.out.println("Request intercepted at afterCompletion: " + request.getRequestURI());

    }

}
2. 创建配置类并注册拦截器
在 Spring Boot 中,使用 WebMvcConfigurer 接口来配置 MVC 相关的设置,包括注册拦截器。你需要重写 addInterceptors 方法来注册自定义的拦截器。
package com.example.demo.config;

import com.example.demo.interceptor.MyInterceptor;

import org.springframework.context.annotation.Bean;

import org.springframework.context.annotation.Configuration;

import org.springframework.web.servlet.config.annotation.InterceptorRegistry;

import org.springframework.web.servlet.config.annotation.WebMvcConfigurer;

@Configuration

public class WebConfig implements WebMvcConfigurer {

    // 注册拦截器

    @Override

    public void addInterceptors(InterceptorRegistry registry) {

        // 创建拦截器对象

        registry.addInterceptor(new MyInterceptor())

                // 指定拦截的路径,使用斜杠作为路径匹配符

                .addPathPatterns("/**")  // 拦截所有请求

                .excludePathPatterns("/login", "/signup");  // 排除特定路径,如登录和注册页面

    }

}
3. 说明:
3.addPathPatterns("/**"):表示拦截所有请求路径。
4.excludePathPatterns("/login", "/signup"):排除 /login 和 /signup 路径的请求,不进行拦截。
你可以根据需要调整拦截的路径和排除的路径。
4. 示例 Controller 类
你可以创建一个简单的 Controller 来测试拦截器。
package com.example.demo.controller;

import org.springframework.web.bind.annotation.GetMapping;

import org.springframework.web.bind.annotation.RestController;

@RestController

public class TestController {

    @GetMapping("/hello")

    public String hello() {

        return "Hello, World!";

    }

    @GetMapping("/login")

    public String login() {

        return "Login Page";

    }

    @GetMapping("/signup")

    public String signup() {

        return "Signup Page";

    }

}
5. 运行程序
5.启动 Spring Boot 应用后,访问 /hello 时会被拦截器拦截。
6.访问 /login 或 /signup 时,由于在拦截器中配置了排除路径,这些请求不会被拦截器拦截。
总结:
7.创建拦截器类,重写 HandlerInterceptor 接口中的方法(preHandle、postHandle、afterCompletion)。
8.实现 WebMvcConfigurer 接口,并在 addInterceptors 方法中注册拦截器,并指定拦截和排除规则。
9.拦截器会在请求和响应的不同阶段执行,允许你对请求进行预处理或后处理。
这样,你就完成了拦截器的创建和配置,能够对请求进行过滤和处理。
URI 和 URL的区别
URI = Universal Resource Identifier
URL= Universal Resource Locator
Identifier:标识符,Locator:定位器 从字面上来看,URI可以唯一标识一个资源,URL可以提供找到该资源的路径
文件上传
package com.example.demo.controller;

import org.springframework.web.bind.annotation.*;
import org.springframework.web.multipart.MultipartFile;
import org.springframework.ui.Model;
import org.springframework.util.ResourceUtils;
import java.io.File;
import java.io.IOException;
import java.nio.file.Files;
import java.nio.file.Path;
import java.nio.file.Paths;

@Controller
@RequestMapping("/upload")
public class FileUploadController {

    // 显示上传页面
    @GetMapping
    public String showUploadForm() {
        return "uploadForm";  // 返回上传页面视图
    }

    // 处理文件上传
    @PostMapping("/file")
    public String handleFileUpload(@RequestParam("file") MultipartFile file, Model model) {
        if (file.isEmpty()) {
            model.addAttribute("message", "请选择一个文件!");
            return "uploadForm";
        }

        try {
            String path = ResourceUtils.getFile("classpath:").getPath()
            // 使用日期创建子目录
            String dateFolder = new SimpleDateFormat("yyyyMMdd").format(new Date());
            // 使用 ResourceUtils 获取上传文件的目标路径
            File uploadDir = new File(path + "static/images/upload/" + dateFolder); 目录也是一种特殊的文件
            if (!uploadDir.exists()) {
                // 如果目标目录不存在,则创建目录
                uploadDir.mkdirs();
            }

            fullName = file.getOriginalFilename() + "_" + UUID.randomUUID().toString()
            // 创建目标文件路径
            Path path = Paths.get(uploadDir.getAbsolutePath(), fullName);

            // 保存文件
            file.transferTo(path);
            model.addAttribute("message", "文件上传成功!");

        } catch (IOException e) {
            model.addAttribute("message", "文件上传失败:" + e.getMessage());
        }

        return "uploadForm";
    }
}
<!DOCTYPE html>
<html xmlns:th="http://www.thymeleaf.org">
<head>
    <meta charset="UTF-8">
    <title>文件上传</title>
</head>
<body>
    <h1>文件上传</h1>
    <form th:action="@{/upload/file}" method="post" enctype="multipart/form-data">
        <label for="file">选择文件:</label>
        <input type="file" name="file" id="file" required/>
        <button type="submit">上传文件</button>
    </form>

    <div>
        <h2 th:text="${message}"></h2>
    </div>
</body>
</html>
关于文件路径的解读
这行代码的作用是获取当前项目中资源文件的路径,具体来说,它是通过 ResourceUtils.getFile("classpath") 来获取资源文件的路径并将其转换成字符串形式。以下是详细的解释:
代码解释:
String path = ResourceUtils.getFile("classpath:").getPath();
1.ResourceUtils.getFile("classpath:"):
2.ResourceUtils 是 Spring 框架中的一个工具类,主要用于简化文件资源的加载。
3.getFile 是 ResourceUtils 类中的一个静态方法,用来根据给定的资源路径获取文件对象(File)。
4.参数 "classpath" 是传递给 getFile 方法的资源路径。这个路径指示了从 classpath 中加载资源文件。注意,"classpath" 并不是一个有效的文件路径,而是一个资源的路径指示符。
具体来说:
5."classpath:" 通常指的是类路径下的资源,类路径可能包含编译后的 .class 文件、资源文件(如 .properties, .xml, .txt 等)等。
6."classpath:" 是 Spring ResourceUtils 识别的一个关键字,它会自动指向程序的类路径,即在 src/main/resources 目录下的资源文件。Spring 会根据不同的环境来解析该路径并返回相应的文件资源。
7..getPath():
8.getPath() 是 Java 中 File 类的方法,它返回该 File 对象的路径表示形式。也就是说,它会将 File 对象转换成字符串路径。这个路径是本地文件系统上的路径表示。
9.例如,如果通过 ResourceUtils.getFile("classpath") 获取到的文件是项目根目录下的某个资源文件,getPath() 会返回该文件在文件系统中的绝对路径字符串。
getFile 方法内部的处理:
ResourceUtils.getFile() 方法是根据不同的资源类型来加载文件的。如果参数是 "classpath",它会尝试获取类路径中的文件。在实际应用中,getFile 会通过 ClassPathResource(Spring 的一种资源加载机制)来解析类路径中的资源,进而返回对应的文件对象。
返回值:
10.getFile("classpath") 返回的是类路径下的某个资源的 File 对象。如果资源位于类路径中的某个目录下,getFile 会返回该资源对应的文件对象。
11..getPath() 则返回该文件的绝对路径。
示例:
如果在项目的 resources 目录下有一个文件 example.txt,并且 "classpath" 实际上指向了该文件,那么 getPath() 可能会返回类似以下的路径:
/Users/username/projects/myapp/target/classes/example.txt这表示 example.txt 文件在本地文件系统中的实际路径。
注意:
12."classpath" 并不是直接表示某个文件,而是表示资源所在的路径。Spring 会根据实际的类路径设置来解析具体的文件位置。
13.如果类路径中的资源不存在,调用 ResourceUtils.getFile("classpath") 时会抛出异常(如 FileNotFoundException)。
总结:
14.ResourceUtils.getFile("classpath:") 用来获取类路径下的资源文件,并返回一个 File 对象。
15..getPath() 会将这个 File 对象转换为文件系统的路径字符串。
异常处理
1.默认情况下,Spring Boot提供 /error处理所有错误的映射,也就是说当出现错误时,SpringBoot 底层会请求转发到 /error 这个映射
2.比如使用浏览器访问不存在接口(路径映射),响应一个"whitelabel"错误视图,以HTML格式呈现的给用户
说明:在当前配置了LoginInterceptor的情况下,需要先登录,在请求
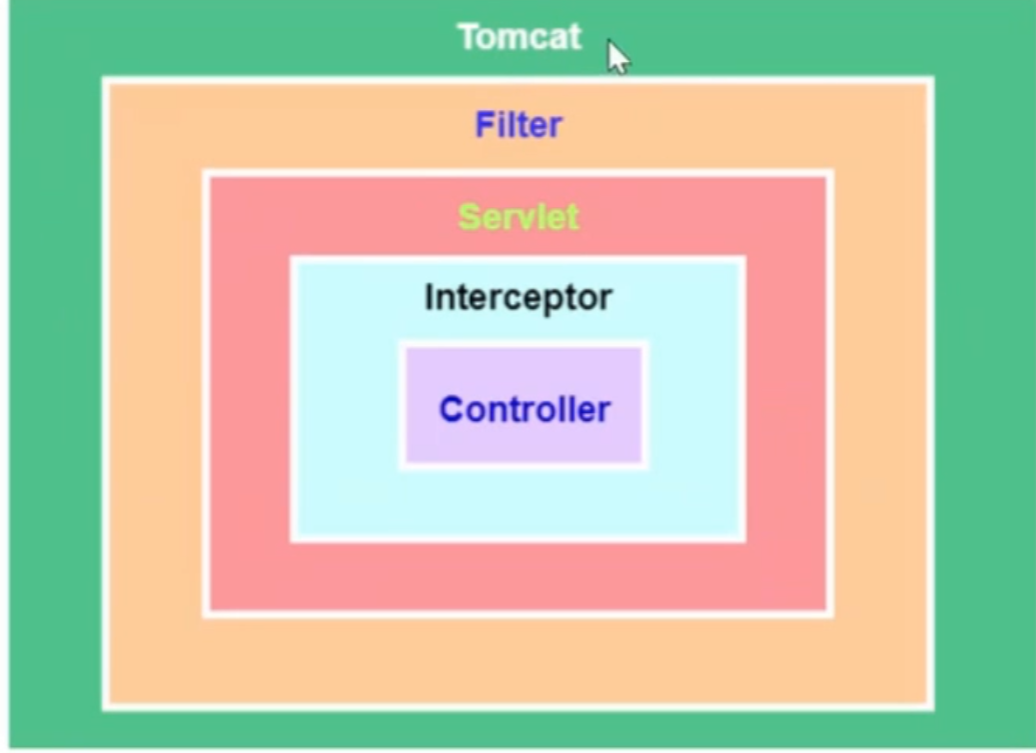
拦截器和过滤器的区别
1.使用范围不同
1)过滤器 实现的是 javax.servlet.Filter 接口,而这个接口是在Servlet规范中定义的,也就是说过滤器Filter 的使用要依赖于Tomcat等容器,Filter只能在web程序中使用
2)拦截器(Interceptor)它是一个Spring组件,并由Spring容器管理,并不依赖Tomcat等容器,是可以单独使用的。不仅能应用在web程序中,也可以用于Application等程序中
3)说明:过滤器不会处理请求转发,拦截器会处理请求转发
自定义异常处理
下面是一个基于 Spring Boot 的示例,演示如何使用 @ResponseStatus 注解和自定义异常。
1. 创建自定义异常类
首先,我们定义一个自定义异常类,并使用 @ResponseStatus 注解来指定当该异常抛出时,应该返回的 HTTP 状态码。
javaimport org.springframework.http.HttpStatus;
import org.springframework.web.bind.annotation.ResponseStatus;

// 自定义异常类
@ResponseStatus(value = HttpStatus.BAD_REQUEST, reason = "Invalid data provided")
public class InvalidDataException extends RuntimeException {

    // 默认构造函数
    public InvalidDataException() {
        super("Invalid data provided");
    }

    // 通过构造函数传递自定义消息
    public InvalidDataException(String message) {
        super(message);
    }
}
@ResponseStatus(value = HttpStatus.BAD_REQUEST):设置 HTTP 响应状态为 400(Bad Request)。reason = "Invalid data provided":设置一个默认的异常信息,作为响应体返回。
2. 创建一个控制器来触发自定义异常
接下来,我们创建一个控制器类,其中包含一个方法来处理请求。如果请求数据不符合要求,我们将抛出自定义异常 InvalidDataException。
javaimport org.springframework.web.bind.annotation.GetMapping;
import org.springframework.web.bind.annotation.RequestParam;
import org.springframework.web.bind.annotation.RestController;

@RestController
public class DataController {

    // 模拟处理数据的接口
    @GetMapping("/processData")
    public String processData(@RequestParam(value = "data", required = false) String data) {
        if (data == null || data.isEmpty()) {
            // 当数据无效时抛出自定义异常
            throw new InvalidDataException("Data parameter cannot be null or empty");
        }
        return "Data processed: " + data;
    }
}
3. 创建 Spring Boot 主应用类
接下来,我们创建 Spring Boot 启动类,并将控制器启动。
javaimport org.springframework.boot.SpringApplication;
import org.springframework.boot.autoconfigure.SpringBootApplication;

@SpringBootApplication
public class Application {
    public static void main(String[] args) {
        SpringApplication.run(Application.class, args);
    }
}
4. 测试和验证
现在,我们可以通过浏览器或 Postman 等工具访问接口来测试这个功能:
请求 1:没有传递 data 参数
访问 http://localhost:8080/processData(不带参数),由于参数缺失或为空,触发 InvalidDataException,返回 HTTP 400 状态码和错误信息:
json{
    "timestamp": "2024-11-08T15:00:00.000+00:00",
    "status": 400,
    "error": "Bad Request",
    "exception": "com.example.demo.InvalidDataException",
    "message": "Data parameter cannot be null or empty",
    "path": "/processData"
}
请求 2:传递了一个有效的 data 参数
访问 http://localhost:8080/processData?data=test,返回成功消息:
json"Data processed: test"5. 总结
自定义异常类:我们通过继承
RuntimeException创建了一个自定义异常InvalidDataException,并使用@ResponseStatus注解指定当该异常被抛出时,HTTP 状态码应该是400 Bad Request,同时提供了一个默认的错误信息。控制器:在控制器类
DataController中,我们检查请求参数,如果参数无效,则抛出自定义异常,Spring 会自动处理该异常并返回适当的 HTTP 响应。自动返回 HTTP 状态码:由于
@ResponseStatus注解,Spring 在抛出InvalidDataException时,自动返回 HTTP 400 状态码,而无需手动处理。
通过这种方式,我们能够非常方便地处理 RESTful API 中的异常,并返回合适的 HTTP 状态码和错误信息,符合 REST API 的设计规范
@RegistrationBean注入Servlet、Filter、 Listener
1. Servlet注册示例
首先,我们来定义一个简单的Servlet,并通过@RegistrationBean将它注入到Spring Boot的应用中。
创建Servlet类
javaimport javax.servlet.Servlet;
import javax.servlet.ServletException;
import javax.servlet.ServletRequest;
import javax.servlet.ServletResponse;
import javax.servlet.annotation.WebServlet;
import java.io.IOException;

public class MyServlet implements Servlet {
    @Override
    public void init(javax.servlet.ServletConfig servletConfig) throws ServletException {
        System.out.println("MyServlet initialized");
    }

    @Override
    public ServletConfig getServletConfig() {
        return null;
    }

    @Override
    public void service(ServletRequest servletRequest, ServletResponse servletResponse) throws ServletException, IOException {
        servletResponse.getWriter().write("Hello from MyServlet!");
    }

    @Override
    public String getServletInfo() {
        return "MyServlet";
    }

    @Override
    public void destroy() {
        System.out.println("MyServlet destroyed");
    }
}
使用@RegistrationBean注册Servlet
javaimport org.springframework.boot.web.servlet.ServletRegistrationBean;
import org.springframework.context.annotation.Bean;
import org.springframework.context.annotation.Configuration;

@Configuration
public class ServletConfig {

    @Bean
    public ServletRegistrationBean<MyServlet> myServlet() {
        ServletRegistrationBean<MyServlet> registrationBean = new ServletRegistrationBean<>(new MyServlet(), "/myservlet");
        return registrationBean;
    }
}
这样,当Spring Boot启动时,MyServlet就会被注册到/myservlet路径。
2. Filter注册示例
接下来,我们来创建一个Filter,并使用@RegistrationBean将它注册到Spring Boot应用中。
创建Filter类
javaimport javax.servlet.Filter;
import javax.servlet.FilterChain;
import javax.servlet.FilterConfig;
import javax.servlet.ServletException;
import javax.servlet.ServletRequest;
import javax.servlet.ServletResponse;
import java.io.IOException;

public class MyFilter implements Filter {
    @Override
    public void init(FilterConfig filterConfig) throws ServletException {
        System.out.println("MyFilter initialized");
    }

    @Override
    public void doFilter(ServletRequest request, ServletResponse response, FilterChain chain) throws IOException, ServletException {
        System.out.println("MyFilter is processing request");
        chain.doFilter(request, response);
    }

    @Override
    public void destroy() {
        System.out.println("MyFilter destroyed");
    }
}
使用@RegistrationBean注册Filter
javaimport org.springframework.boot.web.servlet.FilterRegistrationBean;
import org.springframework.context.annotation.Bean;
import org.springframework.context.annotation.Configuration;

@Configuration
public class FilterConfig {

    @Bean
    public FilterRegistrationBean<MyFilter> myFilter() {
        FilterRegistrationBean<MyFilter> registrationBean = new FilterRegistrationBean<>(new MyFilter());
        registrationBean.addUrlPatterns("/myservlet");  // 设置过滤的URL
        return registrationBean;
    }
}
这样,MyFilter会在访问/myservlet路径时进行请求处理。
3. Listener注册示例
我们还可以使用@RegistrationBean来注册Listener,以便在Servlet容器中监听应用的生命周期事件。
创建Listener类
javaimport javax.servlet.ServletContextEvent;
import javax.servlet.ServletContextListener;
import javax.servlet.annotation.WebListener;

public class MyListener implements ServletContextListener {
    @Override
    public void contextInitialized(ServletContextEvent sce) {
        System.out.println("MyListener contextInitialized");
    }

    @Override
    public void contextDestroyed(ServletContextEvent sce) {
        System.out.println("MyListener contextDestroyed");
    }
}
使用@RegistrationBean注册Listener
javaimport org.springframework.boot.web.servlet.ServletListenerRegistrationBean;
import org.springframework.context.annotation.Bean;
import org.springframework.context.annotation.Configuration;

@Configuration
public class ListenerConfig {

    @Bean
    public ServletListenerRegistrationBean<MyListener> myListener() {
        return new ServletListenerRegistrationBean<>(new MyListener());
    }
}
这样,MyListener会在应用启动和销毁时触发contextInitialized和contextDestroyed方法。
完整代码示例
import org.springframework.boot.SpringApplication;
import org.springframework.boot.autoconfigure.SpringBootApplication;
import org.springframework.context.annotation.Bean;
import org.springframework.context.annotation.Configuration;
import org.springframework.boot.web.servlet.ServletRegistrationBean;
import org.springframework.boot.web.servlet.FilterRegistrationBean;
import org.springframework.boot.web.servlet.ServletListenerRegistrationBean;

@SpringBootApplication
public class MySpringBootApp {

    public static void main(String[] args) {
        SpringApplication.run(MySpringBootApp.class, args);
    }
}

@Configuration
class ServletConfig {
    @Bean
    public ServletRegistrationBean<MyServlet> myServlet() {
        return new ServletRegistrationBean<>(new MyServlet(), "/myservlet");
    }
}

@Configuration
class FilterConfig {
    @Bean
    public FilterRegistrationBean<MyFilter> myFilter() {
        FilterRegistrationBean<MyFilter> registrationBean = new FilterRegistrationBean<>(new MyFilter());
        registrationBean.addUrlPatterns("/myservlet");
        return registrationBean;
    }
}

@Configuration
class ListenerConfig {
    @Bean
    public ServletListenerRegistrationBean<MyListener> myListener() {
        return new ServletListenerRegistrationBean<>(new MyListener());
    }
}
(Tomcat) appication.yml配置
server.
  port: 9999  #端口
  tomcat.
   threads:
     max:10  #最大工作线程数
     min-spare:5     #最小工作线程数
   accept-count: 200    #启动的线程数达到最大时,接受排队的请求个数,默认值为100
   max-connections:2000   #最大连接数
   connection-timeout:10000  #建立连接超时时间亳秒
通过类配置Tomcat
WebServerFactoryCustomizer 通过实现该接口配置JDBC + HikarDataSource
引入启动器
  <dependency>
      <groupId>org.springframework.boot</groupId>
      <artifactId>spring-boot-starter-data-jdbc</artifactId>
  </dependency>
配置数据源
  datasource:
    url: jdbc:mysql://localhost:3306/your_database?useUnicode=true&characterEncoding=UTF-8&useSSL=false
    username: your_username
    password: your_password
    driver-class-name: com.mysql.cj.jdbc.Driver
Druid
        <dependency>
            <groupId>com.alibaba</groupId>
            <artifactId>druid</artifactId>
            <version>1.2.6</version>
        </dependency>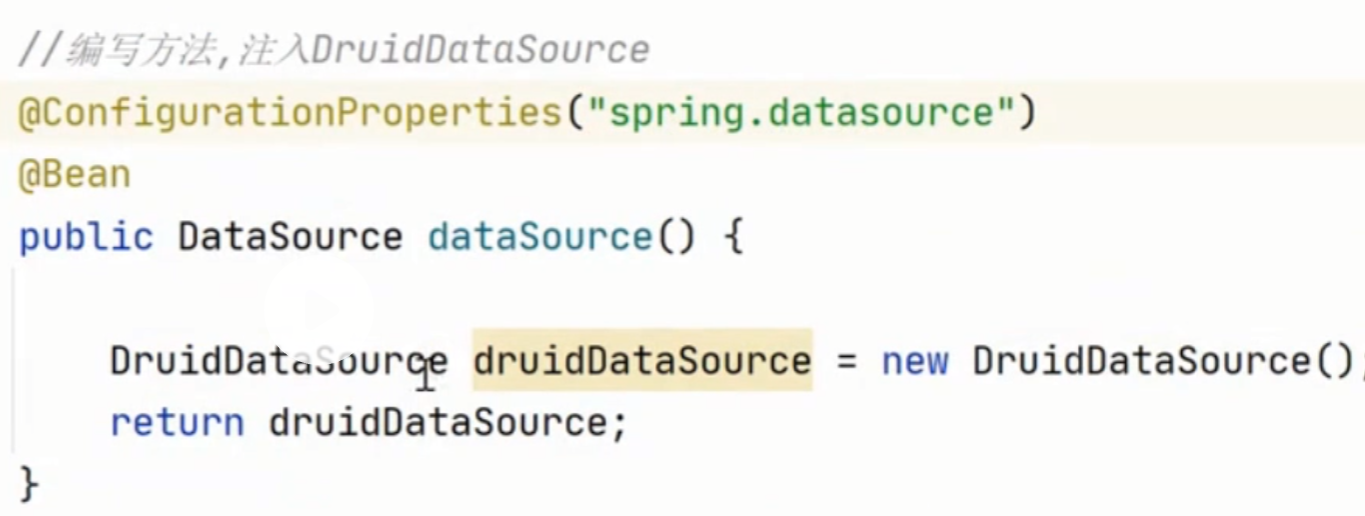
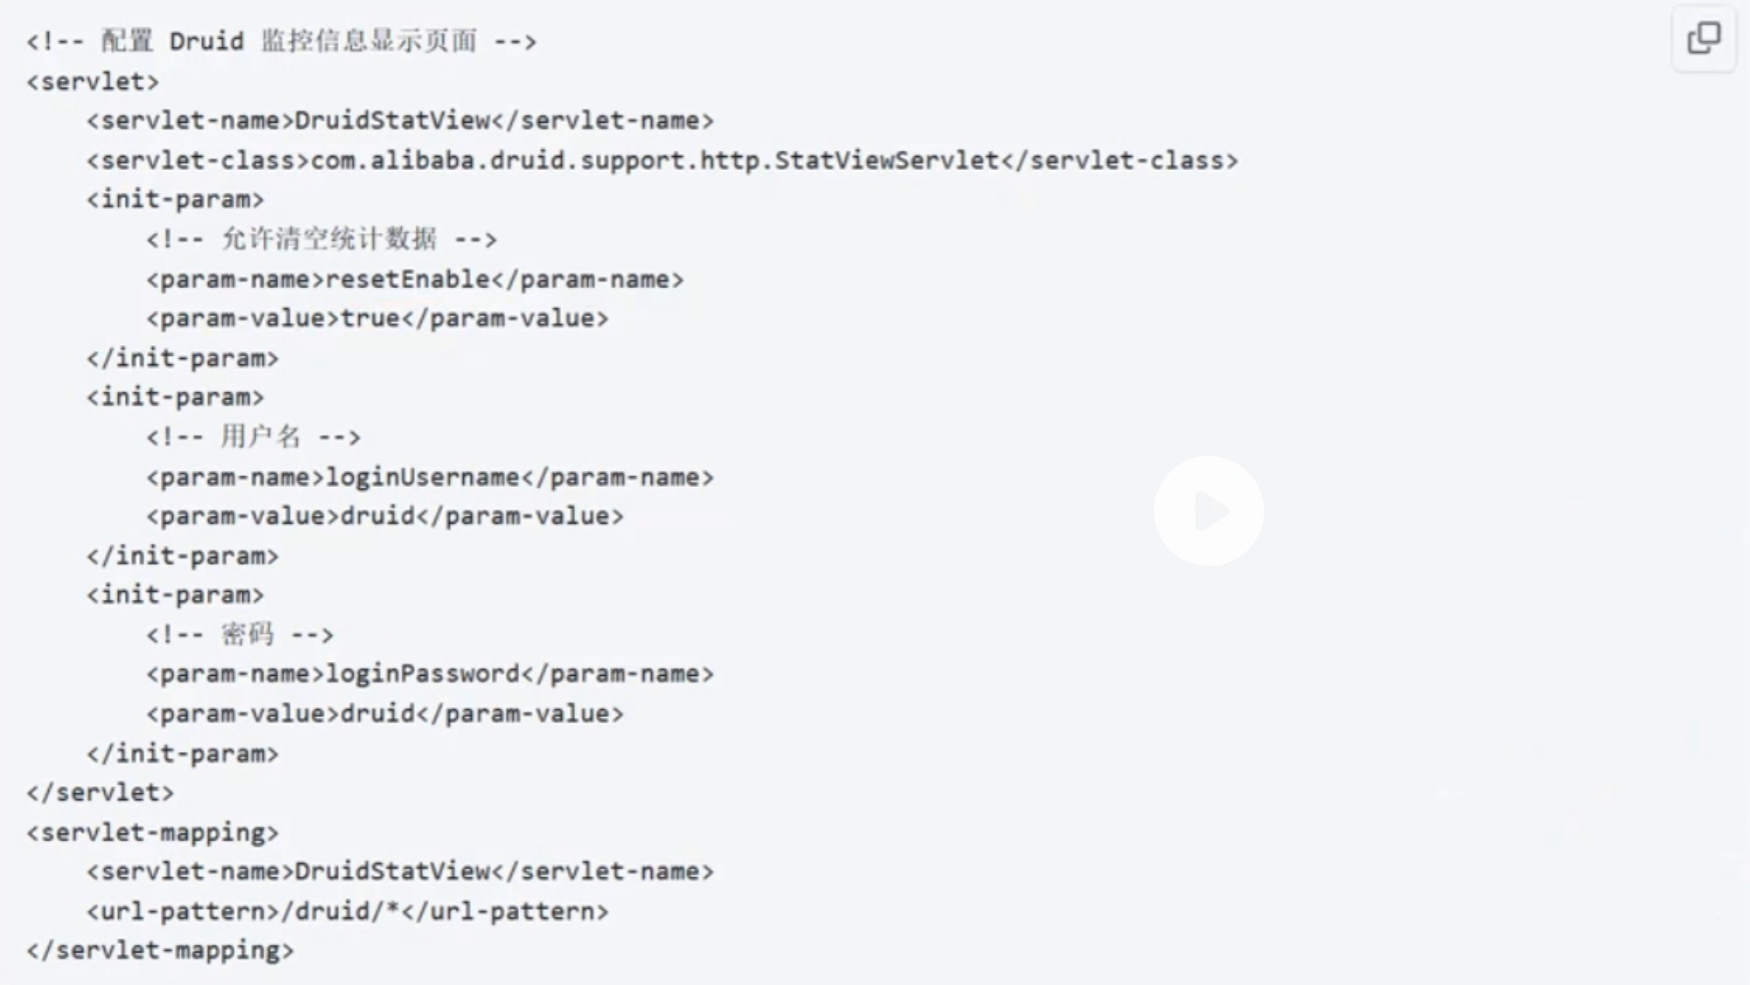
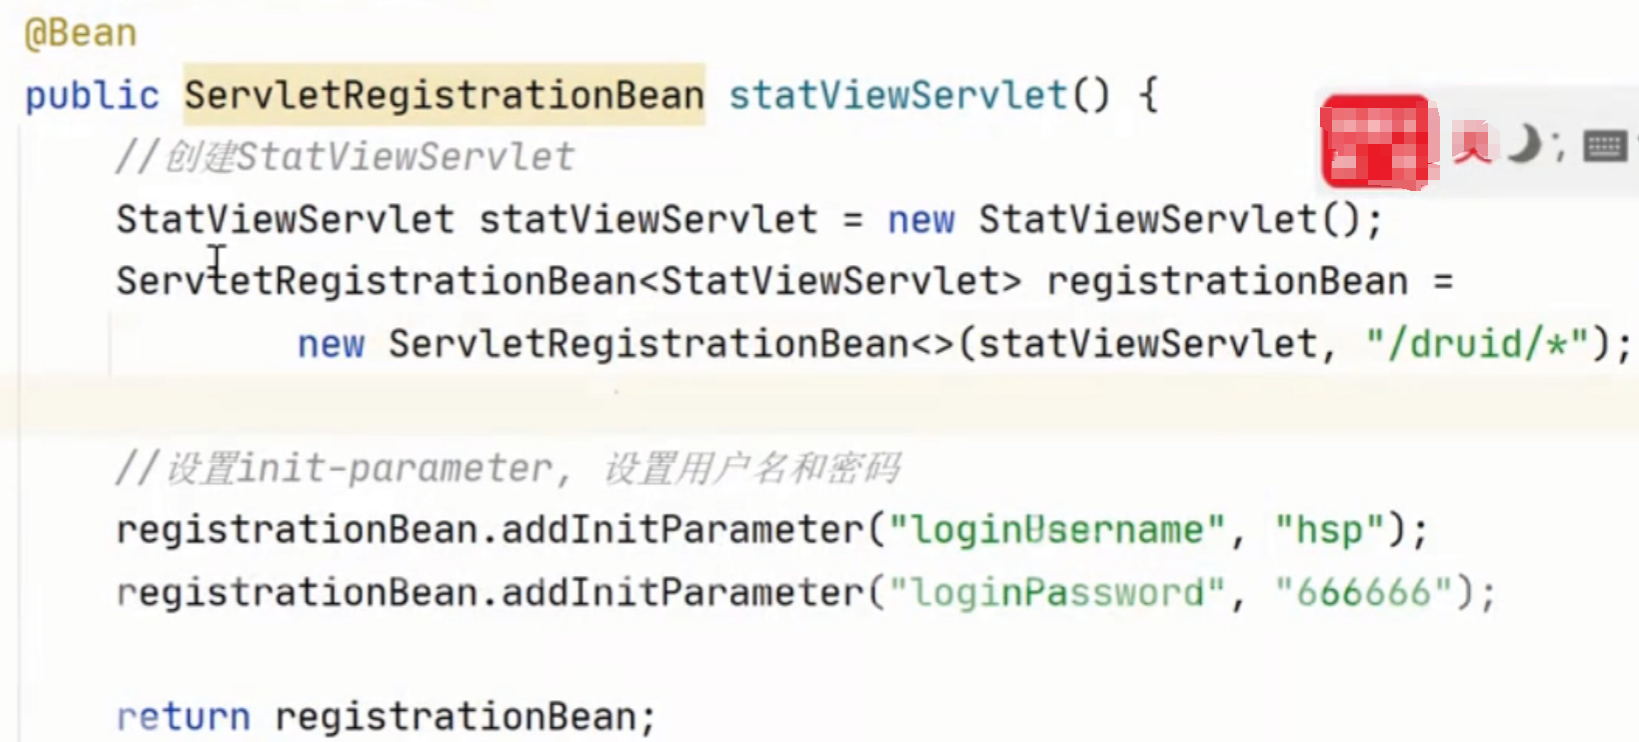
Druid 监控功能
web.xml方式
application.yml方式
        <dependency>
            <groupId>com.alibaba</groupId>
            <artifactId>druid-spring-boot-starter</artifactId>
            <version>1.2.6</version>
        </dependency>
yml 配置文件
  datasource:
    url: jdbc:mysql://localhost:3306/your_database?useUnicode=true&characterEncoding=UTF-8&useSSL=false
    username: your_username
    password: your_password
    driver-class-name: com.mysql.cj.jdbc.Driver
    druid.stat-view-servlet.enabled: true
    druid.stat-view-servlet.url-pattern: /druid/*
    druid.stat-view-servlet.login-username: admin
    druid.stat-view-servlet.login-password: admin123
    druid:
      filters: stat,log4j
      connection-properties: druid.stat.mergeSql=true
      // web关联监控
      web-stat-filter:
        enabled: true
        url-pattern: /*
        exclusions: "*.js,*.gif,*.jpg,*.png,*.css,*.ico,/druid/*"
        session-stat-enable: true
Sql防火墙
filters: stat,log4j,wallspringboot 整合mybatis
 <!--引入mybatis-->
<dependency>
    <groupId>org.mybatis.spring.boot</groupId>
    <artifactId>mybatis-spring-boot-starter</artifactId>
    <version> 2.1.4</version>
</dependency>
mybatis:
mapper-locations: classpath:mapper/*.xml
# config-location: 这里可以zai配置文件,比如mybatis-config.xml
# typeAliasesPackage: com.your_package.entity 这里可以指定实体类所在的包
# log-impl: org.apache.ibatis.logging.stdout.StdOutImpl # 这里可以指定日志输出方式springboot 整合 mybatisPlus
1. MyBatis和MyBatis-Plus的区别
1.1 MyBatis
手动编写SQL:MyBatis要求开发者手动编写SQL语句,并映射到Java对象。通过Mapper接口和XML映射文件来完成操作,灵活性高,但开发工作量较大。
高度自定义:你可以完全自定义SQL查询、更新、删除操作。
复杂性:对于一些常见的增删改查(CRUD)操作,你需要编写重复的SQL语句。
1.2 MyBatis-Plus
简化CRUD操作:MyBatis-Plus是对MyBatis的增强,提供了一些通用的方法来简化常见的CRUD操作。你不再需要手动编写复杂的SQL语句,框架提供了预定义的方法来处理常见的数据库操作。
自动生成SQL:MyBatis-Plus能够自动生成大部分的SQL语句,无需开发者编写。
条件构造器:MyBatis-Plus提供了条件构造器(Wrapper),使得动态查询的构建变得更简单。
内置分页插件:MyBatis-Plus提供了分页插件,简化分页操作。
性能优化:MyBatis-Plus默认开启了性能分析插件,可以打印执行的SQL语句,帮助分析性能问题。
自定义方法:虽然MyBatis-Plus提供了很多通用方法,但你依然可以根据需求自定义SQL操作。
2. MyBatis-Plus的代码示例
2.1 引入MyBatis-Plus依赖
首先,需要在pom.xml文件中引入MyBatis-Plus的依赖:
xml<dependencies>
    <!-- MyBatis-Plus Starter -->
    <dependency>
        <groupId>com.baomidou</groupId>
        <artifactId>mybatis-plus-boot-starter</artifactId>
        <version>3.5.3</version>
    </dependency>

    <!-- MySQL Driver -->
    <dependency>
        <groupId>mysql</groupId>
        <artifactId>mysql-connector-java</artifactId>
        <version>8.0.26</version>
    </dependency>

    <!-- Spring Boot Starter -->
    <dependency>
        <groupId>org.springframework.boot</groupId>
        <artifactId>spring-boot-starter-data-jpa</artifactId>
    </dependency>
</dependencies>
2.2 创建实体类和Mapper接口
假设我们有一个User实体类,代表数据库中的user表:
java@Data // Lombok注解,自动生成getter/setter
public class User {
    private Long id;
    private String name;
    private Integer age;
    private String email;
}
2.3 使用MyBatis-Plus的Mapper接口 (Mapper)
在MyBatis中,我们通常需要写一个XML映射文件来定义SQL查询。但在MyBatis-Plus中,我们只需要继承BaseMapper接口即可,框架会自动生成常见的SQL操作。
javaimport com.baomidou.mybatisplus.core.mapper.BaseMapper;

public interface UserMapper extends BaseMapper<User> {
    // 可以在这里定义自定义的查询方法,MyBatis-Plus会自动处理常见的CRUD操作
}
2.4 使用MyBatis-Plus提供的通用方法
在MyBatis中,操作数据库时通常需要编写具体的SQL语句。而在MyBatis-Plus中,我们可以通过继承BaseMapper接口,直接使用框架提供的通用方法来执行常见的数据库操作。
示例:查询所有用户
javaimport org.springframework.beans.factory.annotation.Autowired;
import org.springframework.stereotype.Service;
import java.util.List;

@Service
public class UserService {

    @Autowired
    private UserMapper userMapper;

    public List<User> getAllUsers() {
        return userMapper.selectList(null); // selectList(null) 查询所有用户
    }
}
示例:根据条件查询用户
MyBatis-Plus提供了一个条件构造器QueryWrapper,可以方便地构建SQL查询条件:
javaimport com.baomidou.mybatisplus.core.conditions.query.QueryWrapper;

public List<User> getUsersByAge(Integer age) {
    QueryWrapper<User> queryWrapper = new QueryWrapper<>();
    queryWrapper.eq("age", age); // 查询年龄为指定值的用户
    return userMapper.selectList(queryWrapper);
}
示例:分页查询
MyBatis-Plus提供了内置的分页插件,可以轻松实现分页查询。只需要调用Page类即可。
javaimport com.baomidou.mybatisplus.extension.plugins.pagination.Page;

public List<User> getUsersByPage(int pageNum, int pageSize) {
    Page<User> page = new Page<>(pageNum, pageSize); // 分页查询
    Page<User> resultPage = userMapper.selectPage(page, null); // selectPage方法自动处理分页
    return resultPage.getRecords(); // 获取查询结果
}
2.5 插件配置
MyBatis-Plus还支持配置分页插件、性能分析插件等。
javaimport com.baomidou.mybatisplus.extension.plugins.PaginationInterceptor;
import org.springframework.context.annotation.Bean;
import org.springframework.context.annotation.Configuration;

@Configuration
public class MybatisPlusConfig {

    @Bean
    public PaginationInterceptor paginationInterceptor() {
        return new PaginationInterceptor();
    }
}
2.6 接口继承(service)
public interface MonsterService extends IService<Monster> {

}  // 提供大量接口实现
2.7 接口的实现类(Imp)
public class MonsterServiceImpl extends ServiceImpl<MonsterMapper,Monster> implements MonsterService {

}
3. 总结
MyBatis:需要手动编写SQL语句,可以完全自定义,但开发工作量较大。
MyBatis-Plus:提供了很多开箱即用的功能(如自动生成SQL、通用CRUD方法、分页插件等),减少了开发者编写SQL的工作量,尤其适用于常见的增删改查场景。见的CRUD操作 }
MyBatisX插件

SpringBoot
本文采用 CC BY-NC-SA 4.0 许可协议,转载请注明出处。
评论交流
欢迎留下你的想法