


什么是redis
Redis(Remote Dictionary Server)是一个开源的、高性能的、基于内存的数据结构存储系统,广泛用于缓存、消息队列、实时分析等场景。它支持多种数据结构,如字符串、哈希、列表、集合、有序集合等,能够以极快的速度处理大量的数据请求。Redis 是一种键值对(key-value)存储系统,但与传统的键值存储不同,它提供了丰富的数据类型和操作命令,使其更加灵活和功能强大。
Redis 的主要特点:
内存存储: Redis 是一个内存数据库,它的数据存储在 RAM 中,因此读写速度极快。尽管数据存储在内存中,Redis 也提供了持久化功能(AOF 和 RDB),允许数据备份到磁盘。
丰富的数据结构: Redis 支持多种数据结构,而不仅仅是简单的字符串。常见的数据结构包括:
String:简单的字符串类型。
List:双端链表,支持快速的插入和删除。
Set:集合,不允许重复元素,支持集合的并集、交集等操作。
Sorted Set(有序集合):集合元素带有分数(score),集合中的元素会根据分数排序。
Hash:类似于 Python 中的字典,可以存储多个字段和对应的值。
Bitmaps:位图操作,可以用来进行快速的位操作。
HyperLogLog:用于进行基数统计,尤其在大数据量情况下用于计算唯一元素的估算。
Geospatial:支持地理位置数据存储和计算。
高性能: Redis 的读写速度非常快,可以每秒处理数百万次操作。它通过将数据存储在内存中,并通过单线程的事件驱动机制来减少线程切换的开销,从而提供非常高的性能。
持久化机制: Redis 提供了两种持久化选项:
RDB(快照持久化):定期将数据库的状态保存到磁盘。
AOF(追加文件持久化):记录每次写操作,能够提供更高的数据安全性。也可以将 RDB 和 AOF 配合使用,以达到更高的持久化可靠性。
原子操作: Redis 支持多种原子操作,可以保证数据的一致性。例如,Redis 提供的
INCR、DECR、LPUSH、SADD等操作都可以保证在并发环境下的一致性。高可用和集群支持: Redis 提供了主从复制功能,能够通过主节点和多个从节点来实现数据的冗余备份和高可用。Redis 也支持分片(Redis Cluster),可以将数据分布到多个 Redis 实例中,从而实现水平扩展。
事务支持: Redis 提供了事务机制,通过 MULTI、EXEC、DISCARD 和 WATCH 命令支持事务的批量操作和事务的监视。
发布/订阅模式: Redis 支持发布/订阅功能,可以让多个客户端订阅某个频道,当有消息发布到该频道时,所有订阅者都会接收到消息。
Lua 脚本: Redis 支持 Lua 脚本,可以将多个 Redis 命令组合成一个脚本在服务器端执行,保证原子性。
Redis 的常见应用场景:
缓存: Redis 作为缓存数据库广泛应用。其高性能的特点使得它非常适合用于存储热数据,减少数据库的访问压力,提升系统响应速度。
消息队列: Redis 提供的列表(List)和发布/订阅(Pub/Sub)功能使得它可以作为一个高效的消息队列系统,用于异步处理任务。
实时分析和计数: Redis 可以存储和操作实时的数据,如统计网站的访客数、活跃用户数等。HyperLogLog 和 Sorted Set 等数据结构为实时分析提供了极大的便利。
会话存储: Redis 的快速读写操作使它非常适合作为 Web 应用的会话存储,特别是在需要高并发的场景下。
分布式锁: Redis 通过提供原子操作和键的过期机制,可以实现分布式锁,避免在多个进程或服务间的竞争条件。
排行榜和计分板: 使用 Redis 的有序集合(Sorted Set),可以非常方便地实现排行榜和计分板功能,支持快速的排名计算。
Redis 的优点与缺点:
优点:
高性能:Redis 的操作非常快速,能够满足高并发、低延迟的需求。
灵活的数据模型:支持多种数据类型,提供多种数据操作,能够适应各种复杂的应用需求。
丰富的功能:除了基本的键值存储外,Redis 还提供了事务、发布订阅、Lua 脚本等多种强大功能。
持久化支持:Redis 提供了不同的持久化选项,能够平衡性能和数据持久化的需求。
支持分布式:Redis 支持主从复制、分片和集群,能够满足分布式和高可用的需求。
缺点:
内存限制:由于 Redis 是基于内存的数据库,存储数据的量受限于服务器的内存容量。
单线程:虽然 Redis 的单线程模型带来了高效的处理能力,但它不适合某些 CPU 密集型任务,且在多核系统上无法完全利用硬件优势。
数据持久化存在风险:虽然 Redis 提供了持久化机制,但由于是内存数据库,在极端情况下(如服务器崩溃时)可能会丢失部分数据。
总结:
Redis 是一款功能强大、性能卓越的内存数据存储系统,广泛用于缓存、消息队列、会话管理、实时数据处理等场景。它的高性能、丰富的数据结构和强大的扩展性使其成为现代互联网架构中的核心组件之一。然而,在使用时也需要注意内存管理和持久化策略,以确保数据的安全和系统的稳定。
Redis 命令(文档 https://redis.com.cn/)
键(Key)命令
Redis 是 key-value 型数据库,键(Key)命令是 Redis 中经常使用的命令。常用的键命令如下所示:
String 命令
Strings(字符串)结构是 Redis 的基本数据类型,值value是字符串类型,常用命令:
Hash 命令
Hash(哈希散列)是 Redis 基本数据类型,值value 中存储的是 hash 表。Hash 特别适合用于存储对象。常用的命令:
List 命令
List 是 Redis 中最常用数据类型。值value 中存储的是列表。:
Set 命令
Zset 命令
下表列出了 Redis 有序集合的基本命令
Redis 管理 redis 服务相关命令
下表列出了管理 redis 服务相关的命令
Redis 发布订阅命令
下表列出了列表相关命令:
Redis 事务命令
下表列出了 Redis 事务的相关命令
Redis 连接命令
下表列出了用于 Redis 连接相关的命令
Redis 脚本 命令
Redis HyperLogLog 命令
Redis 发布订阅 命令
Redis 地理位置(geo) 命令
redis配置文档
################################### NETWORK ###################################
# 指定 redis 只接收来自于该IP地址的请求,如果不进行设置,那么将处理所有请求
bind 127.0.0.1
#是否开启保护模式,默认开启。要是配置里没有指定bind和密码。
#开启该参数后,redis只会本地进行访问,拒绝外部访问。要是开启了密码和bind,可以开启。否则最好关闭,设置为no
protected-mode yes
#redis监听的端口号
port 6379
#此参数确定了TCP连接中已完成队列(完成三次握手之后)的长度, 当然此值必须不大于Linux系统定义的/proc/sys/net/core/somaxconn值,默认是511,而Linux的默认参数值是128。
#当系统并发量大并且客户端速度缓慢的时候,可以将这二个参数一起参考设定。该内核参数默认值一般是128,对于负载很大的服务程序来说大大的不够。一般会将它修改为2048或者更大。
#在/etc/sysctl.conf中添加:net.core.somaxconn = 2048,然后在终端中执行sysctl -p
tcp-backlog 511
#此参数为设置客户端空闲超过timeout,服务端会断开连接,为0则服务端不会主动断开连接,不能小于0
timeout 0
#tcp keepalive参数。如果设置不为0,就使用配置tcp的SO_KEEPALIVE值,使用keepalive有两个好处:检测挂掉的对端。降低中间设备出问题而导致网络看似连接却已经与对端端口的问题。在Linux内核中,设置了keepalive,redis会定时给对端发送ack。
#检测到对端关闭需要两倍的设置值
tcp-keepalive 300
#是否在后台执行,yes:后台运行;no:不是后台运行
daemonize yes
#redis的进程文件
pidfile /var/run/redis/redis.pid
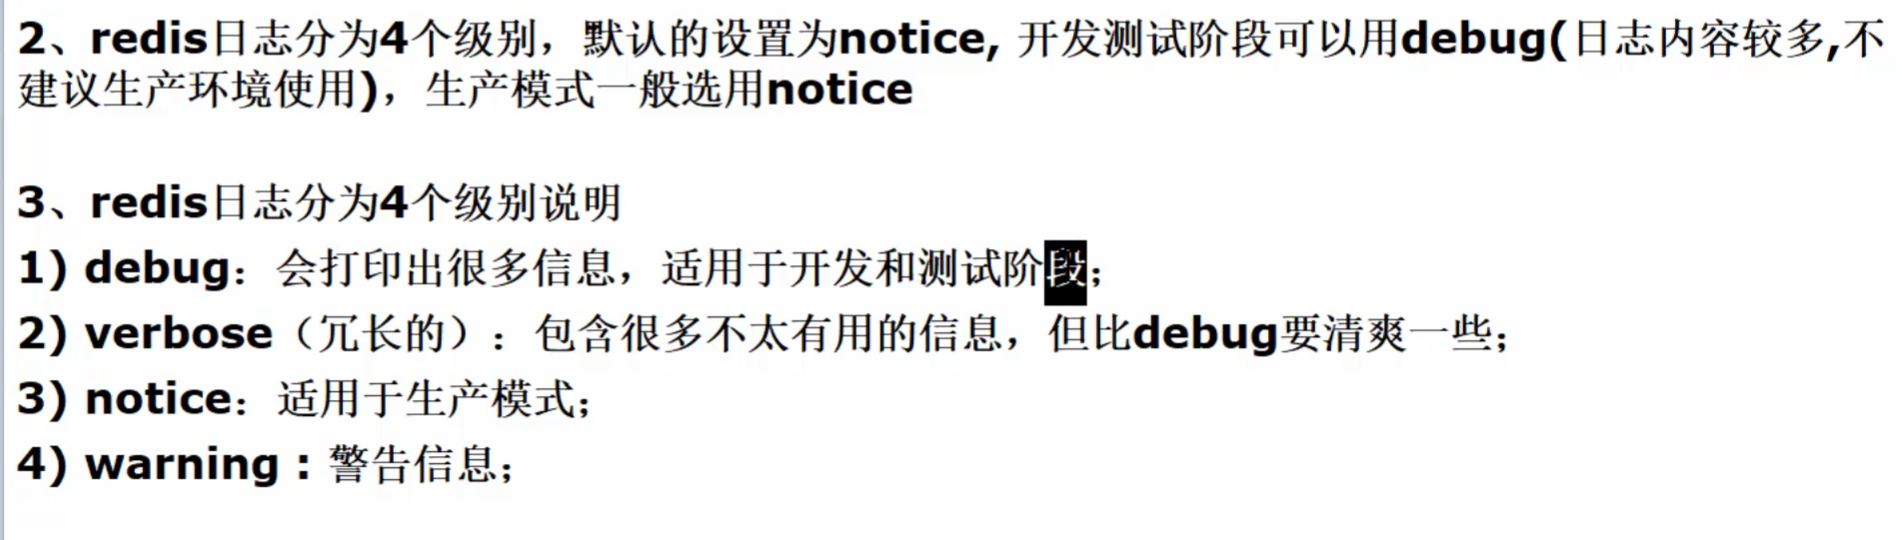
#指定了服务端日志的级别。级别包括:debug(很多信息,方便开发、测试),verbose(许多有用的信息,但是没有debug级别信息多),notice(适当的日志级别,适合生产环境),warn(只有非常重要的信息)
loglevel notice
#指定了记录日志的文件。空字符串的话,日志会打印到标准输出设备。后台运行的redis标准输出是/dev/null
logfile /usr/local/redis/var/redis.log
#是否打开记录syslog功能
# syslog-enabled no
#syslog的标识符。
# syslog-ident redis
#日志的来源、设备
# syslog-facility local0
#数据库的数量,默认使用的数据库是0。可以通过”SELECT 【数据库序号】“命令选择一个数据库,序号从0开始
databases 16
_
################################# SNAPSHOTTING #################################
_
################################### SNAPSHOTTING ###################################
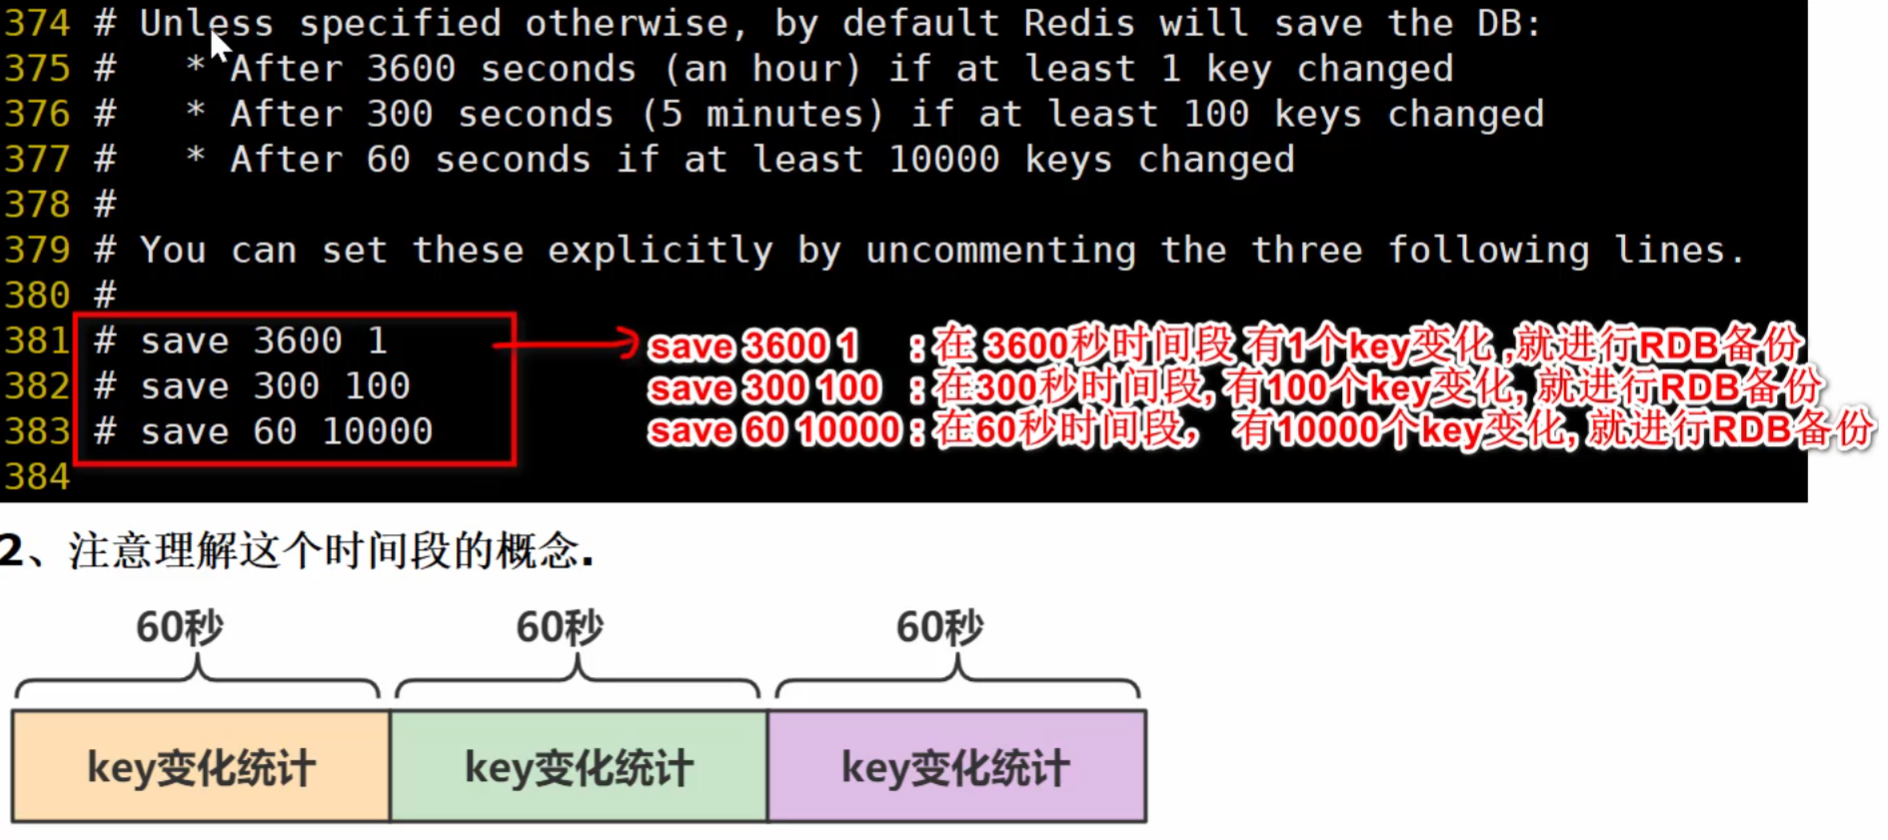
#RDB核心规则配置 save <指定时间间隔> <执行指定次数更新操作>,满足条件就将内存中的数据同步到硬盘中。
#官方出厂配置默认是 900秒内有1个更改,300秒内有10个更改以及60秒内有10000个更改,则将内存中的数据快照写入磁盘。
#若不想用RDB方案,可以把 save "" 的注释打开,下面三个注释
save 900 1
save 300 10
save 60 10000
#当RDB持久化出现错误后,是否依然进行继续进行工作,yes:不能进行工作,no:可以继续进行工作,可以通过info中的rdb_last_bgsave_status了解RDB持久化是否有错误
stop-writes-on-bgsave-error yes
#配置存储至本地数据库时是否压缩数据,默认为yes。Redis采用LZF压缩方式,但占用了一点CPU的时间。
#若关闭该选项,但会导致数据库文件变的巨大。建议开启。
rdbcompression yes
#是否校验rdb文件;从rdb格式的第五个版本开始,在rdb文件的末尾会带上CRC64的校验和。
#这跟有利于文件的容错性,但是在保存rdb文件的时候,会有大概10%的性能损耗,所以如果你追求高性能,可以关闭该配置
rdbchecksum yes
#指定本地数据库文件名,一般采用默认的 dump.rdb
dbfilename dump.rdb
#数据目录,数据库的写入会在这个目录。rdb、aof文件也会写在这个目录
dir /usr/local/redis/var
_
################################# REPLICATION #################################
_
################################# REPLICATION #################################
# 复制选项,slave复制对应的master。
# replicaof <masterip> <masterport>
#如果master设置了requirepass,那么slave要连上master,需要有master的密码才行。
#masterauth就是用来配置master的密码,这样可以在连上master后进行认证。
# masterauth <master-password>
#当从库同主机失去连接或者复制正在进行,从机库有两种运行方式:
#1) 如果slave-serve-stale-data设置为yes(默认设置),从库会继续响应客户端的请求。
#2) 如果slave-serve-stale-data设置为no,INFO,replicaOF, AUTH, PING, SHUTDOWN, REPLCONF, ROLE, CONFIG,SUBSCRIBE, UNSUBSCRIBE,
#PSUBSCRIBE, PUNSUBSCRIBE, PUBLISH, PUBSUB,COMMAND, POST, HOST: and LATENCY命令之外的任何请求都会返回一个错误”SYNC with master in progress”。
replica-serve-stale-data yes
#作为从服务器,默认情况下是只读的(yes),可以修改成NO,用于写(不建议)
#replica-read-only yes
# 是否使用socket方式复制数据。目前redis复制提供两种方式,disk和socket。
#如果新的slave连上来或者重连的slave无法部分同步,就会执行全量同步,master会生成rdb文件。
#有2种方式:
#disk方式是master创建一个新的进程把rdb文件保存到磁盘,再把磁盘上的rdb文件传递给slave。disk方式的时候,当一个rdb保存的过程中,多个slave都能共享这个rdb文件。
#socket是master创建一个新的进程,直接把rdb文件以socket的方式发给slave。socket的方式就的一个个slave顺序复制。
#在磁盘速度缓慢,网速快的情况下推荐用socket方式。
repl-diskless-sync no
#diskless复制的延迟时间,防止设置为0。一旦复制开始,节点不会再接收新slave的复制请求直到下一个rdb传输。
所以最好等待一段时间,等更多的slave连上来
repl-diskless-sync-delay 5
#slave根据指定的时间间隔向服务器发送ping请求。时间间隔可以通过 repl_ping_slave_period 来设置,默认10秒。
# repl-ping-slave-period 10
# 复制连接超时时间。master和slave都有超时时间的设置。
#master检测到slave上次发送的时间超过repl-timeout,即认为slave离线,清除该slave信息。
#slave检测到上次和master交互的时间超过repl-timeout,则认为master离线。
#需要注意的是repl-timeout需要设置一个比repl-ping-slave-period更大的值,不然会经常检测到超时
# repl-timeout 60
#是否禁止复制tcp链接的tcp nodelay参数,可传递yes或者no。默认是no,即使用tcp nodelay。
#如果master设置了yes来禁止tcp nodelay设置,在把数据复制给slave的时候,会减少包的数量和更小的网络带宽。
#但是这也可能带来数据的延迟。默认我们推荐更小的延迟,但是在数据量传输很大的场景下,建议选择yes
repl-disable-tcp-nodelay no
#复制缓冲区大小,这是一个环形复制缓冲区,用来保存最新复制的命令。
#这样在slave离线的时候,不需要完全复制master的数据,如果可以执行部分同步,只需要把缓冲区的部分数据复制给slave,就能恢复正常复制状态。
#缓冲区的大小越大,slave离线的时间可以更长,复制缓冲区只有在有slave连接的时候才分配内存。
#没有slave的一段时间,内存会被释放出来,默认1m
# repl-backlog-size 1mb
# master没有slave一段时间会释放复制缓冲区的内存,repl-backlog-ttl用来设置该时间长度。单位为秒。
# repl-backlog-ttl 3600
# 当master不可用,Sentinel会根据slave的优先级选举一个master。
#最低的优先级的slave,当选master。而配置成0,永远不会被选举
replica-priority 100
#redis提供了可以让master停止写入的方式,如果配置了min-replicas-to-write,健康的slave的个数小于N,mater就禁止写入。
#master最少得有多少个健康的slave存活才能执行写命令。
#这个配置虽然不能保证N个slave都一定能接收到master的写操作,但是能避免没有足够健康的slave的时候,master不能写入来避免数据丢失。
#设置为0是关闭该功能
# min-replicas-to-write 3
# 延迟小于min-replicas-max-lag秒的slave才认为是健康的slave
# min-replicas-max-lag 10
# min-replicas-max-lag 设置1或设置0禁用这个特性。
# Setting one or the other to 0 disables the feature.
# By default min-replicas-to-write is set to 0 (feature disabled) and
# min-replicas-max-lag is set to 10.
_
################################# SECURITY #################################
_
#requirepass配置可以让用户使用AUTH命令来认证密码,才能使用其他命令。
#这让redis可以使用在不受信任的网络中。为了保持向后的兼容性,可以注释该命令,因为大部分用户也不需要认证。
#使用requirepass的时候需要注意,因为redis太快了,每秒可以认证15w次密码,简单的密码很容易被攻破,所以最好使用一个更复杂的密码
# requirepass foobared
#把危险的命令给修改成其他名称。比如CONFIG命令可以重命名为一个很难被猜到的命令,这样用户不能使用,而内部工具还能接着使用
# rename-command CONFIG b840fc02d524045429941cc15f59e41cb7be6c52
#设置成一个空的值,可以禁止一个命令
# rename-command CONFIG ""
_
################################# CLIENTS #################################
# 设置能连上redis的最大客户端连接数量。默认是10000个客户端连接。
# 由于redis不区分连接是客户端连接还是内部打开文件或者和slave连接等,所以maxclients最小建议设置到32。
# 如果超过了maxclients,redis会给新的连接发送’max number of clients reached’,并关闭连接
# maxclients 10000
####################### MEMORY MANAGEMENT ##########################
_
#设置redis使用内存字节数,当达到内存最大值时,redis会根据选择的逐出策略尝试删除key(详细参阅maxmemory策略)
#
maxmemory <bytes>
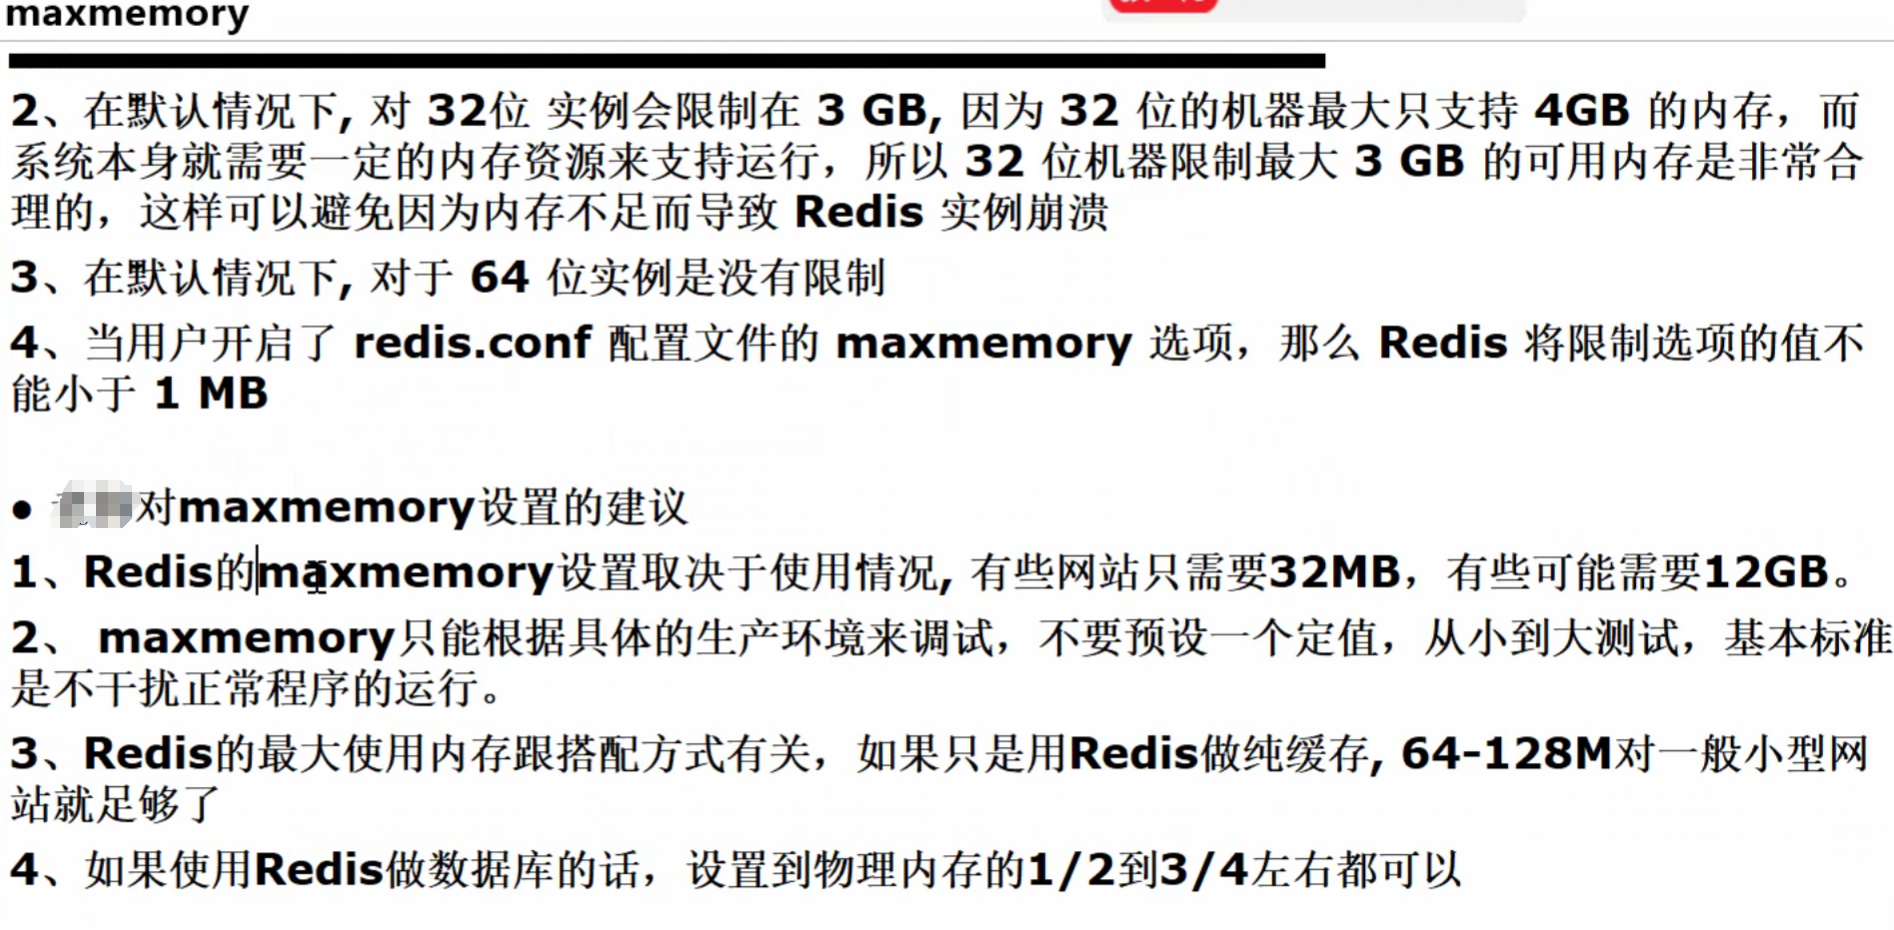
#redis配置的最大内存容量。当内存满了,需要配合maxmemory-policy策略进行处理。
#注意slave的输出缓冲区是不计算在maxmemory内的。所以为了防止主机内存使用完,建议设置的maxmemory需要更小一些maxmemory 122000000
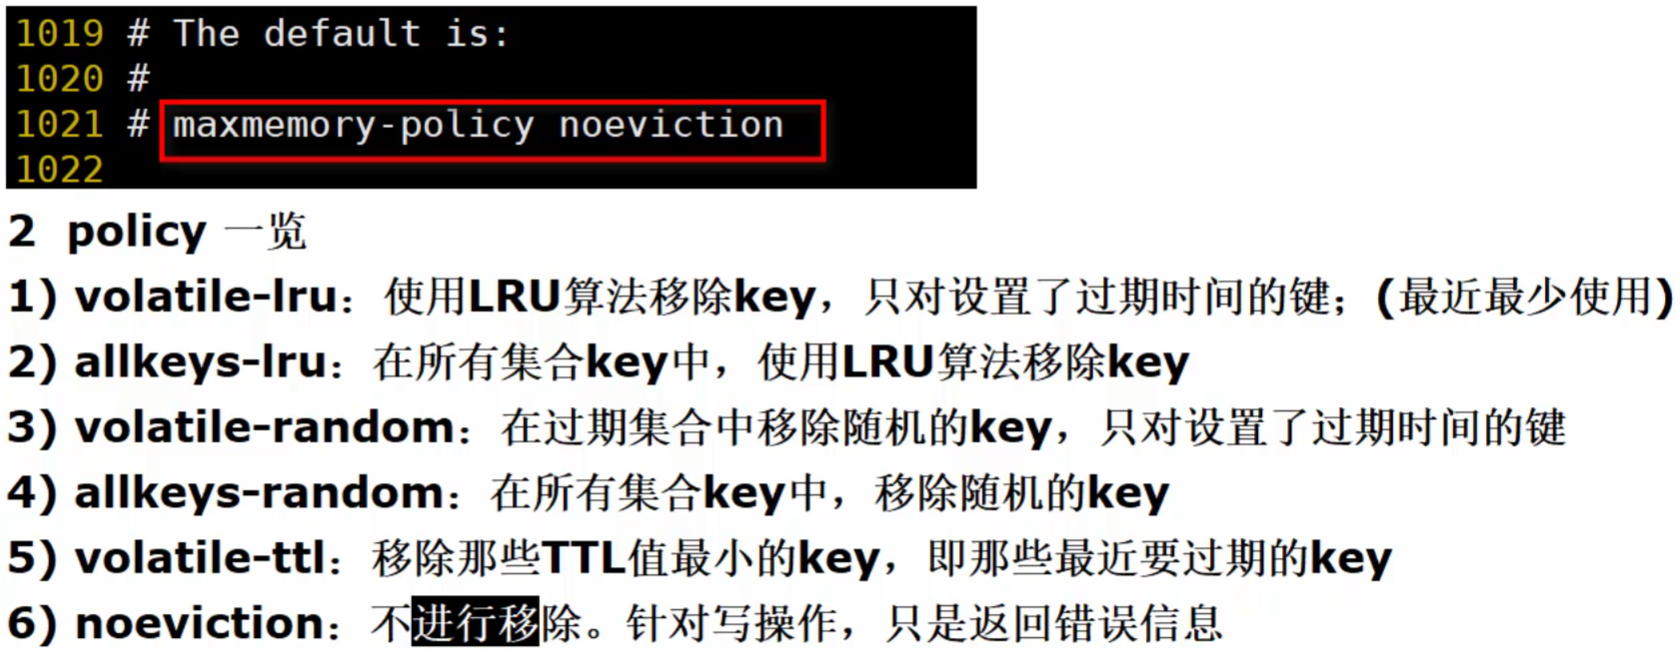
#内存容量超过maxmemory后的处理策略。
#volatile-lru:利用LRU算法移除设置过过期时间的key。
#volatile-random:随机移除设置过过期时间的key。
#volatile-ttl:移除即将过期的key,根据最近过期时间来删除(辅以TTL)
#allkeys-lru:利用LRU算法移除任何key。
#allkeys-random:随机移除任何key。
#noeviction:不移除任何key,只是返回一个写错误。
#上面的这些驱逐策略,如果redis没有合适的key驱逐,对于写命令,还是会返回错误。
#并且redis将不再接收写请求,只接收get请求。
#写命令包括:set setnx setex append incr decr rpush lpush rpushx lpushx linsert lset rpoplpush sadd
# sinter sinterstore sunion sunionstore sdiff sdiffstore zadd zincrby zunionstore zinterstore hset
# hsetnx hmset hincrby incrby decrby getset mset msetnx exec sort。
# maxmemory-policy noeviction
# lru检测的样本数。使用lru或者ttl淘汰算法,从需要淘汰的列表中随机选择sample个key,选出闲置时间最长的key移除
# maxmemory-samples 5
# 是否开启salve的最大内存
# replica-ignore-maxmemory yes
########################## LAZY FREEING #############################
#以非阻塞方式释放内存
#使用以下配置指令调用了
lazyfree-lazy-eviction no
lazyfree-lazy-expire no
lazyfree-lazy-server-del no
replica-lazy-flush no
######################## APPEND ONLY MODE ###########################
#Redis 默认不开启。它的出现是为了弥补RDB的不足(数据的不一致性),所以它采用日志的形式来记录每个写操作,并追加到文件中。
#Redis 重启的会根据日志文件的内容将写指令从前到后执行一次以完成数据的恢复工作默认redis使用的是rdb方式持久化,这种方式在许多应用中已经足够用了。
#但是redis如果中途宕机,会导致可能有几分钟的数据丢失,根据save来策略进行持久化,Append Only File是另一种持久化方式,可以提供更好的持久化特性。
#Redis会把每次写入的数据在接收后都写入 appendonly.aof 文件,每次启动时Redis都会先把这个文件的数据读入内存里,先忽略RDB文件。
#若开启rdb则将no改为yes
appendonly no
#指定本地数据库文件名,默认值为 appendonly.aof
appendfilename "appendonly.aof"
#aof持久化策略的配置
#no表示不执行fsync,由操作系统保证数据同步到磁盘,速度最快
#always表示每次写入都执行fsync,以保证数据同步到磁盘
#everysec表示每秒执行一次fsync,可能会导致丢失这1s数据
# appendfsync always
appendfsync everysec
# appendfsync no
# 在aof重写或者写入rdb文件的时候,会执行大量IO,此时对于everysec和always的aof模式来说,执行fsync会造成阻塞过长时间,no-appendfsync-on-rewrite字段设置为默认设置为no。
#如果对延迟要求很高的应用,这个字段可以设置为yes,否则还是设置为no,这样对持久化特性来说这是更安全的选择。
#设置为yes表示rewrite期间对新写操作不fsync,暂时存在内存中,等rewrite完成后再写入,默认为no,建议yes。
#Linux的默认fsync策略是30秒。可能丢失30秒数据
no-appendfsync-on-rewrite no
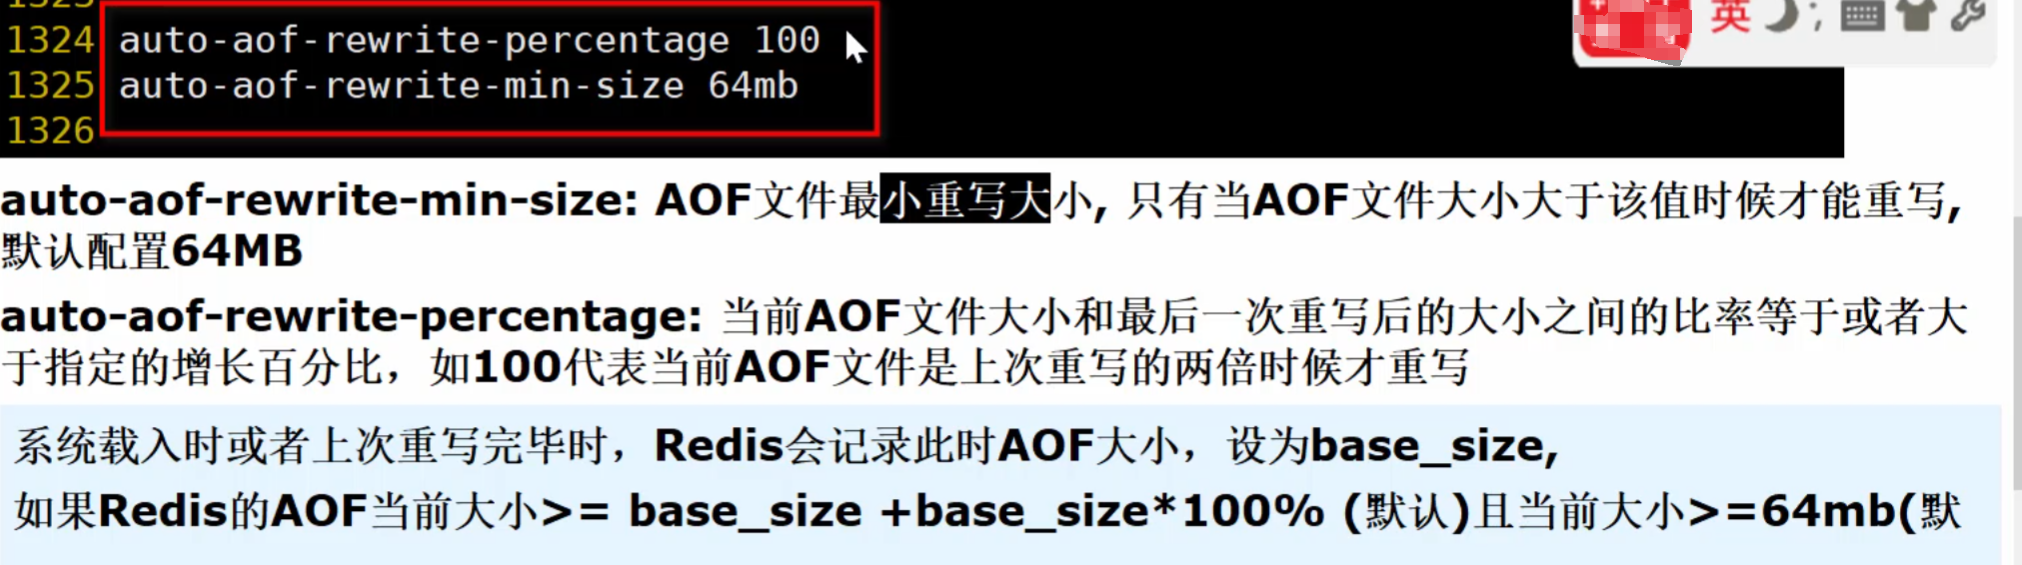
#aof自动重写配置。当目前aof文件大小超过上一次重写的aof文件大小的百分之多少进行重写,即当aof文件增长到一定大小的时候Redis能够调用bgrewriteaof对日志文件进行重写。
#当前AOF文件大小是上次日志重写得到AOF文件大小的二倍(设置为100)时,自动启动新的日志重写过程
auto-aof-rewrite-percentage 100
#设置允许重写的最小aof文件大小,避免了达到约定百分比但尺寸仍然很小的情况还要重写
auto-aof-rewrite-min-size 64mb
#aof文件可能在尾部是不完整的,当redis启动的时候,aof文件的数据被载入内存。
#重启可能发生在redis所在的主机操作系统宕机后,尤其在ext4文件系统没有加上data=ordered选项(redis宕机或者异常终止不会造成尾部不完整现象。)
#出现这种现象,可以选择让redis退出,或者导入尽可能多的数据。
#如果选择的是yes,当截断的aof文件被导入的时候,会自动发布一个log给客户端然后load。
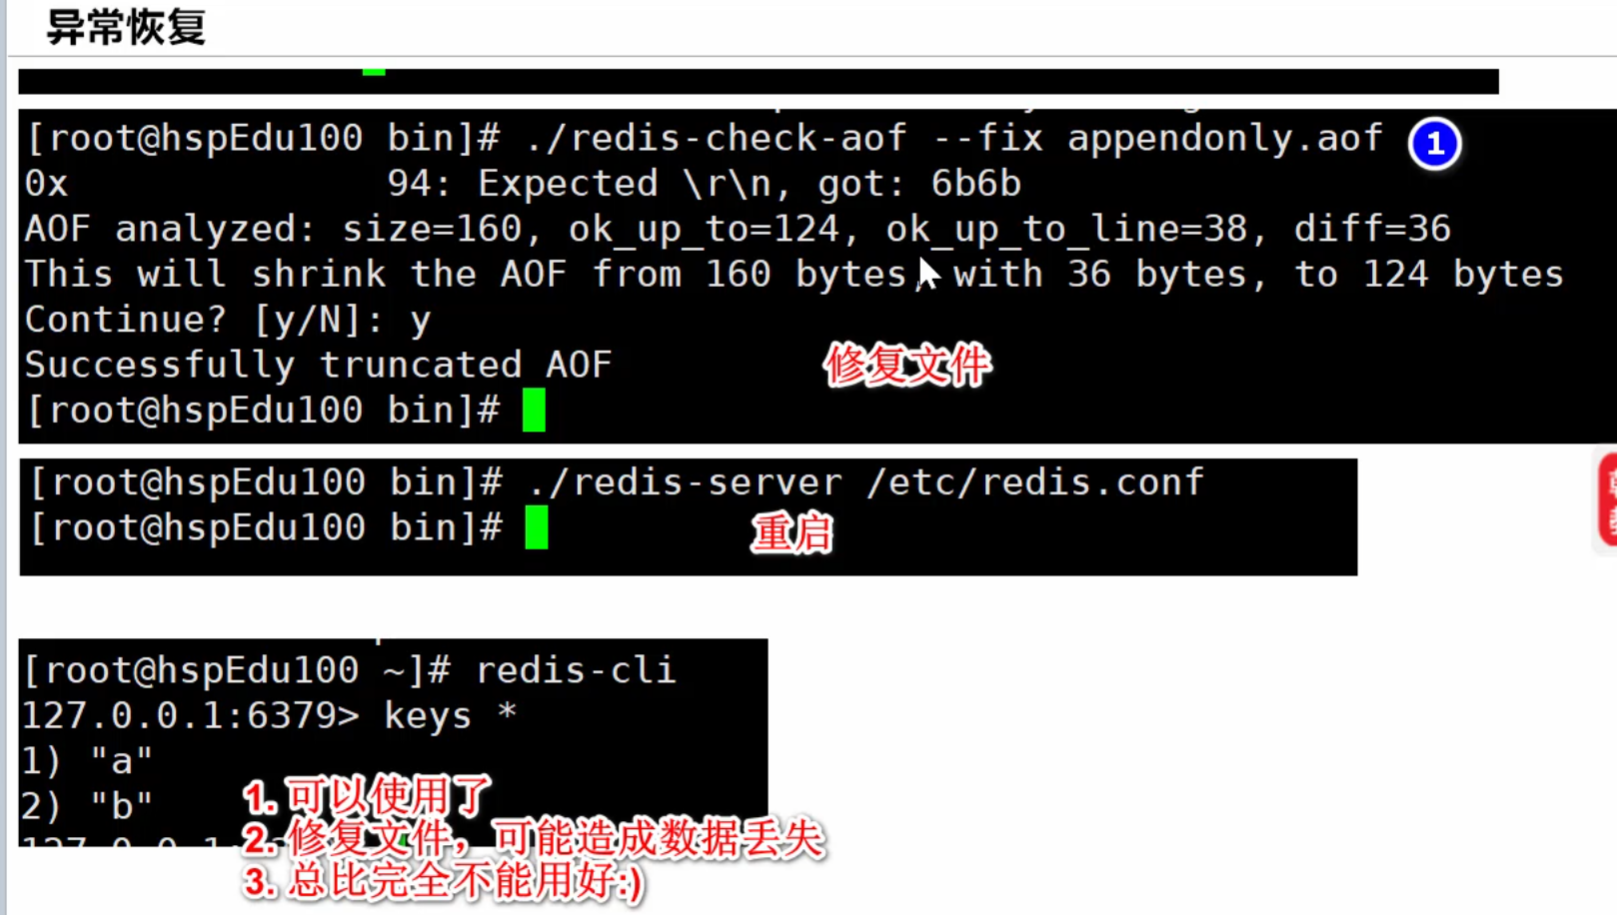
#如果是no,用户必须手动redis-check-aof修复AOF文件才可以
aof-load-truncated yes
#加载redis时,可以识别AOF文件以“redis”开头。
#字符串并加载带前缀的RDB文件,然后继续加载AOF尾巴
aof-use-rdb-preamble yes
_
######################### LUA SCRIPTING ############################
# 如果达到最大时间限制(毫秒),redis会记个log,然后返回error。
#当一个脚本超过了最大时限。只有SCRIPT KILL和SHUTDOWN NOSAVE可以用。
#第一个可以杀没有调write命令的东西。要是已经调用了write,只能用第二个命令杀
lua-time-limit 5000
######################### REDIS CLUSTER ############################
_
# 集群开关,默认是不开启集群模式
# cluster-enabled yes
#集群配置文件的名称,每个节点都有一个集群相关的配置文件,持久化保存集群的信息。
#这个文件并不需要手动配置,这个配置文件有Redis生成并更新,每个Redis集群节点需要一个单独的配置文件,请确保与实例运行的系统中配置文件名称不冲突
# cluster-config-file nodes-6379.conf
#节点互连超时的阀值。集群节点超时毫秒数
# cluster-node-timeout 15000
#在进行故障转移的时候,全部slave都会请求申请为master,但是有些slave可能与master断开连接一段时间了,导致数据过于陈旧,这样的slave不应该被提升为master。
#该参数就是用来判断slave节点与master断线的时间是否过长。判断方法是:
#比较slave断开连接的时间和(node-timeout * slave-validity-factor) + repl-ping-slave-period
#如果节点超时时间为三十秒, 并且slave-validity-factor为10,假设默认的repl-ping-slave-period是10秒,即如果超过310秒slave将不会尝试进行故障转移
# cluster-replica-validity-factor 10
# master的slave数量大于该值,slave才能迁移到其他孤立master上,如这个参数若被设为2,那么只有当一个主节点拥有2 个可工作的从节点时,它的一个从节点会尝试迁移
# cluster-migration-barrier 1
#默认情况下,集群全部的slot有节点负责,集群状态才为ok,才能提供服务。
#设置为no,可以在slot没有全部分配的时候提供服务。
#不建议打开该配置,这样会造成分区的时候,小分区的master一直在接受写请求,而造成很长时间数据不一致
# cluster-require-full-coverage yes
_
#################### CLUSTER DOCKER/NAT support #######################
_
#*群集公告IP
#*群集公告端口
#*群集公告总线端口
# Example:
# cluster-announce-ip 10.1.1.5
# cluster-announce-port 6379
# cluster-announce-bus-port 6380
_
############################# SLOW LOG #################################
_
# slog log是用来记录redis运行中执行比较慢的命令耗时。
#当命令的执行超过了指定时间,就记录在slow log中,slog log保存在内存中,所以没有IO操作。
#执行时间比slowlog-log-slower-than大的请求记录到slowlog里面,单位是微秒,所以1000000就是1秒。
#注意,负数时间会禁用慢查询日志,而0则会强制记录所有命令。
slowlog-log-slower-than 10000
#慢查询日志长度。当一个新的命令被写进日志的时候,最老的那个记录会被删掉。
#这个长度没有限制。只要有足够的内存就行。
#你可以通过 SLOWLOG RESET 来释放内存
slowlog-max-len 128
_
######################## LATENCY MONITOR ############################
#延迟监控功能是用来监控redis中执行比较缓慢的一些操作,用LATENCY打印redis实例在跑命令时的耗时图表。
#只记录大于等于下边设置的值的操作。0的话,就是关闭监视。
#默认延迟监控功能是关闭的,如果你需要打开,也可以通过CONFIG SET命令动态设置
latency-monitor-threshold 0
####################### EVENT NOTIFICATION ###########################
_
#键空间通知使得客户端可以通过订阅频道或模式,来接收那些以某种方式改动了 Redis 数据集的事件。因为开启键空间通知功能需要消耗一些 CPU ,所以在默认配置下,该功能处于关闭状态。
#notify-keyspace-events 的参数可以是以下字符的任意组合,它指定了服务器该发送哪些类型的通知:
##K 键空间通知,所有通知以 __keyspace@__ 为前缀
##E 键事件通知,所有通知以 __keyevent@__ 为前缀
##g DEL 、 EXPIRE 、 RENAME 等类型无关的通用命令的通知
##$ 字符串命令的通知
##l 列表命令的通知
##s 集合命令的通知
##h 哈希命令的通知
##z 有序集合命令的通知
##x 过期事件:每当有过期键被删除时发送
##e 驱逐(evict)事件:每当有键因为 maxmemory 政策而被删除时发送
##A 参数 g$lshzxe 的别名
#输入的参数中至少要有一个 K 或者 E,否则的话,不管其余的参数是什么,都不会有任何 通知被分发。详细使用可以参考http://redis.io/topics/notifications
notify-keyspace-events ""
_
####################### ADVANCED CONFIG ###########################
_
# 数据量小于等于hash-max-ziplist-entries的用ziplist,大于hash-max-ziplist-entries用hash
hash-max-ziplist-entries 512
# value大小小于等于hash-max-ziplist-value的用ziplist,大于hash-max-ziplist-value用hash
hash-max-ziplist-value 64
#-5:最大大小:64 KB<--不建议用于正常工作负载
#-4:最大大小:32 KB<--不推荐
#-3:最大大小:16 KB<--可能不推荐
#-2:最大大小:8kb<--良好
#-1:最大大小:4kb<--良好
list-max-ziplist-size -2
#0:禁用所有列表压缩
#1:深度1表示“在列表中的1个节点之后才开始压缩,
#从头部或尾部
#所以:【head】->node->node->…->node->【tail】
#[头部],[尾部]将始终未压缩;内部节点将压缩。
#2:[头部]->[下一步]->节点->节点->…->节点->[上一步]->[尾部]
#2这里的意思是:不要压缩头部或头部->下一个或尾部->上一个或尾部,
#但是压缩它们之间的所有节点。
#3:[头部]->[下一步]->[下一步]->节点->节点->…->节点->[上一步]->[上一步]->[尾部]
list-compress-depth 0
# 数据量小于等于set-max-intset-entries用iniset,大于set-max-intset-entries用set
set-max-intset-entries 512
#数据量小于等于zset-max-ziplist-entries用ziplist,大于zset-max-ziplist-entries用zset
zset-max-ziplist-entries 128
#value大小小于等于zset-max-ziplist-value用ziplist,大于zset-max-ziplist-value用zset
zset-max-ziplist-value 64
#value大小小于等于hll-sparse-max-bytes使用稀疏数据结构(sparse),大于hll-sparse-max-bytes使用稠密的数据结构(dense)。
#一个比16000大的value是几乎没用的,建议的value大概为3000。如果对CPU要求不高,对空间要求较高的,建议设置到10000左右
hll-sparse-max-bytes 3000
#宏观节点的最大流/项目的大小。在流数据结构是一个基数
#树节点编码在这项大的多。利用这个配置它是如何可能#大节点配置是单字节和
#最大项目数,这可能包含了在切换到新节点的时候
# appending新的流条目。如果任何以下设置来设置
# ignored极限是零,例如,操作系统,它有可能只是一集通过设置限制最大#纪录到最大字节0和最大输入到所需的值
stream-node-max-bytes 4096
stream-node-max-entries 100
#Redis将在每100毫秒时使用1毫秒的CPU时间来对redis的hash表进行重新hash,可以降低内存的使用。
#当你的使用场景中,有非常严格的实时性需要,不能够接受Redis时不时的对请求有2毫秒的延迟的话,把这项配置为no。
#如果没有这么严格的实时性要求,可以设置为yes,以便能够尽可能快的释放内存
activerehashing yes
##对客户端输出缓冲进行限制可以强迫那些不从服务器读取数据的客户端断开连接,用来强制关闭传输缓慢的客户端。
#对于normal client,第一个0表示取消hard limit,
#第二个0和第三个0表示取消soft limit,normal client默认取消限制,因为如果没有寻问,他们是不会接收数据的
client-output-buffer-limit normal 0 0 0
#对于slave client和MONITER client,如果client-output-buffer一旦超过256mb,又或者超过64mb持续60秒,那么服务器就会立即断开客户端连接
client-output-buffer-limit replica 256mb 64mb 60
#对于pubsub client,如果client-output-buffer一旦超过32mb,又或者超过8mb持续60秒,那么服务器就会立即断开客户端连接
client-output-buffer-limit pubsub 32mb 8mb 60
# 这是客户端查询的缓存极限值大小
# client-query-buffer-limit 1gb
#在redis协议中,批量请求,即表示单个字符串,通常限制为512 MB。但是您可以更改此限制。
# proto-max-bulk-len 512mb
#redis执行任务的频率为1s除以hz
hz 10
#当启用动态赫兹时,实际配置的赫兹将用作作为基线,但实际配置的赫兹值的倍数
#在连接更多客户端后根据需要使用。这样一个闲置的实例将占用很少的CPU时间,而繁忙的实例将反应更灵敏
dynamic-hz yes
#在aof重写的时候,如果打开了aof-rewrite-incremental-fsync开关,系统会每32MB执行一次fsync。
#这对于把文件写入磁盘是有帮助的,可以避免过大的延迟峰值
aof-rewrite-incremental-fsync yes
#在rdb保存的时候,如果打开了rdb-save-incremental-fsync开关,系统会每32MB执行一次fsync。
#这对于把文件写入磁盘是有帮助的,可以避免过大的延迟峰值
rdb-save-incremental-fsync yes
_
###################### ACTIVE DEFRAGMENTATION ##########################
_
# 已启用活动碎片整理
# activedefrag yes
# 启动活动碎片整理的最小碎片浪费量
# active-defrag-ignore-bytes 100mb
# 启动活动碎片整理的最小碎片百分比
# active-defrag-threshold-lower 10
# 我们使用最大努力的最大碎片百分比
# active-defrag-threshold-upper 100
# 以CPU百分比表示的碎片整理的最小工作量
# active-defrag-cycle-min 5
# 在CPU的百分比最大的努力和碎片整理
# active-defrag-cycle-max 75
#将从中处理的set/hash/zset/list字段的最大数目
#主词典扫描
# active-defrag-max-scan-fields 1000
_
redis.conf配置文件
0.超简版
_
################################## INCLUDES ###################################
################################## MODULES #####################################
################################## NETWORK #####################################
# By default, if no "bind" configuration directive is specified, Redis listens
# for connections from all the network interfaces available on the server.
# It is possible to listen to just one or multiple selected interfaces using
# the "bind" configuration directive, followed by one or more IP addresses.
#
# Examples:
#
# bind 192.168.1.100 10.0.0.1
# bind 127.0.0.1 ::1
bind 0.0.0.0
# By default protected mode is enabled. You should disable it only if
# you are sure you want clients from other hosts to connect to Redis
# even if no authentication is configured, nor a specific set of interfaces
# are explicitly listed using the "bind" directive.
protected-mode no
# Accept connections on the specified port, default is 6379 (IANA #815344).
# If port 0 is specified Redis will not listen on a TCP socket.
port 6379
# TCP listen() backlog.
#
# In high requests-per-second environments you need an high backlog in order
# to avoid slow clients connections issues. Note that the Linux kernel
# will silently truncate it to the value of /proc/sys/net/core/somaxconn so
# make sure to raise both the value of somaxconn and tcp_max_syn_backlog
# in order to get the desired effect.
tcp-backlog 511
# Close the connection after a client is idle for N seconds (0 to disable)
timeout 0
# A reasonable value for this option is 300 seconds, which is the new
# Redis default starting with Redis 3.2.1.
tcp-keepalive 300
################################# GENERAL #####################################
# By default Redis does not run as a daemon. Use 'yes' if you need it.
# Note that Redis will write a pid file in /var/run/redis.pid when daemonized.
daemonize no
# Note: these supervision methods only signal "process is ready."
# They do not enable continuous liveness pings back to your supervisor.
supervised no
# Creating a pid file is best effort: if Redis is not able to create it
# nothing bad happens, the server will start and run normally.
pidfile /var/run/redis_6379.pid
# Specify the server verbosity level.
# This can be one of:
# debug (a lot of information, useful for development/testing)
# verbose (many rarely useful info, but not a mess like the debug level)
# notice (moderately verbose, what you want in production probably)
# warning (only very important / critical messages are logged)
loglevel notice
# Specify the log file name. Also the empty string can be used to force
# Redis to log on the standard output. Note that if you use standard
# output for logging but daemonize, logs will be sent to /dev/null
logfile ""
# Set the number of databases. The default database is DB 0, you can select
# a different one on a per-connection basis using SELECT <dbid> where
# dbid is a number between 0 and 'databases'-1
databases 16
# However it is possible to force the pre-4.0 behavior and always show a
# ASCII art logo in startup logs by setting the following option to yes.
always-show-logo yes
################################ SNAPSHOTTING ################################
# In the example below the behaviour will be to save:
# after 900 sec (15 min) if at least 1 key changed
# after 300 sec (5 min) if at least 10 keys changed
# after 60 sec if at least 10000 keys changed
#
# Note: you can disable saving completely by commenting out all "save" lines.
#
# It is also possible to remove all the previously configured save
# points by adding a save directive with a single empty string argument
# like in the following example:
#
# save ""
save 900 1
save 300 10
save 60 10000
# However if you have setup your proper monitoring of the Redis server
# and persistence, you may want to disable this feature so that Redis will
# continue to work as usual even if there are problems with disk,
# permissions, and so forth.
stop-writes-on-bgsave-error yes
# Compress string objects using LZF when dump .rdb databases?
# For default that's set to 'yes' as it's almost always a win.
# If you want to save some CPU in the saving child set it to 'no' but
# the dataset will likely be bigger if you have compressible values or keys.
rdbcompression yes
# RDB files created with checksum disabled have a checksum of zero that will
# tell the loading code to skip the check.
rdbchecksum yes
# The filename where to dump the DB
dbfilename dump.rdb
# Note that you must specify a directory here, not a file name.
dir ./
################################# REPLICATION #################################
# When a replica loses its connection with the master, or when the replication
# is still in progress, the replica can act in two different ways:
#
# 1) if replica-serve-stale-data is set to 'yes' (the default) the replica will
# still reply to client requests, possibly with out of date data, or the
# data set may just be empty if this is the first synchronization.
#
# 2) if replica-serve-stale-data is set to 'no' the replica will reply with
# an error "SYNC with master in progress" to all the kind of commands
# but to INFO, replicaOF, AUTH, PING, SHUTDOWN, REPLCONF, ROLE, CONFIG,
# SUBSCRIBE, UNSUBSCRIBE, PSUBSCRIBE, PUNSUBSCRIBE, PUBLISH, PUBSUB,
# COMMAND, POST, HOST: and LATENCY.
#
replica-serve-stale-data yes
# Note: read only replicas are not designed to be exposed to untrusted clients
# on the internet. It's just a protection layer against misuse of the instance.
# Still a read only replica exports by default all the administrative commands
# such as CONFIG, DEBUG, and so forth. To a limited extent you can improve
# security of read only replicas using 'rename-command' to shadow all the
# administrative / dangerous commands.
replica-read-only yes
# With slow disks and fast (large bandwidth) networks, diskless replication
# works better.
repl-diskless-sync no
# The delay is specified in seconds, and by default is 5 seconds. To disable
# it entirely just set it to 0 seconds and the transfer will start ASAP.
repl-diskless-sync-delay 5
# By default we optimize for low latency, but in very high traffic conditions
# or when the master and replicas are many hops away, turning this to "yes" may
# be a good idea.
repl-disable-tcp-nodelay no
# By default the priority is 100.
replica-priority 100
################################## SECURITY ###################################
################################### CLIENTS ####################################
############################## MEMORY MANAGEMENT ################################
############################# LAZY FREEING ####################################
# DEL, UNLINK and ASYNC option of FLUSHALL and FLUSHDB are user-controlled.
# It's up to the design of the application to understand when it is a good
# idea to use one or the other. However the Redis server sometimes has to
# delete keys or flush the whole database as a side effect of other operations.
# Specifically Redis deletes objects independently of a user call in the
# following scenarios:
#
# 1) On eviction, because of the maxmemory and maxmemory policy configurations,
# in order to make room for new data, without going over the specified
# memory limit.
# 2) Because of expire: when a key with an associated time to live (see the
# EXPIRE command) must be deleted from memory.
# 3) Because of a side effect of a command that stores data on a key that may
# already exist. For example the RENAME command may delete the old key
# content when it is replaced with another one. Similarly SUNIONSTORE
# or SORT with STORE option may delete existing keys. The SET command
# itself removes any old content of the specified key in order to replace
# it with the specified string.
# 4) During replication, when a replica performs a full resynchronization with
# its master, the content of the whole database is removed in order to
# load the RDB file just transferred.
#
# In all the above cases the default is to delete objects in a blocking way,
# like if DEL was called. However you can configure each case specifically
# in order to instead release memory in a non-blocking way like if UNLINK
# was called, using the following configuration directives:
lazyfree-lazy-eviction no
lazyfree-lazy-expire no
lazyfree-lazy-server-del no
replica-lazy-flush no
############################## APPEND ONLY MODE ###############################
appendonly no
# The name of the append only file (default: "appendonly.aof")
appendfilename "appendonly.aof"
# appendfsync always
# appendfsync no
appendfsync everysec
# If you have latency problems turn this to "yes". Otherwise leave it as
# "no" that is the safest pick from the point of view of durability.
no-appendfsync-on-rewrite no
# This base size is compared to the current size. If the current size is
# bigger than the specified percentage, the rewrite is triggered. Also
# you need to specify a minimal size for the AOF file to be rewritten, this
# is useful to avoid rewriting the AOF file even if the percentage increase
# is reached but it is still pretty small.
#
# Specify a percentage of zero in order to disable the automatic AOF
# rewrite feature.
auto-aof-rewrite-percentage 100
auto-aof-rewrite-min-size 64mb
# Note that if the AOF file will be found to be corrupted in the middle
# the server will still exit with an error. This option only applies when
# Redis will try to read more data from the AOF file but not enough bytes
# will be found.
aof-load-truncated yes
# When loading Redis recognizes that the AOF file starts with the "REDIS"
# string and loads the prefixed RDB file, and continues loading the AOF
# tail.
aof-use-rdb-preamble yes
################################ LUA SCRIPTING ###############################
# Set it to 0 or a negative value for unlimited execution without warnings.
lua-time-limit 5000
################################ REDIS CLUSTER ###############################
########################## CLUSTER DOCKER/NAT support ########################
################################## SLOW LOG ###################################
# The following time is expressed in microseconds, so 1000000 is equivalent
# to one second. Note that a negative number disables the slow log, while
# a value of zero forces the logging of every command.
slowlog-log-slower-than 10000
# There is no limit to this length. Just be aware that it will consume memory.
# You can reclaim memory used by the slow log with SLOWLOG RESET.
slowlog-max-len 128
################################ LATENCY MONITOR ##############################
# By default latency monitoring is disabled since it is mostly not needed
# if you don't have latency issues, and collecting data has a performance
# impact, that while very small, can be measured under big load. Latency
# monitoring can easily be enabled at runtime using the command
# "CONFIG SET latency-monitor-threshold <milliseconds>" if needed.
latency-monitor-threshold 0
############################# EVENT NOTIFICATION ##############################
# By default all notifications are disabled because most users don't need
# this feature and the feature has some overhead. Note that if you don't
# specify at least one of K or E, no events will be delivered.
notify-keyspace-events ""
############################### ADVANCED CONFIG ###############################
# Hashes are encoded using a memory efficient data structure when they have a
# small number of entries, and the biggest entry does not exceed a given
# threshold. These thresholds can be configured using the following directives.
hash-max-ziplist-entries 512
hash-max-ziplist-value 64
# Lists are also encoded in a special way to save a lot of space.
# The number of entries allowed per internal list node can be specified
# as a fixed maximum size or a maximum number of elements.
# For a fixed maximum size, use -5 through -1, meaning:
# -5: max size: 64 Kb <-- not recommended for normal workloads
# -4: max size: 32 Kb <-- not recommended
# -3: max size: 16 Kb <-- probably not recommended
# -2: max size: 8 Kb <-- good
# -1: max size: 4 Kb <-- good
# Positive numbers mean store up to _exactly_ that number of elements
# per list node.
# The highest performing option is usually -2 (8 Kb size) or -1 (4 Kb size),
# but if your use case is unique, adjust the settings as necessary.
list-max-ziplist-size -2
# Lists may also be compressed.
# Compress depth is the number of quicklist ziplist nodes from *each* side of
# the list to *exclude* from compression. The head and tail of the list
# are always uncompressed for fast push/pop operations. Settings are:
# 0: disable all list compression
# 1: depth 1 means "don't start compressing until after 1 node into the list,
# going from either the head or tail"
# So: [head]->node->node->...->node->[tail]
# [head], [tail] will always be uncompressed; inner nodes will compress.
# 2: [head]->[next]->node->node->...->node->[prev]->[tail]
# 2 here means: don't compress head or head->next or tail->prev or tail,
# but compress all nodes between them.
# 3: [head]->[next]->[next]->node->node->...->node->[prev]->[prev]->[tail]
# etc.
list-compress-depth 0
# Sets have a special encoding in just one case: when a set is composed
# of just strings that happen to be integers in radix 10 in the range
# of 64 bit signed integers.
# The following configuration setting sets the limit in the size of the
# set in order to use this special memory saving encoding.
set-max-intset-entries 512
# Similarly to hashes and lists, sorted sets are also specially encoded in
# order to save a lot of space. This encoding is only used when the length and
# elements of a sorted set are below the following limits:
zset-max-ziplist-entries 128
zset-max-ziplist-value 64
# HyperLogLog sparse representation bytes limit. The limit includes the
# 16 bytes header. When an HyperLogLog using the sparse representation crosses
# this limit, it is converted into the dense representation.
#
# A value greater than 16000 is totally useless, since at that point the
# dense representation is more memory efficient.
#
# The suggested value is ~ 3000 in order to have the benefits of
# the space efficient encoding without slowing down too much PFADD,
# which is O(N) with the sparse encoding. The value can be raised to
# ~ 10000 when CPU is not a concern, but space is, and the data set is
# composed of many HyperLogLogs with cardinality in the 0 - 15000 range.
hll-sparse-max-bytes 3000
# Streams macro node max size / items. The stream data structure is a radix
# tree of big nodes that encode multiple items inside. Using this configuration
# it is possible to configure how big a single node can be in bytes, and the
# maximum number of items it may contain before switching to a new node when
# appending new stream entries. If any of the following settings are set to
# zero, the limit is ignored, so for instance it is possible to set just a
# max entires limit by setting max-bytes to 0 and max-entries to the desired
# value.
stream-node-max-bytes 4096
stream-node-max-entries 100
# Active rehashing uses 1 millisecond every 100 milliseconds of CPU time in
# order to help rehashing the main Redis hash table (the one mapping top-level
# keys to values). The hash table implementation Redis uses (see dict.c)
# performs a lazy rehashing: the more operation you run into a hash table
# that is rehashing, the more rehashing "steps" are performed, so if the
# server is idle the rehashing is never complete and some more memory is used
# by the hash table.
#
# The default is to use this millisecond 10 times every second in order to
# actively rehash the main dictionaries, freeing memory when possible.
#
# If unsure:
# use "activerehashing no" if you have hard latency requirements and it is
# not a good thing in your environment that Redis can reply from time to time
# to queries with 2 milliseconds delay.
#
# use "activerehashing yes" if you don't have such hard requirements but
# want to free memory asap when possible.
activerehashing yes
# The client output buffer limits can be used to force disconnection of clients
# that are not reading data from the server fast enough for some reason (a
# common reason is that a Pub/Sub client can't consume messages as fast as the
# publisher can produce them).
#
# The limit can be set differently for the three different classes of clients:
#
# normal -> normal clients including MONITOR clients
# replica -> replica clients
# pubsub -> clients subscribed to at least one pubsub channel or pattern
#
# The syntax of every client-output-buffer-limit directive is the following:
#
# client-output-buffer-limit <class> <hard limit> <soft limit> <soft seconds>
#
# A client is immediately disconnected once the hard limit is reached, or if
# the soft limit is reached and remains reached for the specified number of
# seconds (continuously).
# So for instance if the hard limit is 32 megabytes and the soft limit is
# 16 megabytes / 10 seconds, the client will get disconnected immediately
# if the size of the output buffers reach 32 megabytes, but will also get
# disconnected if the client reaches 16 megabytes and continuously overcomes
# the limit for 10 seconds.
#
# By default normal clients are not limited because they don't receive data
# without asking (in a push way), but just after a request, so only
# asynchronous clients may create a scenario where data is requested faster
# than it can read.
#
# Instead there is a default limit for pubsub and replica clients, since
# subscribers and replicas receive data in a push fashion.
#
# Both the hard or the soft limit can be disabled by setting them to zero.
client-output-buffer-limit normal 0 0 0
client-output-buffer-limit replica 256mb 64mb 60
client-output-buffer-limit pubsub 32mb 8mb 60
# Client query buffers accumulate new commands. They are limited to a fixed
# amount by default in order to avoid that a protocol desynchronization (for
# instance due to a bug in the client) will lead to unbound memory usage in
# the query buffer. However you can configure it here if you have very special
# needs, such us huge multi/exec requests or alike.
#
# client-query-buffer-limit 1gb
# In the Redis protocol, bulk requests, that are, elements representing single
# strings, are normally limited ot 512 mb. However you can change this limit
# here.
#
# proto-max-bulk-len 512mb
# Redis calls an internal function to perform many background tasks, like
# closing connections of clients in timeout, purging expired keys that are
# never requested, and so forth.
#
# Not all tasks are performed with the same frequency, but Redis checks for
# tasks to perform according to the specified "hz" value.
#
# By default "hz" is set to 10. Raising the value will use more CPU when
# Redis is idle, but at the same time will make Redis more responsive when
# there are many keys expiring at the same time, and timeouts may be
# handled with more precision.
#
# The range is between 1 and 500, however a value over 100 is usually not
# a good idea. Most users should use the default of 10 and raise this up to
# 100 only in environments where very low latency is required.
hz 10
# Normally it is useful to have an HZ value which is proportional to the
# number of clients connected. This is useful in order, for instance, to
# avoid too many clients are processed for each background task invocation
# in order to avoid latency spikes.
#
# Since the default HZ value by default is conservatively set to 10, Redis
# offers, and enables by default, the ability to use an adaptive HZ value
# which will temporary raise when there are many connected clients.
#
# When dynamic HZ is enabled, the actual configured HZ will be used as
# as a baseline, but multiples of the configured HZ value will be actually
# used as needed once more clients are connected. In this way an idle
# instance will use very little CPU time while a busy instance will be
# more responsive.
dynamic-hz yes
# When a child rewrites the AOF file, if the following option is enabled
# the file will be fsync-ed every 32 MB of data generated. This is useful
# in order to commit the file to the disk more incrementally and avoid
# big latency spikes.
aof-rewrite-incremental-fsync yes
# When redis saves RDB file, if the following option is enabled
# the file will be fsync-ed every 32 MB of data generated. This is useful
# in order to commit the file to the disk more incrementally and avoid
# big latency spikes.
rdb-save-incremental-fsync yes
########################### ACTIVE DEFRAGMENTATION #######################
日志级别
maxmemory
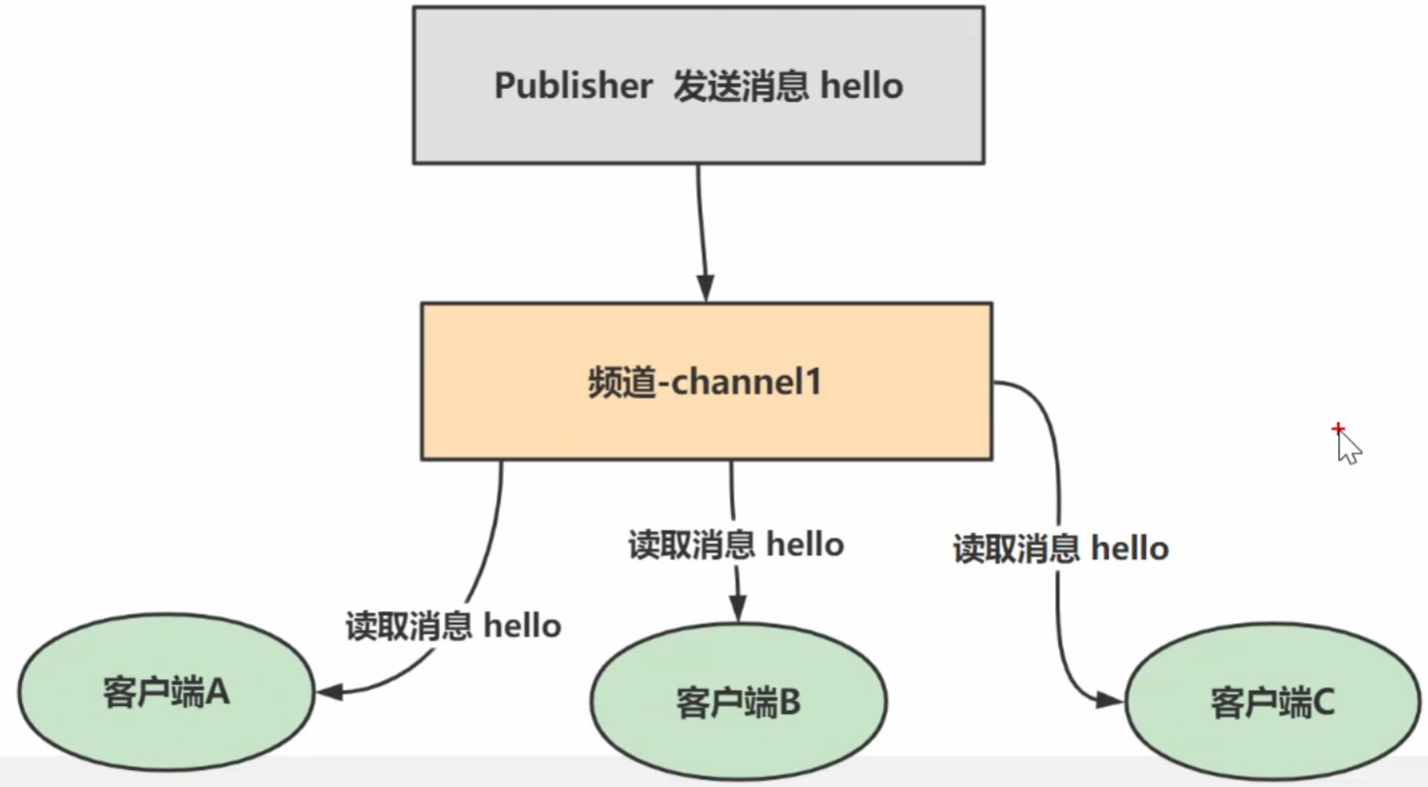
发布和订阅

任务队列
1.顾名思义,就是"传递消息的队列"
2、与任务队列进行交互的实体有两类,一类是生产者(producer),另一类则是消费者(生产者将需要处理的任务放入任务队列中,而消费者则不断地从任务队列中读入任consumer)务信息并执行
可以这么简单的理解:
1)Subscriber:收音机,可以收到多个频道,并以队列方式显示
2)Publisher:电台,可以往不同的FM频道中发消息3)Channe:不同频率的FM频道
-从Pub/Sub的机制来看,它更像是一个广播系统,多个订阅者(Subscriber)可以订阅多个频道(Channel),多个发布者(Publisher)可以往多个频道(Channel)中发布消息。
SpringBoot 整合 Redis
依赖注入
    <dependencies>
        <dependency>
            <groupId>org.springframework.boot</groupId>
            <artifactId>spring-boot-starter-web</artifactId>
        </dependency>

        <!-- redis依赖 -->
        <dependency>
            <groupId>org.springframework.boot</groupId>
            <artifactId>spring-boot-starter-data-redis</artifactId>
        </dependency>

        <!-- spring2.X集成redis所需common-pool-->
        <dependency>
            <groupId>org.apache.commons</groupId>
            <artifactId>commons-pool2</artifactId>
        </dependency>

        <dependency>
            <groupId>org.springframework.boot</groupId>
            <artifactId>spring-boot-starter-test</artifactId>
            <scope>test</scope>
        </dependency>

        <dependency>
            <groupId>com.fasterxml.jackson.core</groupId>
            <artifactId>jackson-databind</artifactId>
            <version>2.13.2.2</version>
        </dependency>

    </dependencies>
配置类
package com.zfc.redis.config;

import com.fasterxml.jackson.annotation.JsonAutoDetect;
import com.fasterxml.jackson.annotation.JsonTypeInfo;
import com.fasterxml.jackson.annotation.PropertyAccessor;
import com.fasterxml.jackson.databind.ObjectMapper;
import com.fasterxml.jackson.databind.jsontype.impl.LaissezFaireSubTypeValidator;
import org.springframework.cache.CacheManager;
import org.springframework.cache.annotation.CachingConfigurerSupport;
import org.springframework.cache.annotation.EnableCaching;
import org.springframework.context.annotation.Bean;
import org.springframework.context.annotation.Configuration;
import org.springframework.data.redis.cache.RedisCacheConfiguration;
import org.springframework.data.redis.cache.RedisCacheManager;
import org.springframework.data.redis.connection.RedisConnectionFactory;
import org.springframework.data.redis.core.RedisTemplate;
import org.springframework.data.redis.serializer.Jackson2JsonRedisSerializer;
import org.springframework.data.redis.serializer.RedisSerializationContext;
import org.springframework.data.redis.serializer.RedisSerializer;
import org.springframework.data.redis.serializer.StringRedisSerializer;

import java.time.Duration;

/**
 * @authorzfc
 * @version 1.0
 */
@EnableCaching
@Configuration
public class RedisConfig extends CachingConfigurerSupport {

    @Bean
    public RedisTemplate<String, Object> redisTemplate(RedisConnectionFactory factory) {
        RedisTemplate<String, Object> template =
                new RedisTemplate<>();
        System.out.println("template=>" + template);//这里可以验证..
        RedisSerializer<String> redisSerializer =
                new StringRedisSerializer();
        Jackson2JsonRedisSerializer jackson2JsonRedisSerializer =
                new Jackson2JsonRedisSerializer(Object.class);
        ObjectMapper om = new ObjectMapper();
        om.setVisibility(PropertyAccessor.ALL, JsonAutoDetect.Visibility.ANY);
        om.activateDefaultTyping(
                LaissezFaireSubTypeValidator.instance,
                ObjectMapper.DefaultTyping.NON_FINAL,
                JsonTypeInfo.As.WRAPPER_ARRAY);
        jackson2JsonRedisSerializer.setObjectMapper(om);
        template.setConnectionFactory(factory);
        //key序列化方式
        template.setKeySerializer(redisSerializer);
        //value序列化
        template.setValueSerializer(jackson2JsonRedisSerializer);
        //value hashmap序列化
        template.setHashValueSerializer(jackson2JsonRedisSerializer);
        return template;
    }

    @Bean
    public CacheManager cacheManager(RedisConnectionFactory factory) {
        RedisSerializer<String> redisSerializer =
                new StringRedisSerializer();
        Jackson2JsonRedisSerializer jackson2JsonRedisSerializer = new Jackson2JsonRedisSerializer(Object.class);
        //解决查询缓存转换异常的问题
        ObjectMapper om = new ObjectMapper();
        om.setVisibility(PropertyAccessor.ALL, JsonAutoDetect.Visibility.ANY);
        om.activateDefaultTyping(
                LaissezFaireSubTypeValidator.instance,
                ObjectMapper.DefaultTyping.NON_FINAL,
                JsonTypeInfo.As.WRAPPER_ARRAY);
        jackson2JsonRedisSerializer.setObjectMapper(om);
        // 配置序列化(解决乱码的问题),过期时间600秒
        RedisCacheConfiguration config = RedisCacheConfiguration.defaultCacheConfig()
                .entryTtl(Duration.ofSeconds(600))
                .serializeKeysWith(RedisSerializationContext.SerializationPair.fromSerializer(redisSerializer))
                .serializeValuesWith(RedisSerializationContext.SerializationPair.fromSerializer(jackson2JsonRedisSerializer))
                .disableCachingNullValues();
        RedisCacheManager cacheManager = RedisCacheManager.builder(factory)
                .cacheDefaults(config)
                .build();
        return cacheManager;
    }
}
application
# Redis服务器地址,必填项
spring.redis.host=ip
# Redis服务器端口号,默认为6379
spring.redis.port=xxxx
# Redis密码,如果没有设置密码则留空
spring.redis.password=xxxx
# Redis数据库索引,默认为0
spring.redis.database=0
# 连接Redis的超时时间,单位为毫秒
spring.redis.timeout=1800000
# Redis连接池配置,最大活跃连接数
spring.redis.lettuce.pool.max-active=20
# Redis连接池最大等待时间,-1表示无限等待
spring.redis.lettuce.pool.max-wait=-1
# Redis连接池最大空闲连接数
spring.redis.lettuce.pool.max-idle=5
# Redis连接池最小空闲连接数
spring.redis.lettuce.pool.min-idle=0
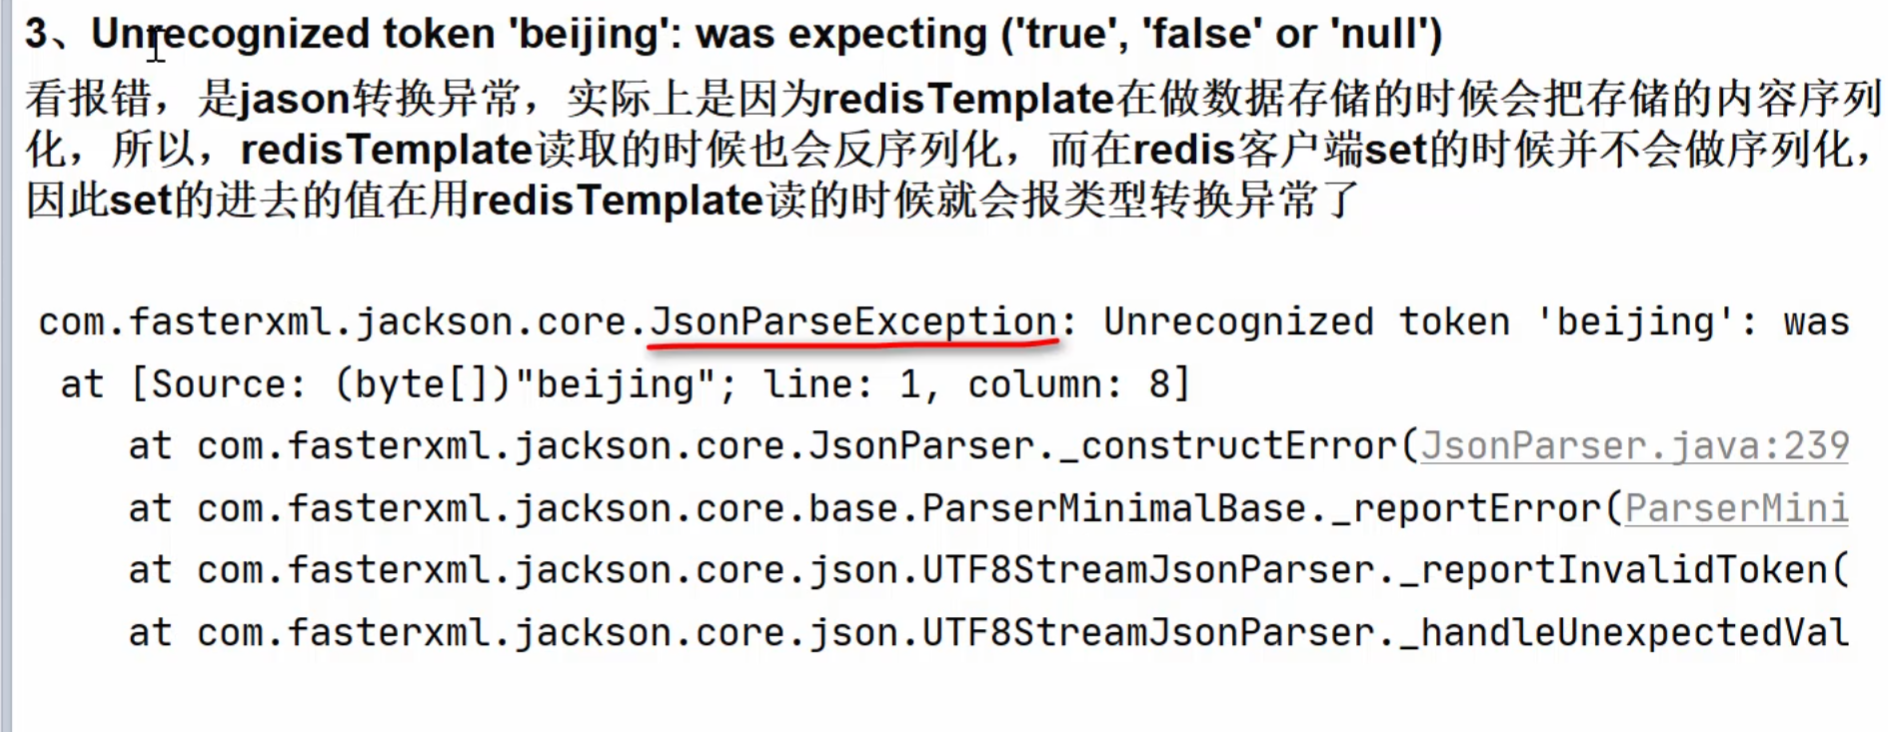
会出现的错误
Controller
package com.zfc.redis.controller;

import org.springframework.data.redis.core.RedisTemplate;
import org.springframework.data.redis.core.script.DefaultRedisScript;
import org.springframework.util.StringUtils;
import org.springframework.web.bind.annotation.GetMapping;
import org.springframework.web.bind.annotation.RequestMapping;
import org.springframework.web.bind.annotation.RestController;

import javax.annotation.Resource;
import java.util.Arrays;
import java.util.List;
import java.util.Set;
import java.util.UUID;
import java.util.concurrent.TimeUnit;

/**
 * @author zfc
 * @version 1.0
 */
@RestController
@RequestMapping("/redisTest")
public class RedisTestController {

    //装配RedisTemplate
    @Resource
    private RedisTemplate redisTemplate;

    //编写方法,使用Redis分布式锁,完成对 key为num的+1操作
    @GetMapping("/lock")
    public void lock() {

        //得到一个uuid值,作为锁的值
        String uuid = UUID.randomUUID().toString();

        //1. 获取锁/设置锁 key->lock : setnx
        Boolean lock =
                redisTemplate.opsForValue().setIfAbsent("lock", uuid, 3, TimeUnit.SECONDS);
        if (lock) {//true, 说明获取锁/设置锁成功
            //这个key为num的数据,事先要在Redis初始化
            Object value = redisTemplate.opsForValue().get("num");
            //1.判断返回的value是否有值
            if (value == null || !StringUtils.hasText(value.toString())) {
                return;
            }
            //2.有值,就将其转成int
            int num = Integer.parseInt(value.toString());
            //3.将num+1,再重新设置回去
            redisTemplate.opsForValue().set("num", ++num);
            //释放锁-lock


            //为了防止误删除其它用户的锁,先判断当前的锁是不是前面获取到的锁,如果相同,再释放

            //=====使用lua脚本, 控制删除原子性========
            // 定义lua 脚本
            String script = "if redis.call('get', KEYS[1]) == ARGV[1] then return redis.call('del', KEYS[1]) else return 0 end";
            // 使用redis执行lua执行
            DefaultRedisScript<Long> redisScript = new DefaultRedisScript<>();
            redisScript.setScriptText(script);
            // 设置一下返回值类型 为Long
            // 因为删除判断的时候,返回的0,给其封装为数据类型。如果不封装那么默认返回String 类型,
            // 那么返回字符串与0 会有发生错误。
            redisScript.setResultType(Long.class);
            // 第一个是script 脚本 ,第二个需要判断的key,第三个就是key所对应的值
            // _解读 Arrays.asList("lock") 会传递给 script 的 KEYS[1] , uuid 会传递给ARGV[1] , 其它的小伙伴应该很容易理解
            redisTemplate.execute(redisScript, Arrays.asList("lock"), uuid);


            //if (uuid.equals((String) redisTemplate.opsForValue().get("lock"))) {
            //    //...
            //    redisTemplate.delete("lock");
            //}

            //redisTemplate.delete("lock");

        } else { //获取锁失败,休眠100毫秒,再重新获取锁/设置锁

            try {
                Thread.sleep(100);
                lock();//重新执行
            } catch (InterruptedException e) {
                e.printStackTrace();
            }
        }
    }

    //编写第一个测试方法
    //演示设置数据和获取数据
    @GetMapping("/t1")
    public String t1() {

        //设置值到redis
        redisTemplate.opsForValue().set("book", "天龙八部~");
        //从redis获取值
        String book = (String) redisTemplate.opsForValue().get("book");
        return book;
    }

    //编写方法,演示如何操作list,hash,set,zset
    @GetMapping("/t2")
    public String t2() {
        //list-存
        redisTemplate.opsForList().leftPush("books", "笑傲江湖");
        redisTemplate.opsForList().leftPush("books", "hello,java");

        //list-取出
        List books = redisTemplate.opsForList().range("books", 0, -1);
        String booksList = "";
        for (Object book : books) {
            System.out.println("book-->" + book.toString());
            booksList += book.toString() + " ";
        }
        //hash
        //redisTemplate.opsForHash()
        //set
        //redisTemplate.opsForSet()
        //zset
        //redisTemplate.opsForZSet()
        return booksList;
    }

    //编写一个方法,获取所有的key
    @GetMapping("/t3")
    public String t3() {
        Set keys = redisTemplate.keys("*");
        for (Object key : keys) {
            System.out.println("key--->" + key.toString());
        }
        return "OK";
    }


    //编写方法,获取通过客户端添加的数据-会出现异常
    //需要保持一致,比如RedisTemplate读取的数据,应当是RedisTemplate存放的数据
    @GetMapping("/t4")
    public String t4() {

        String val = (String) redisTemplate.opsForValue().get("book");

        System.out.println("val= " + val);

        return val;
    }


}
Redis 数据持久化
RDB
在指定的时间间隔内将内存中的数据集快照写入磁盘也就snapshot快照,恢复时将快照文件读到内存
持久化的流程
1)redis客户端执行bgsave命令或者自动触发bgsave命令;
2)主进程判断当前是否已经存在正在执行的子进程,如果存在,那么主进程直接返回:
3)如果不存在正在执行的子进程,那么就fork一个新的子进程进行持久化数据,fork过程是阻塞的,fork操作完成后主进程即可执行其他操作;
4)子进程先将数据写入到临时的rdb文件中,待快照数据写入完成后再原子替换旧的rdb文件
5)同时发送信号给主进程,通知主进程rdb持久化完成,主进程更新相关的统计信息
默认快照设置
备份和恢复
1、关于RDB备份&恢复,老韩要说的
1)说明:Redis可以充当缓存,对项目进行优化,因此重要/敏感的数据建议在Mysql要保存一份
2)从设计层面来说,Redis的内存数据,都是可以重新获取的(可能来自程序,也可能来自MysqI)
3)因此我们这里说的备份&恢复主要是给大家说明一下 Redis启动时,初始化数据是从dump.rdb 来的这个机制。
备份脚本示例(backup_rdb.sh):
#!/bin/bash

# 定义源目录和目标目录
SOURCE_DIR="/usr/local/docker/redis/data"
BACKUP_DIR="/usr/local/docker/redis/backend"

# 获取当前日期,用于备份文件的命名
DATE=$(date +"%Y-%m-%d_%H-%M-%S")

# 定义备份文件名
BACKUP_FILE="dump.rdb.$DATE"

# 进行备份操作
cp "$SOURCE_DIR/dump.rdb" "$BACKUP_DIR/$BACKUP_FILE"

# 输出备份结果
if [ $? -eq 0 ]; then
    echo "Backup successful: $BACKUP_FILE"
else
    echo "Backup failed"
fi
脚本说明:
该脚本将
dump.rdb文件从/usr/local/docker/redis/data复制到/usr/local/docker/redis/backend文件夹,并使用当前日期和时间(例如dump.rdb.2024-11-27_14-30-00)来命名备份文件。使用
cp命令将文件复制到目标目录,并检查备份是否成功。
步骤 2:给脚本添加执行权限
保存脚本后,你需要为它添加执行权限。
chmod +x /path/to/your/backup_rdb.sh
步骤 3:配置 cron 定时任务
为了让这个脚本每天自动运行,你可以将它添加到 cron 定时任务中。
编辑 crontab 配置
输入以下命令来编辑 cron 配置:
crontab -e
添加定时任务
在 crontab 文件中添加以下行,以便每天晚上 2 点执行备份脚本:
0 2 * * * /path/to/your/backup_rdb.sh
这行配置的意思是:
0 2 * * *:每天的 2:00 AM 执行。/path/to/your/backup_rdb.sh:备份脚本的完整路径。
步骤 4:测试备份脚本
为了确保备份脚本可以正常工作,你可以手动运行一下脚本:
/path/to/your/backup_rdb.sh
如果备份成功,应该会在 /usr/local/docker/redis/backend/ 目录中看到以当前日期命名的 dump.rdb 文件。
步骤 5:检查 cron 是否生效
你可以通过以下命令来查看 cron 任务是否已经正确添加:
crontab -lAOF
1、AOF(Append only File)
2、以日志的形式来记录每个写操作(增量保存),将Redis执行过的所有写指令记录下来(比如 set/de操作会记录,读操作get不记录)
3、只许追加文件但不可以改写文件
4、redis启动之初会读取该文件重新构建数据
5、redis 重启的话就根据日志文件的内容将写指令从前到后执行一次以完成数据的恢复工作

AOF 恢复
同步策略
1)appendfsync always始终同步,每次Redis的写入都会立刻记入日志;性能较差但数据完整性比较好
2)appendfsync everysec每秒同步,每秒记入日志一次,如果宕机,本秒的数据可能丢失。
3)appendfsync noredis不主动进行同步,把同步时机交给操作系统(30s写入一次)
3)appendfsync no
Rewrite 压缩
1)AOF文件越来越大,需要定期对AOF文件进行重写达到压缩
2)旧的AOF文件含有无效命令会被忽略,保留最新的数据命令,比如 set a a1;set a b1;set a c1:保留最后一条指令就可以了
3)多条写命令可以合并为一个,比如set a c1 b b1c c1
4)AOF重写降低了文件占用空间
5)更小的AOF文件可以更快的被redis加载
在 Redis 中,AOF(Append-Only File)和 RDB(Redis Database)是两种持久化数据的方式,它们各有优缺点,适用于不同的场景。下面简要总结它们的优缺点:
1. RDB(Redis Database)
RDB 是一种基于快照的持久化方式。它会在指定的时间间隔内将 Redis 数据库的状态快照保存到磁盘中。
优点:
性能较好:RDB 是通过创建数据库的快照来持久化数据的,相较于 AOF,RDB 的性能开销较小,Redis 在执行 RDB 快照时,主要是通过 fork 子进程来完成的,因此不会阻塞主进程太长时间。
备份方便:由于 RDB 是整个数据库的快照,文件比较小、便于备份。可以方便地将整个数据库备份和恢复。
数据恢复速度快:RDB 是完整的数据库快照,在恢复时,Redis 可以一次性载入整个数据集,恢复速度快。
缺点:
数据丢失风险:由于 RDB 是基于快照的,每次持久化只会保存最近的快照,可能会丢失在上次快照之后的操作数据。例如,如果设置 RDB 每 5 分钟生成一次快照,那么在 Redis 崩溃后,最多只能恢复到 5 分钟前的数据,最近的更改可能会丢失。
不适用于高频更新场景:如果数据变化频繁,生成快照的频率较高,RDB 会导致性能下降,并且可能会增加持久化时的系统压力。
2. AOF(Append-Only File)
AOF 通过记录每一个写操作的日志(即所有写入命令)来实现数据持久化。Redis 会将所有的写操作追加到 AOF 文件中。
优点:
数据持久性强:AOF 会记录每一条写命令,能保证数据的持久性。即使 Redis 崩溃,AOF 文件中的数据可以帮助恢复到最近一次成功的写入状态,通常可以达到较高的持久化精度。
较低的数据丢失风险:通过配置
appendfsync选项,AOF 可以确保每次写操作都会被同步到磁盘(但可能会影响性能)。一般情况下,AOF 的数据丢失风险比 RDB 小。
缺点:
性能开销较大:AOF 会记录每个写命令,因此会带来较大的性能开销,尤其是在高频写操作的场景下,AOF 会对 Redis 性能产生较大影响。
AOF 文件较大:由于 AOF 文件记录了所有的写命令,文件可能会比 RDB 的快照大很多,随着数据操作的增加,AOF 文件也会越来越大。
恢复速度较慢:恢复 AOF 文件时,Redis 需要重新执行 AOF 文件中的所有命令,恢复速度较慢。
总结
综合建议:
RDB 适合对数据丢失容忍度较高、不需要频繁持久化的场景(比如定期备份)。
AOF 适合对数据持久化要求较高、能容忍较高性能开销的场景(如高频写操作的应用)。
可以根据实际的应用需求选择使用其中一种持久化方式,或者两者结合使用,取其优点。
Redis 事务
1、Redis事务是一个单独的隔离操作:事务中的所有命令都会序列化、按顺序地执行
2、事务在执行的过程中,不会被其他客户端发送来的命令请求所打断
3、Redis事务的主要作用就是串联多个命令防止别的命令插队
事务相关指令
1. MULTI
MULTI 命令用于标记一个事务的开始,之后的所有命令都不会立即执行,而是会被放入事务队列中,直到调用 EXEC 执行这些命令。
语法:
MULTI
返回:
OK
2. EXEC
EXEC 命令用于执行事务队列中的所有命令。如果在事务队列中有命令执行失败,其他命令仍会被执行。
语法:
EXEC
返回:
如果执行成功,返回事务队列中每个命令的结果(一个列表)。
如果事务队列中有任何命令被中断或失败,其他命令仍会执行,失败命令返回
nil。
3. DISCARD
DISCARD 命令用于放弃当前事务中所有排队的命令,并取消事务的执行。
语法:
DISCARD
返回:
OK
4. WATCH
WATCH 命令用于监视一个或多个键,当在事务执行前,Redis 会监视这些键的变化。如果这些键在 EXEC 执行之前被修改,事务将会失败并被取消。
语法:
WATCH key1 [key2 ...]
返回:
OK
事务流程示例:
开始事务:使用
MULTI命令标记事务开始。排队命令:所有后续命令都会被排入事务队列中,但并不会立即执行。
执行事务:使用
EXEC来执行排队的命令,或者使用DISCARD取消事务。监视键:通过
WATCH可以让事务在某个键被修改时失败。
示例:
WATCH foo       # 监视键 foo
MULTI           # 开始事务
SET foo bar     # 排队命令
SET baz qux     # 排队命令
EXEC            # 执行事务
在这个例子中,WATCH 会监视 foo 键。如果在执行 EXEC 之前,foo 键的值发生了变化(例如通过其他客户端修改了 foo 的值),则整个事务会被中止,所有排队的命令都不会执行。
事务的原子性:
Redis 的事务具有原子性,即事务中的命令要么全部执行,要么完全不执行。
事务中的命令会按顺序执行,但没有 隔离性:事务中的命令在执行前不会被其他命令中断,命令之间的执行顺序不能保证事务内部的隔离性。
总结:
MULTI:开始事务。EXEC:执行事务中的命令。DISCARD:放弃事务。WATCH:监视键,确保在事务期间这些键不被修改,否则事务会失败。
Redis 的事务并不具备传统数据库事务的 ACID 特性,特别是在隔离性方面,但它提供了保证命令按顺序执行的机制,适用于大多数需要事务控制的场景。
悲观锁
1)悲观锁(Pessimistic Lock),顾名思义,就是很悲观,每次去拿数据的时候都认为别人会修改,所以每次在拿数据的时候都会上锁
2)这样别人想拿这个数据就会block直到它拿到锁
3)悲观锁是锁设计理念,传统的关系型数据库里边就用到了很多这种锁机制,比如行锁,表锁等,读锁,写锁等,都是在做操作之前先上锁.
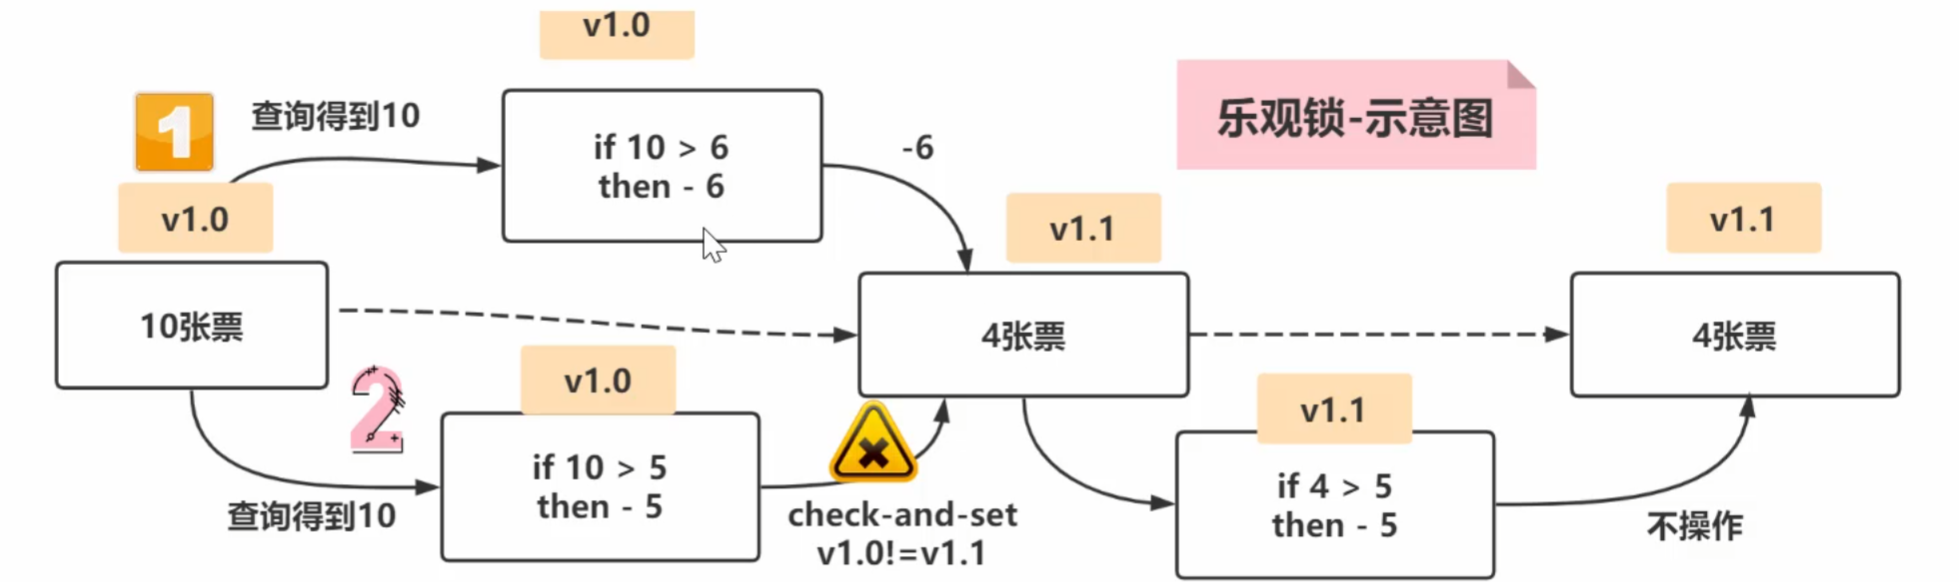
乐观锁
1)乐观锁(Optimistic Lock),顾名思义,就是很乐观,每次去拿数据的时候都认为别人不会修改,所以不会上锁
2)但是在更新的时候会判断一下在此期间别人有没有去更新这个数据,可以使用版本号等机制。
3)乐观锁适用于多读的应用类型,这样可以提高吞吐量。Redis就是利用这种check-and-set机制实现事务的
redis 连接池
package com.zfc.seckill.uitl;

import redis.clients.jedis.Jedis;
import redis.clients.jedis.JedisPool;
import redis.clients.jedis.JedisPoolConfig;

/**
 * @author zfc
 * @version 1.0
 * 使用连接池的方式来获取Redis连接
 */
public class JedisPoolUtil {

    //解读volatile作用
    //1. 线程的可见性: 当一个线程去修改一个共享变量时, 另外一个线程可以读取这个修改的值
    //2. 顺序的一致性: 禁止指令重排
    private static volatile JedisPool jedisPool = null;


    private JedisPoolUtil() {

    }

    //保证每次调用返回的 jedisPool是单例-这里老师使用了双重校验
    public static JedisPool getJedisPoolInstance() {

        if (null == jedisPool) {
            synchronized (JedisPoolUtil.class) {
                if (null == jedisPool) {
                    JedisPoolConfig jedisPoolConfig = new JedisPoolConfig();
                    //对连接池进行配置
                    jedisPoolConfig.setMaxTotal(200);
                    jedisPoolConfig.setMaxIdle(32);
                    jedisPoolConfig.setMaxWaitMillis(60 * 1000);
                    jedisPoolConfig.setBlockWhenExhausted(true);
                    jedisPoolConfig.setTestOnBorrow(true);
                    jedisPool = new JedisPool(jedisPoolConfig, "192.168.198.135", 6379, 60000);
                }
            }
        }
        return jedisPool;
    }

    //释放连接资源
    public static void release(Jedis jedis) {

        if(null != jedis) {
            jedis.close();//如果这个jedis是从连接池获取的,这里jedis.close(),就是将jedis对象/连接,释放到连接池
        }

    }


}
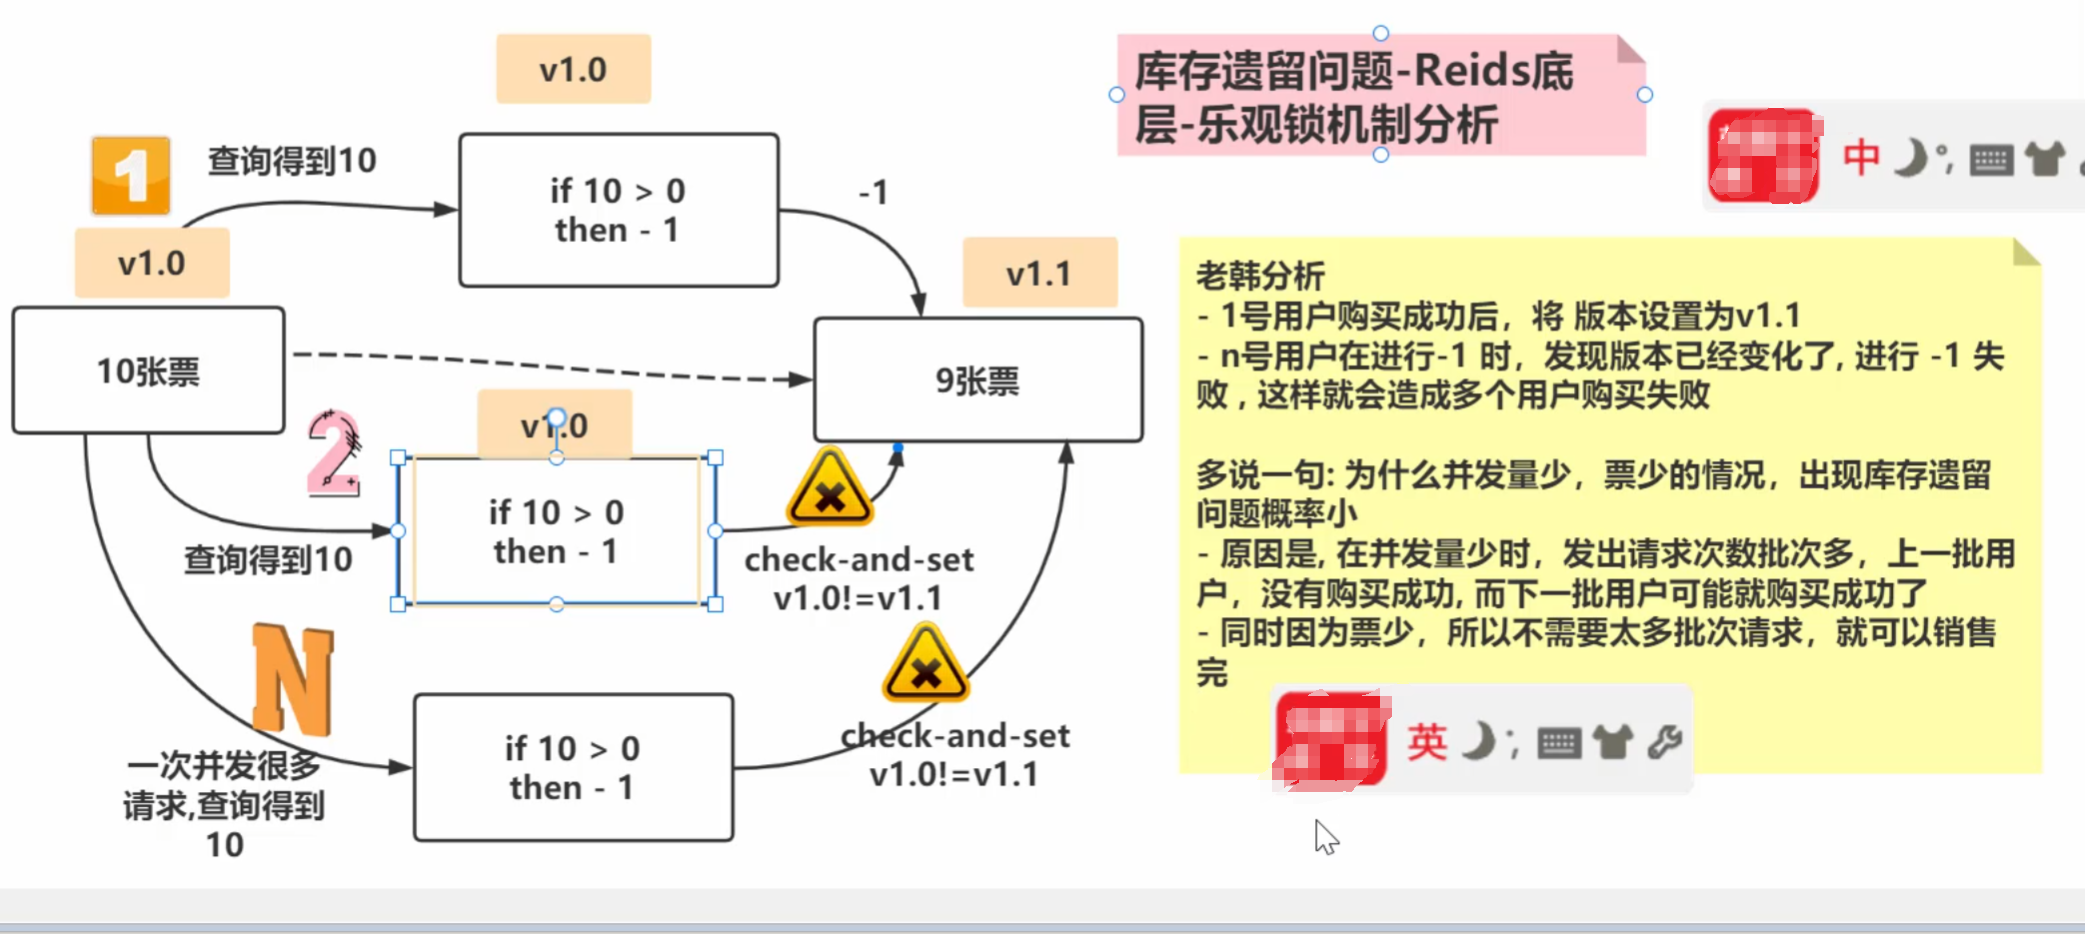
库存遗留
lua脚本
1、Lua 是一个小巧的脚本语言,Lua脚本可以很容易的被C/C++代码调用,也可以反过来调用CIC++的函数:过200k,所以Lua不适合作为开发独立应用程序的语言,而是Lua并没有提供强大的库,一个完整的Lua解释器作为嵌入式脚本语言。
2、很多应用程序、游戏使用LUA作为自己的嵌入脚本语言,以此来实现可配置性、可扩展性。
3、将复杂的或者多步的Redis操作,写为一个脚本-次提交给redis执行,减少反复连接redis的次数。提升性能。
4、LUA脚本是类似Redis事务,有一定的原子性,不会被其他命令插队,可以完成一些redis事务性的操作
5、Redis的lua脚本功能,只有在Redis 2.6以上的版本才可以使用6、通过lua脚本解决争抢问题,实际上是Redis 利用其单线程的特性,用任务队列的方式解决多任务并发问题
语法
package com.zfc.seckill.redis;
import com.hspedu.seckill.uitl.JedisPoolUtil;
import redis.clients.jedis.Jedis;
import redis.clients.jedis.JedisPool;
/**
* @author zfc
* @version 1.0
* 使用Lua脚本完成秒杀
*/
public class SecKillRedisByLua {
/**
* 说明
* 1. 这个脚本字符串是在lua脚本上修改的, 但是要注意不完全是字符串处理
* 2. 比如 : 这里我就使用了 \" , 还有换行使用了 \r\n
* 3. 这些都是细节,如果你直接把lua脚本粘贴过来,不好使,一定要注意细节
* 4. 如果写的不成功,就在这个代码上修改即可
*/
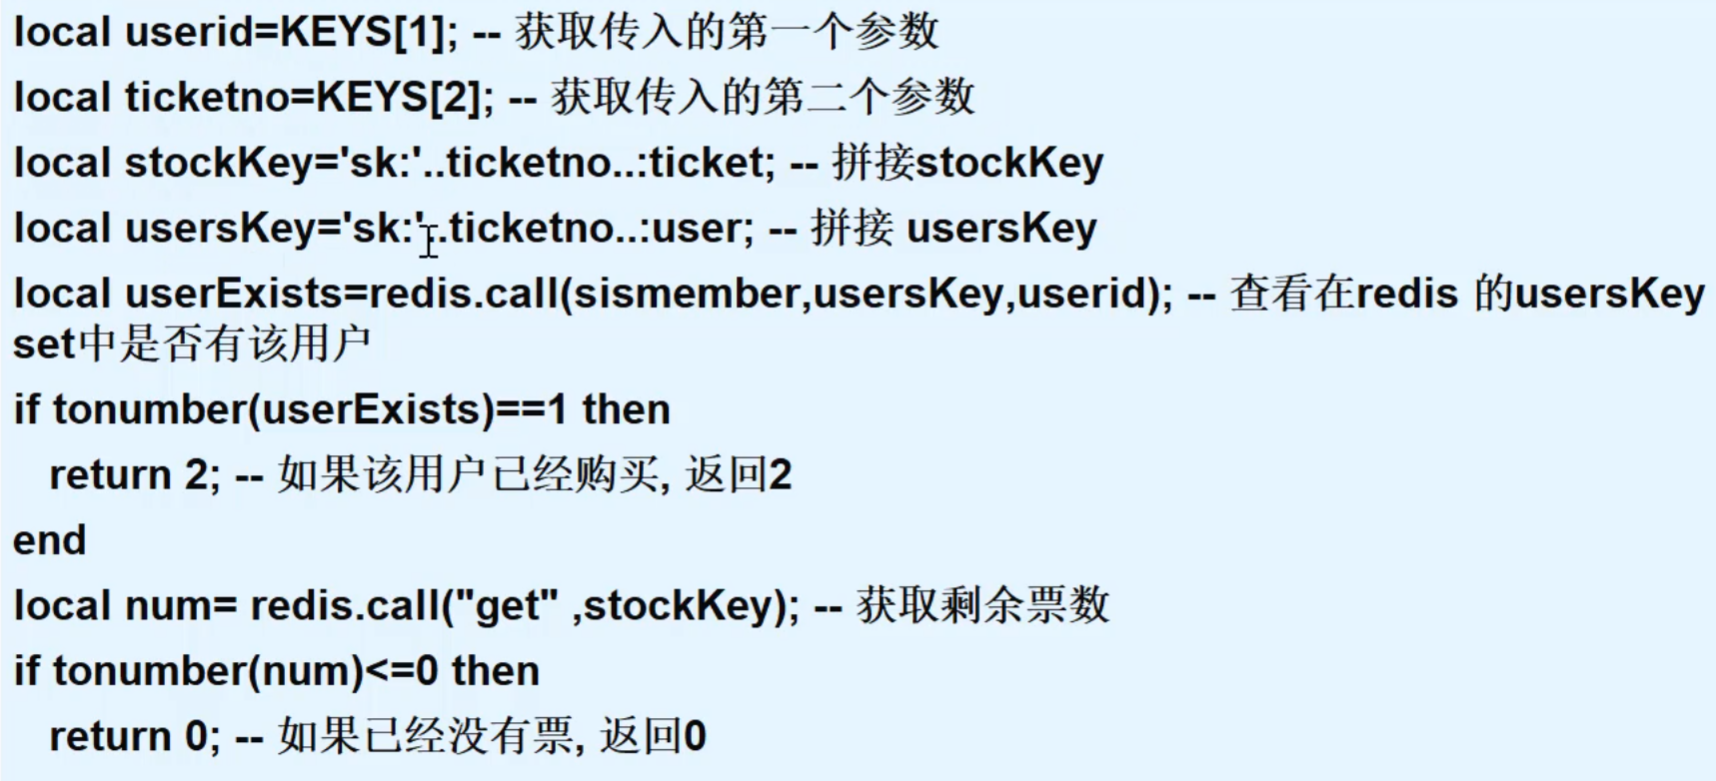
static String secKillScript = "local userid=KEYS[1];\r\n" +
"local ticketno=KEYS[2];\r\n" +
"local stockKey='sk:'..ticketno..\":ticket\";\r\n" +
"local usersKey='sk:'..ticketno..\":user\";\r\n" +
"local userExists=redis.call(\"sismember\",usersKey,userid);\r\n" +
"if tonumber(userExists)==1 then \r\n" +
" return 2;\r\n" +
"end\r\n" +
"local num= redis.call(\"get\" ,stockKey);\r\n" +
"if tonumber(num)<=0 then \r\n" +
" return 0;\r\n" +
"else \r\n" +
" redis.call(\"decr\",stockKey);\r\n" +
" redis.call(\"sadd\",usersKey,userid);\r\n" +
"end\r\n" +
"return 1";
//使用lua脚本完成秒杀的核心方法
public static boolean doSecKill(String uid,String ticketNo) {
//先从redis连接池,获取连接
JedisPool jedisPoolInstance = JedisPoolUtil.getJedisPoolInstance();
Jedis jedis = jedisPoolInstance.getResource();
//就是将lua脚本进行加载
String sha1 = jedis.scriptLoad(secKillScript);
//evalsha是根据指定的 sha1校验码, 执行缓存在服务器的脚本
Object result = jedis.evalsha(sha1, 2, uid, ticketNo);
String resString = String.valueOf(result);
//根据lua脚本执行返回的结果,做相应的处理
if("0".equals(resString)) {
System.out.println("票已经卖光了..");
jedis.close();
return false;
}
if("2".equals(resString)) {
System.out.println("不能重复购买..");
jedis.close();
return false;
}
if("1".equals(resString)) {
System.out.println("抢购成功");
jedis.close();
return true;
} else {
System.out.println("购票失败..");
jedis.close();
return false;
}
}
}
d
Redis
本文采用 CC BY-NC-SA 4.0 许可协议,转载请注明出处。
评论交流
欢迎留下你的想法